Upgrading Veeam Backup & Replication Console

Ref:
Veeam Documentation for console upgrade
Steps
Backup configuration settings !!!
Take screenshots of the backup jobs and DISABLE the jobs afterward.
Disable all backup jobs
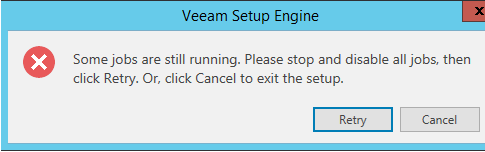
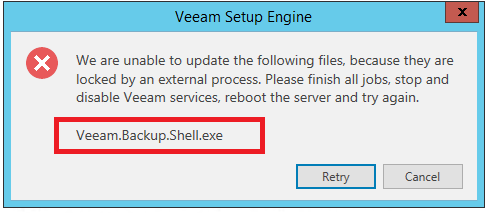
- Stop Veeam.Backup.Shell.exe via Task Manager
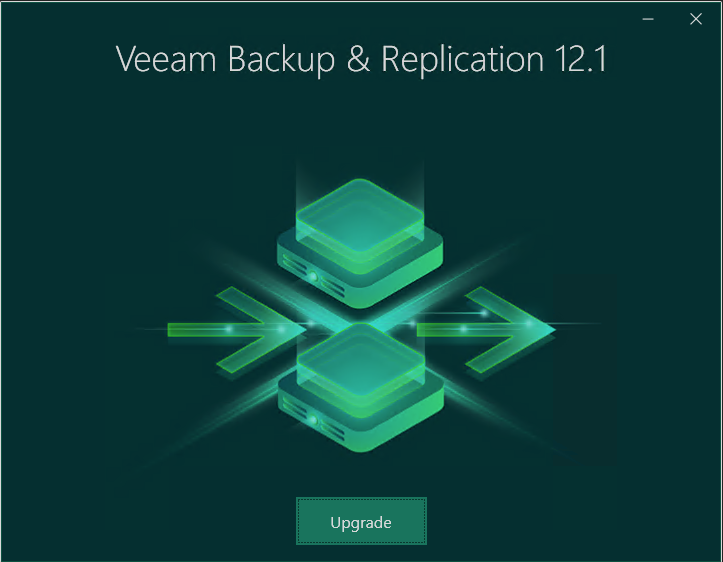
Upgrading Veeam Backup & Replication Console To perform upgrade of Veeam Backup & Replication console to version 12.1, you must be running version 10a (build 10.0.1.4854) or later on the supported operating system (refer to the System Requirements section of this document). For information on upgrade from earlier versions, see this Veeam KB article.
Use the Veeam Backup & Replication Console Upgrade wizard to install the product.
- Start the upgrade wizard.
- Select the Veeam Backup & Replication console as a component to upgrade.
- Read and accept the license agreement.
- Review the components that will be upgraded.
- Install missing software
- Begin upgrade.
Step 1: Take a Snapshot of the server before start
- Login to Veeam account
Step 2: Start Upgrade Wizard
Current Version 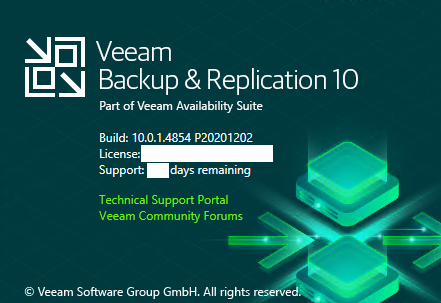
- Download the latest version of the Veeam Backup & Replication installation image from the Veeam Product Downloads page.
Mount the installation image to the machine where Veeam Backup & Replication is installed, or burn the image file to a flash drive or other removable storage device. If you plan to upgrade Veeam Backup & Replication on a VM, use built-in tools of the virtualization management software to mount the image to the VM.
To extract the content of the ISO, you can also use the latest versions of utilities that can properly extract data from ISO files of large size and can properly work with long file paths.
After you mount the image or insert the disk, Autorun opens a splash screen. If Autorun is not available or disabled, run the Setup.exe file from the image or disk.
- Click Upgrade.
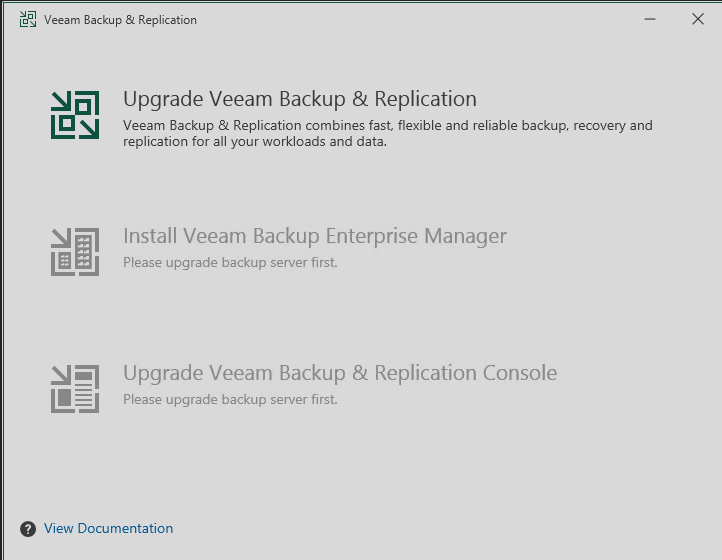
Step 4: Select Component
At this step of the wizard, select Upgrade Veeam Backup & Replication.
To open Veeam Help Center from the upgrade wizard, click View Documentation.
Step 5. Read and Accept License Agreement
At the License Agreement step of the wizard, read Veeam License Agreement and licensing policy as well as license agreements of 3rd party components that Veeam incorporates and license agreements of required software. To accept the license agreements and continue installing Veeam Backup & Replication, click I Accept.
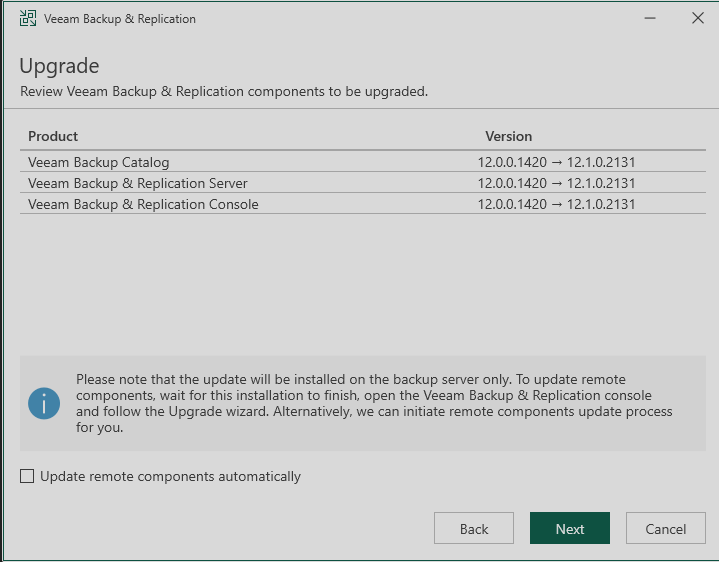
Step 5. Review Components
At the Upgrade step of the wizard, you can review the components that will be upgraded.
To also upgrade the the remote components after the Veeam Backup & Replication server is upgraded, select the Update remote components automatically check box.
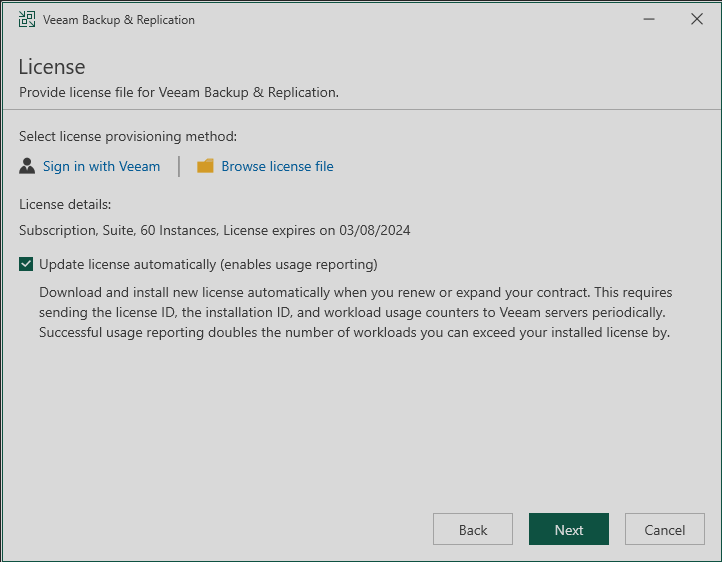
Step 6. Provide License File
At the License step of the wizard, specify what license you want to install for Veeam Backup & Replication. You can leave the license file used in the previous version of Veeam Backup & Replication or install a new one.
To install a license, you have 2 options to choose from:
- Browse your local server or network locations for a license file:
- Click Browse license file.
- Select a valid license file for Veeam Backup & Replication.
- Select a license from your account at the Veeam web-site:
- Click Sign in with Veeam.
- Enter your credentials for accessing the Veeam web-site and click Sign in.
- Select one of the available licenses and click Install selected license.
To install new licenses automatically when you renew or expand your contract, select the Update license automatically check box. If you enable the automatic license update, and therefore enable usage reporting, you will double the number of workloads by which you can exceed your installed license. For more information, see Exceeding License Limit.
C:\Veeam License
Step 7. Install Missing Software
At the System Configuration Check step of the wizard, the setup wizard checks if the required software is installed on the machine. If some of the required components are missing, the setup will try to install them automatically. After the components are successfully installed, reboot is required. To reboot the machine, click Reboot.
If the setup wizard cannot install some of the required software components automatically, install them manually and click Retry.
NOTE
If all required software is already installed on the machine, the System Configuration Check step will be skipped. For more information on the necessary software, see System Requirements.

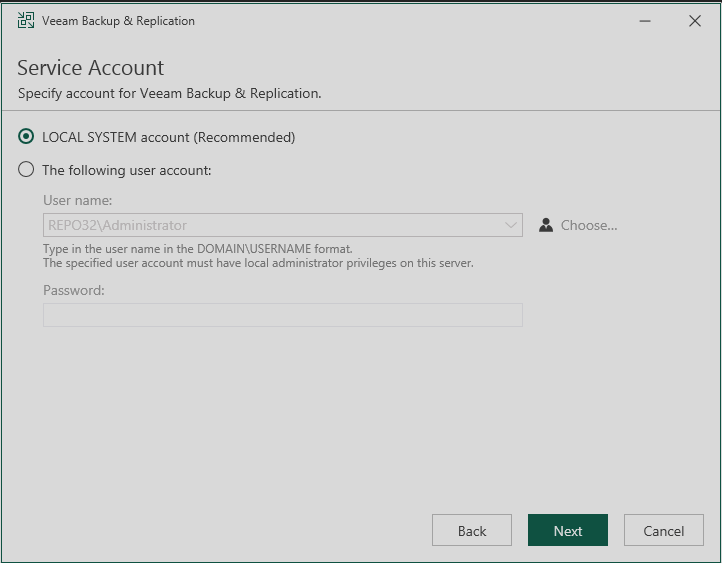
Step 8. Specify Service Account Settings
The Service Account step of the wizard is available if you have selected to configure installation settings manually.
You can select an account under which you want to run the Veeam Backup Service:
- LOCAL SYSTEM account (recommended, used by default)
- Custom user account
The user name of the custom account must be specified in the DOMAIN\USERNAME format and have the following rights and permissions:
- The account must be a member of the
Administrators groupon the machine where Veeam Backup & Replication is installed. - The account must have
db_ownerrights for the configuration database.
Veeam Backup & Replication automatically grants the Log on as service right to the specified user account.
NOTE
1
You cannot use a gMSA for running the Veeam Backup Service.
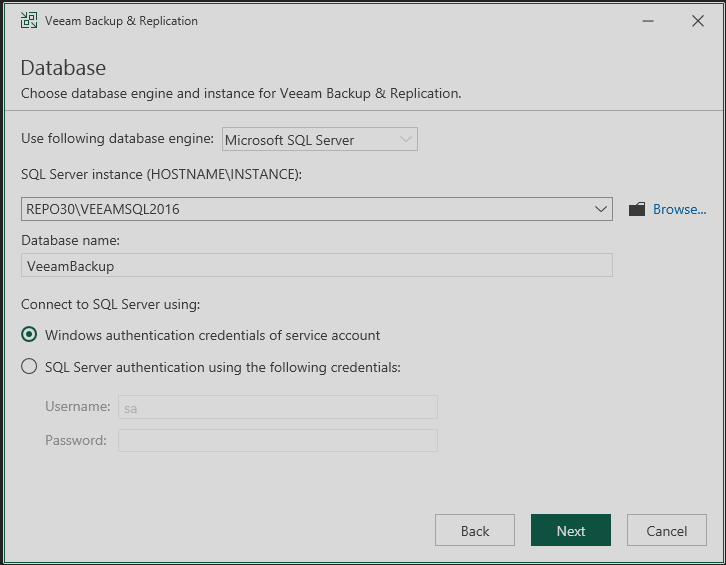
Step 9. Specify Database Engine and Instance
At the Database step of the wizard, select the Microsoft SQL server instance and database that were used by the previous version of Veeam Backup & Replication, and specify the authentication mode.
NOTE
After you upgrade Veeam Backup & Replication, you can migrate its configuration database to PostgreSQL. For more information, see Migrating Configuration Database to PostgreSQL.
- Specify instance settings:
- In the SQL Server instance field, enter the instance name in the HOSTNAME\INSTANCE format or select an instance from the drop-down list. You can also click Browse to choose a Microsoft SQL Server on a remote machine.
- In the Database name field, specify a name for the Veeam Backup & Replication configuration database.
Select an authentication mode to connect to the database server instance: Microsoft Windows authentication or native database server authentication. If you select the native authentication, enter credentials of the database account.
If the configuration database is in use by another Veeam Backup & Replication server, the wizard will notify about it. To continue the installation, click Yes.
- If the wizard detects a configuration database with the specified name (for example,
it was created by a previous installation of Veeam Backup & Replication), the wizard will notify about it. To connect to the detected database, click Yes.
Veeam Backup & Replication will automatically upgrade the database to the latest version.
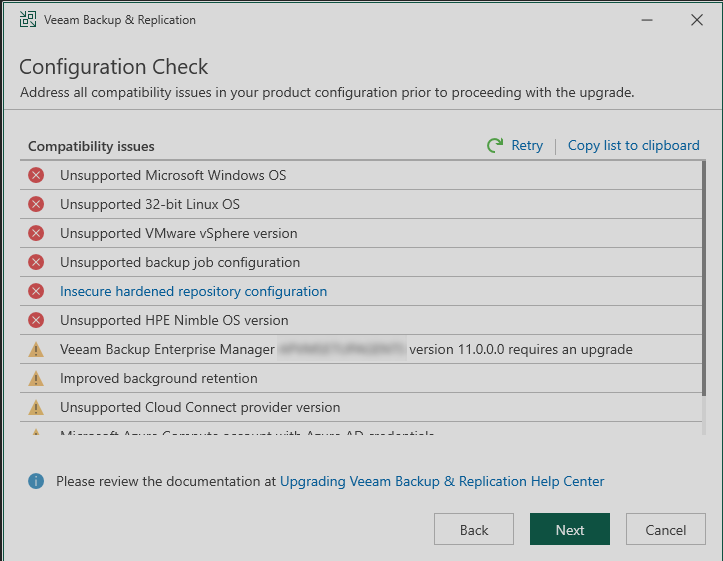
Step 9. Perform Configuration Check
At the Configuration Check step of the wizard, the setup checks the Veeam Backup & Replication configuration.
If the check returns errors, solve their causes before continuing the upgrade. After you solve them, click Retry to check if there are any issues left.
If the check returns warning or information messages, you can continue the upgrade and address them later. However, we recommend that you closely investigate warning and information messages: if not properly addressed, their causes may lead to serious problems with further system operation.
To view the details of a certain message, point the cursor to the line with the message. The pop-up box will display the detailed description.
To copy a list of detected issues with detailed descriptions for further investigation, click Copy list to clipboard.
Step 10. Begin Upgrade
At the Ready to Upgrade step of the wizard, review the upgrade settings and start the upgrade process.
Wait for the installation process to complete and click Finish to exit the wizard.

After Upgrade
After you upgrade Veeam Backup & Replication to version 12, perform the following steps:
If you use remote backup consoles, upgrade them to version 12. If you use remote backup consoles version 11a, you can upgrade them to version 12 automatically when connecting to backup server version 12. If you use remote backup consoles version 10a or 11, upgrade them manually using the product ISO file.
Download and install the latest available update from the Veeam Updates page.
Open the Veeam Backup & Replication console. If necessary, the automated upgrade wizard will automatically appear, prompting you to upgrade the product components running on remote servers. Follow the wizard to complete the upgrade process.
If some remote servers are unavailable at the time of upgrade, you can run the upgrade wizard at any time later from the main product menu, or by closing and re-opening the Veeam Backup & Replication console. Note that the out-of-date product components cannot be used by jobs until they are updated to the backup server version.
Azure compute accounts based on Microsoft Entra ID (formerly Azure Active Directory) user credentials (created with the Use existing account option selected) are obsolete. Replace these accounts with new ones to restore workloads to Microsoft Azure and use Azure archive storage or the Microsoft Azure Plug-In for Veeam Backup & Replication appliance.
If you use the Virtual Labs functionality, open settings of each Virtual Lab, and click through the wizard to redeploy each virtual lab with the new proxy appliance version.
If you are using Linux servers for your backup infrastructure components, the process of upgrade to version 12 will automatically deploy the new persistent data mover only to Linux servers with the VMware Backup Proxy role. To deploy it on other Linux servers, click through the Linux server properties, or use Set-VBRLinux PowerShell cmdlet to mass-deploy. Until you do this, those Linux servers will continue using the legacy run-time data mover to avoid issues with backup repository not meeting the persistent data mover requirements.
Enable any scheduled jobs that you have disabled before the upgrade.
Note
that immediately after the upgrade, the backup server performance may decrease. This happens due to the maintenance job that optimizes the configuration database. The process may take up to an hour depending on the database size.
IMPORTANT
You must upgrade Veeam components on all remote servers with which the backup server communicates during data protection and disaster recovery tasks. If you do not upgrade components on remote servers, Veeam Backup & Replication jobs will fail. For more information, see Server Components Upgrade.
Upgrading Infrastructure Components
Every time you launch the Veeam Backup & Replication console, Veeam Backup & Replication automatically checks if Veeam Backup & Replication components installed on managed servers are up to date. If a later version of components is available, Veeam Backup & Replication displays the Components Update window and prompts you to upgrade components on managed servers. Components upgrade may be necessary, for example, after you have upgraded Veeam Backup & Replication.
You can manually check if components upgrade is required. To do this, select Upgrade from the main menu. If components on all managed servers are up to date, the menu item will be disabled.
To upgrade components on managed servers:
In the Components Update window, select a server and click Details. Veeam Backup & Replication will display the current and latest available versions for installed components.
In the Components Update window, select check boxes next to servers for which you want to upgrade components and click Apply.
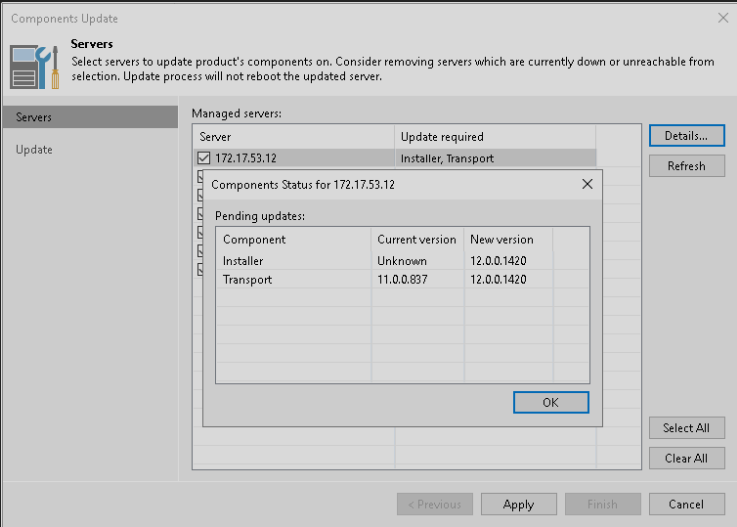
You can update components on every managed server separately. If components installed on the server require upgrade, Veeam Backup & Replication displays a warning icon next to the server.
To update components for a managed server:
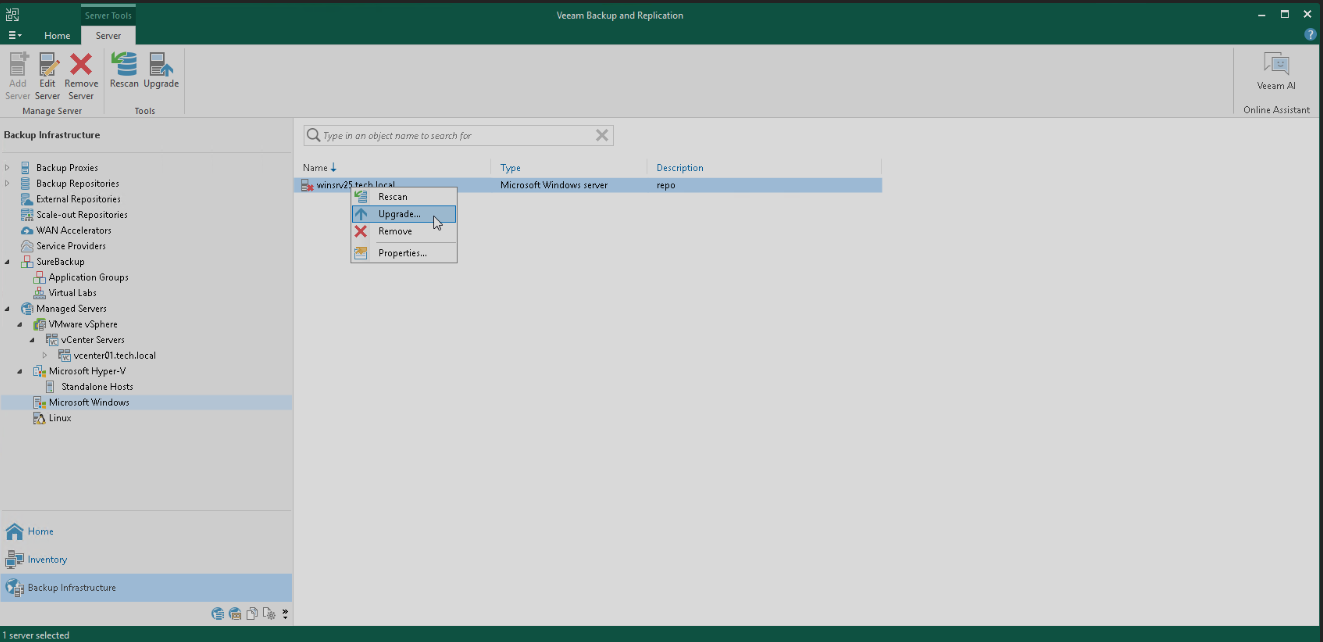
- Open the Backup Infrastructure view.
- In the inventory pane, click Managed servers.
- In the working area, select the server and click Upgrade on the ribbon. Alternatively, right-click the selected server and select
Upgrade.