THM: Protocols And Servers2

Ref:
Task 1 Introduction
The Protocols and Servers room covered many protocols:
- Telnet
- HTTP
- FTP
- SMTP
- POP3
- IMAP
Servers implementing these protocols are subject to different kinds of attacks. To name a few, consider:
- Sniffing Attack (Network Packet Capture)
- Man-in-the-Middle (MITM) Attack
- Password Attack (Authentication Attack)
- Vulnerabilities
From a security perspective, we always need to think about what we aim to protect; consider the security triad: Confidentiality, Integrity, and Availability (CIA).
Confidentialityrefers to keeping the contents of the communications accessible to the intended parties.Integrityis the idea of assuring any data sent is accurate, consistent, and complete when reaching its destination.Availabilityrefers to being able to access the service when we need it. Different parties will put varying emphasis on these three. For instance, confidentiality would be the highest priority for an intelligence agency. Online banking will put most emphasis on the integrity of transactions. Availability is of the highest importance for any platform making money by serving ads.
Knowing that we are protecting the Confidentiality, Integrity, and Availability (CIA), an attack aims to cause Disclosure, Alteration, and Destruction (DAD). The figures below reflect this.
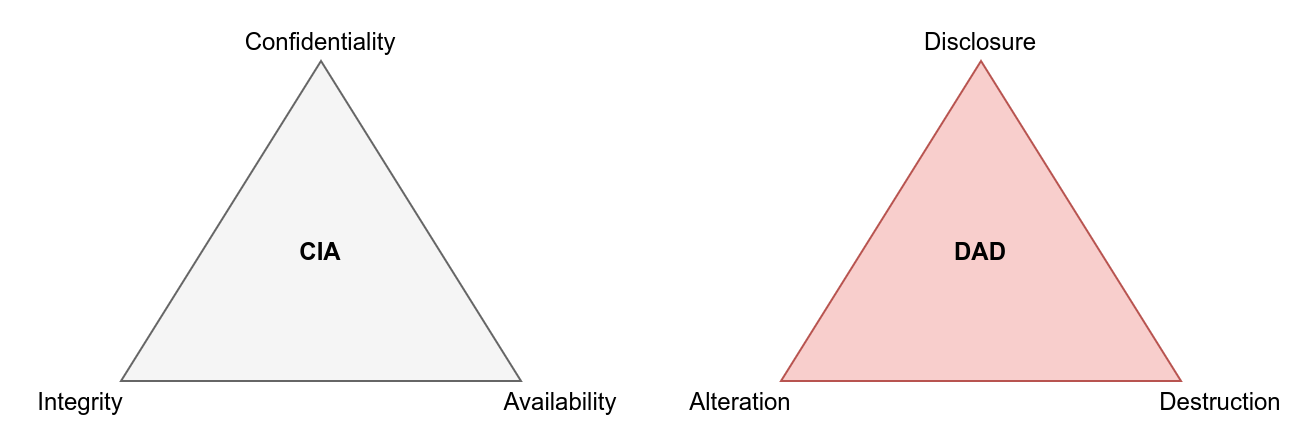
These attacks directly affect the security of the system. For instance, network packet capture violates confidentiality and leads to the disclosure of information. A successful password attack can also lead to disclosure. On the other hand, a Man-in-the-Middle (MITM) attack breaks the system’s integrity as it can alter the communicated data. We will focus on these three attacks in this room as these attacks are integral to the protocol design and server implementation.
Vulnerabilities are of a broader spectrum, and exploited vulnerabilities have different impacts on the target systems. For instance, exploiting a Denial of Service (DoS) vulnerability can affect the system’s availability, while exploiting a Remote Code Execution (RCE) vulnerability can lead to more severe damages. It is important to note that a vulnerability by itself creates a risk; damage can occur only when the vulnerability is exploited. We don’t cover vulnerabilities in this room as they have their own module, Vulnerability Research.
This room will focus on how a protocol can be upgraded or replaced to protect against disclosure and alteration, i.e. protecting the confidentiality and integrity of the transmitted data. We will be recommending other modules that cover additional topics.
Moreover, we introduce Hydra to find weak passwords.
Task 2 Sniffing Attack
Sniffing attack refers to using a network packet capture tool to collect information about the target. When a protocol communicates in cleartext, the data exchanged can be captured by a third party to analyse. A simple network packet capture can reveal information, such as the content of private messages and login credentials, if the data isn’t encrypted in transit.
A sniffing attack can be conducted using an Ethernet (802.3) network card, provided that the user has proper permissions (root permissions on Linux and administrator privileges on MS Windows). There are many programs available to capture network packets. We consider the following:
Tcpdumpis a free open source command-line interface (CLI) program that has been ported to work on many operating systems.Wiresharkis a free open source graphical user interface (GUI) program available for several operating systems, including Linux, macOS and MS Windows.Tsharkis a CLI alternative to Wireshark. There are several specialized tools for capturing passwords and even complete messages; however, this can still be achieved by Tcpdump and Wireshark with some added effort.
Consider a user checking his email messages using POP3. First, we are going to use Tcpdump to attempt to capture the username and password. In the terminal output below, we used the command sudo tcpdump port 110 -A. Before explaining this command, we should mention that this attack requires access to the network traffic, for example, via a wiretap or a switch with port mirroring. Alternatively, we can access the traffic exchanged if we launch a successful Man-in-the-Middle (MITM) attack.
We need sudo as packet captures require root privileges. We wanted to limit the number of captured and displayed packets to those exchanged with the POP3 server. We know that POP3 uses port 110, so we filtered our packets using port 110. Finally, we wanted to display the contents of the captured packets in ASCII format, so we added -A.
Pentester Terminal
1
sudo tcpdump port 110 -A
1
2
3
4
5
6
7
8
9
10
11
12
13
14
15
16
17
18
19
20
21
22
23
24
25
26
27
28
29
[...]
09:05:15.132861 IP 10.20.30.1.58386 > 10.20.30.148.pop3: Flags [P.], seq 1:13, ack 19, win 502, options [nop,nop,TS val 423360697 ecr 3958275530], length 12
E..@.V@.@.g.
...
......n......"............
.;....}.USER frank

09:05:15.133465 IP 10.20.30.148.pop3 > 10.20.30.1.58386: Flags [.], ack 13, win 510, options [nop,nop,TS val 3958280553 ecr 423360697], length 0
E..4..@.@.O~
...
....n....".........?P.....
...i.;..
09:05:15.133610 IP 10.20.30.148.pop3 > 10.20.30.1.58386: Flags [P.], seq 19:43, ack 13, win 510, options [nop,nop,TS val 3958280553 ecr 423360697], length 24
E..L..@.@.Oe
...
....n....".........<-.....
...i.;..+OK Password required.

09:05:15.133660 IP 10.20.30.1.58386 > 10.20.30.148.pop3: Flags [.], ack 43, win 502, options [nop,nop,TS val 423360698 ecr 3958280553], length 0
E..4.W@.@.g.
...
......n......".....??.....
.;.....i
09:05:22.852695 IP 10.20.30.1.58386 > 10.20.30.148.pop3: Flags [P.], seq 13:28, ack 43, win 502, options [nop,nop,TS val 423368417 ecr 3958280553], length 15
E..C.X@.@.g.
...
......n......".....6......
.<.....iPASS D2xc9CgD
[...]
In the terminal output above, we have removed the unimportant packets to help you better focus on the ones that matter. In particular, the username and password were each sent in their own packet. The first packet explicitly displays “USER frank”,while the last packet reveals the password “PASS D2xc9CgD”.
We could also use Wireshark to achieve the same results. In the Wireshark window below, we can see that we have entered pop in the filter field. Now that we’ve filtered just the traffic we’re interested in, we can see a username and password were captured.
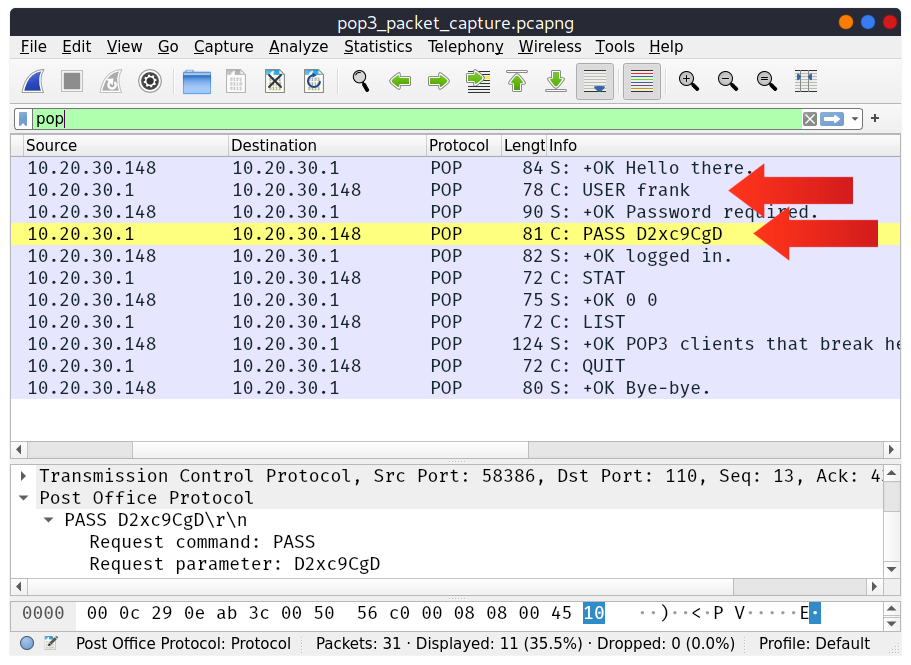
In brief, any protocol that uses cleartext communication is susceptible to this kind of attack. The only requirement for this attack to succeed is to have access to a system between the two communicating systems. This attack requires attention; the mitigation lies in adding an encryption layer on top of any network protocol. In particular, Transport Layer Security (TLS) has been added to HTTP, FTP, SMTP, POP3, IMAP and many others. For remote access, Telnet has been replaced by the secure alternative Secure Shell (SSH).
If you would like to learn more about Wireshark, we recommend the Wireshark 101 room.
What do you need to add to the command sudo tcpdump to capture only Telnet traffic?
1
port 23
What is the simplest display filter you can use with Wireshark to show only IMAP traffic?
1
imap
Task 3 Man-in-the-Middle (MITM) Attack
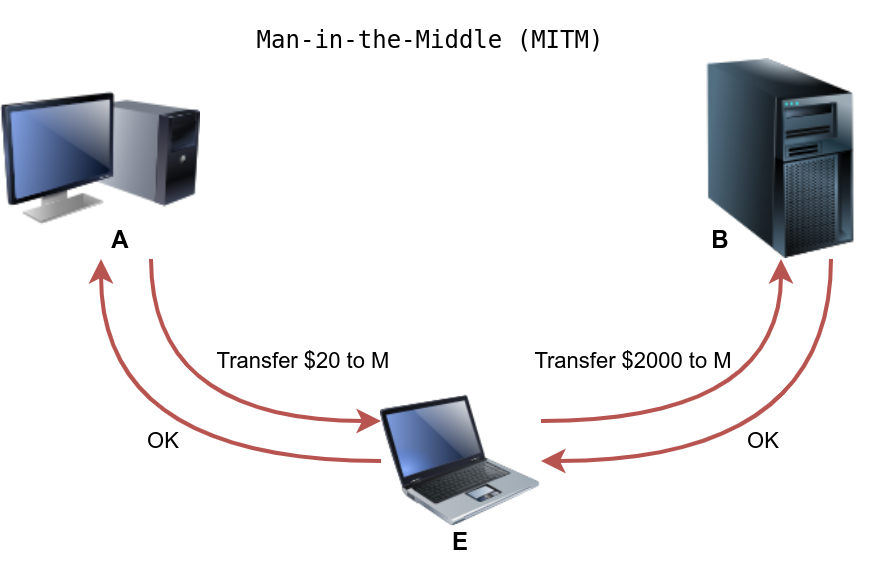
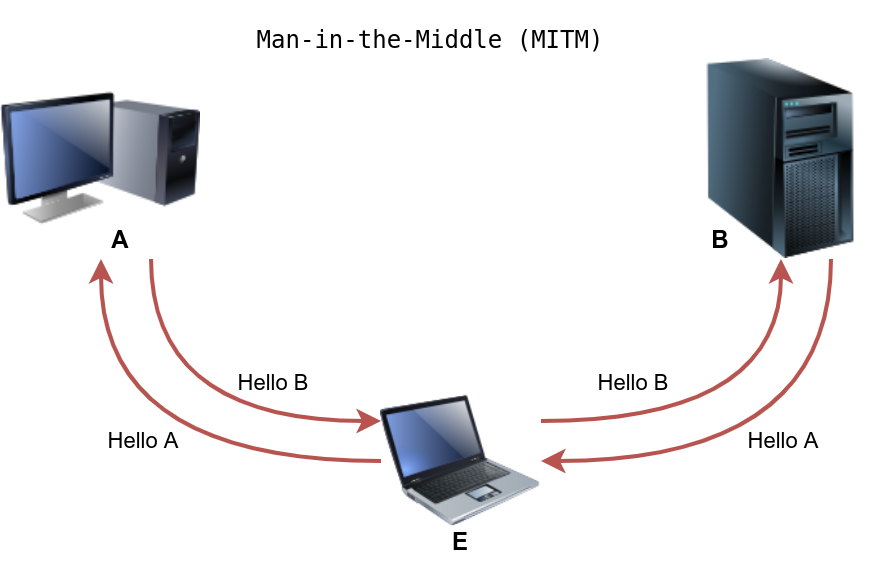
A Man-in-the-Middle (MITM) attack occurs when a victim (A) believes they are communicating with a legitimate destination (B) but is unknowingly communicating with an attacker (E). In the figure below, we have A requesting the transfer of $20 to M; however, E altered this message and replaced the original value with a new one. B received the modified messaged and acted on it.
This attack is relatively simple to carry out if the two parties do not confirm the authenticity and integrity of each message. In some cases, the chosen protocol does not provide secure authentication or integrity checking; moreover, some protocols have inherent insecurities that make them susceptible to this kind of attack.
Any time you browse over HTTP, you are susceptible to a MITM attack, and the scary thing is that you cannot recognize it. Many tools would aid you in carrying out such an attack, such as Ettercap and ]Bettercap](https://www.bettercap.org/).
MITM can also affect other cleartext protocols such as FTP, SMTP, and POP3. Mitigation against this attack requires the use of cryptography. The solution lies in proper authentication along with encryption or signing of the exchanged messages. With the help of Public Key Infrastructure (PKI) and trusted root certificates, Transport Layer Security (TLS) protects from MITM attacks.
How many different interfaces does Ettercap offer?
1
2
3 (Interfaes, Traditional command line and GUI)
https://www.ettercap-project.org/about.html
In how many ways can you invoke Bettercap?
1
2
3
4
5
6
7
8
3
https://www.bettercap.org/usage/

- Web UI - the easiest method, good if you never used bettercap before.

- Interactive Mode - an interactive session on terminal that will unlock more advanced features.

- Scripting - using the builtin javascript engine with agents that automate the session.
Task 4 Transport Layer Security (TLS)
In this task, we learn about a standard solution to protect the confidentiality and integrity of the exchanged packets. The following approach can protect against password sniffing and MITM attacks.
SSL (Secure Sockets Layer)started when the world wide web started to see new applications, such as online shopping and sending payment information.
Netscape introduced SSL in 1994, with SSL 3.0 being released in 1996. But eventually, more security was needed, and TLS (Transport Layer Security)protocol was introduced in 1999. Before we explain what TLS and SSL provide, let’s see how they fit the networking model.
The common protocols we have covered so far send the data in cleartext; this makes it possible for anyone with access to the network to capture, save and analyze the exchanged messages.
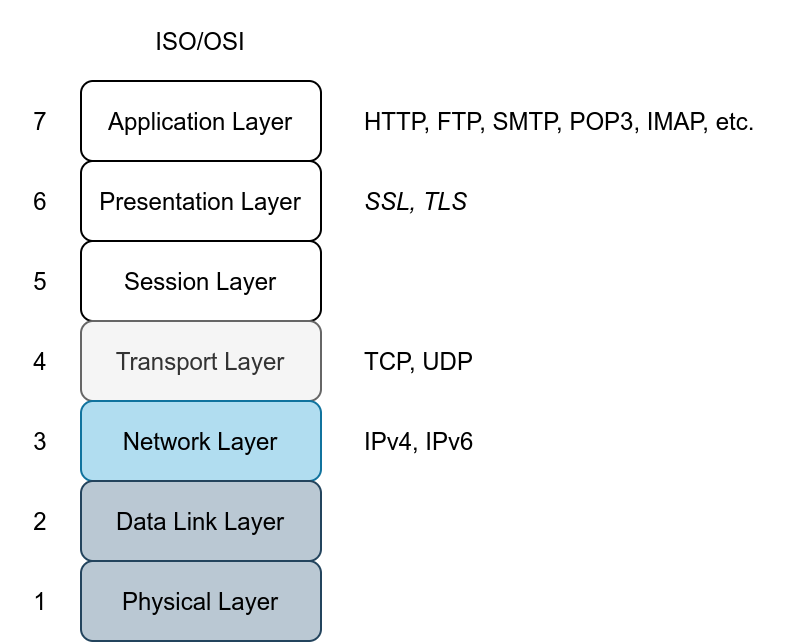
The image below shows the ISO/OSI network layers. The protocols we have covered so far in this room are on the application layer. Consider the ISO/OSI model; we can add encryption to our protocols via the presentation layer. Consequently, data will be presented in an encrypted format (ciphertext)instead of its original form.
Because of the close relation between SSL and TLS, one might be used instead of the other. However, TLS is more secure than SSL, and it has practically replaced SSL. We could have dropped SSL and just written TLS instead of SSL/TLS, but we will continue to mention the two to avoid any ambiguity because the term SSL is still in wide use. However, we can expect all modern servers to be using TLS.
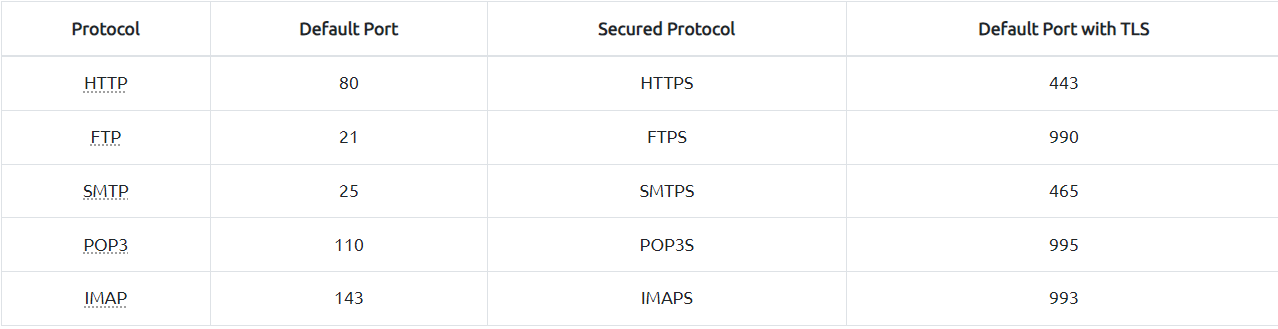
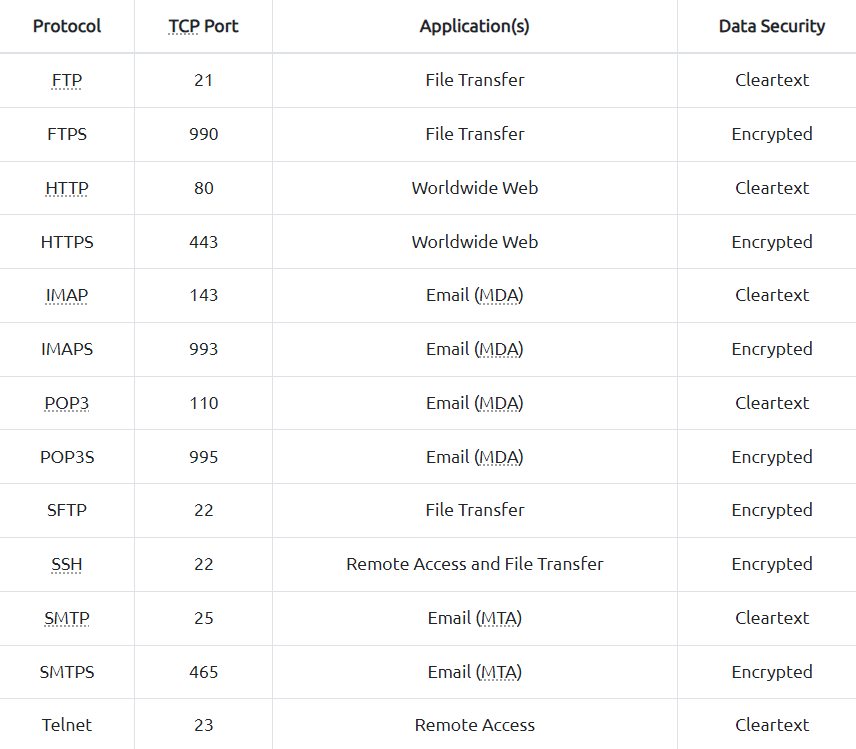
An existing cleartext protocol can be upgraded to use encryption via SSL/TLS. We can use TLS to upgrade HTTP, FTP, SMTP, POP3, and IMAP, to name a few. The following table lists the protocols we have covered and their default ports before and after the encryption upgrade via SSL/TLS. The list is not exhaustive; however, the purpose is to help us better understand the process.
Considering the case of HTTP. Initially, to retrieve a web page over HTTP, the web browser would need at least perform the following two steps:
- Establish a TCP connection with the remote web server
- Send HTTP requests to the web server, such as GET and POST requests.
HTTPS requires an additional step to encrypt the traffic. The new step takes place after establishing a TCP connection and before sending HTTP requests.
This extra step can be inferred from the ISO/OSI model in the image presented earlier. Consequently, HTTPS requires at least the following three steps:
- Establish a TCP connection
- Establish SSL/TLS connection
- Send HTTP requests to the webserver
To establish an SSL/TLS connection, the client needs to perform the proper handshake with the server. Based on RFC 6101, the SSL connection establishment will look like the figure below.
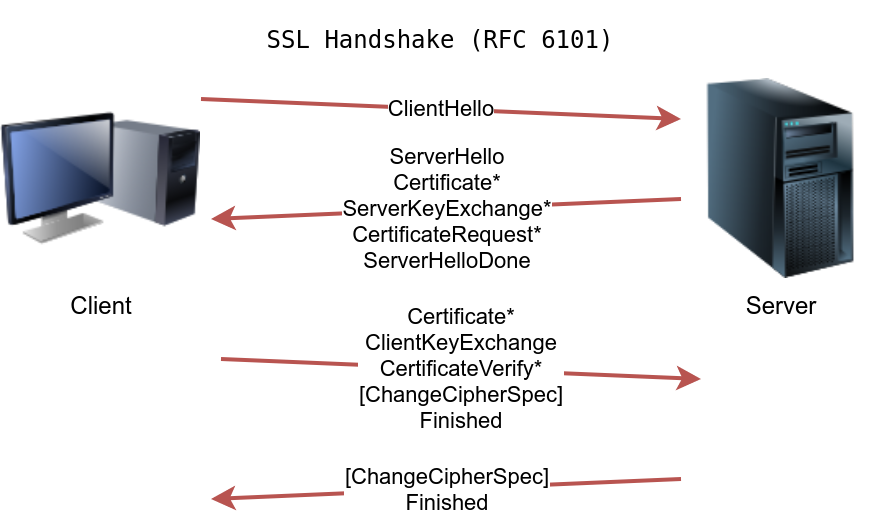
After establishing a TCP connection with the server, the client establishes an SSL/TLS connection, as shown in the figure above. The terms might look complicated depending on your knowledge of cryptography, but we can simplify the four steps as:
- The client sends a ClientHello to the server to indicate its capabilities, such as supported algorithms.
- The server responds with a ServerHello, indicating the selected connection parameters. The server provides its certificate if server authentication is required. The certificate is a digital file to identify itself; it is usually digitally signed by a third party. Moreover, it might send additional information necessary to generate the master key, in its ServerKeyExchange message, before sending the ServerHelloDone message to indicate that it is done with the negotiation.
- The client responds with a ClientKeyExchange, which contains additional information required to generate the master key. Furthermore, it switches to use encryption and informs the server using the ChangeCipherSpec message.
- The server switches to use encryption as well and informs the client in the ChangeCipherSpec message.
If this still sounds sophisticated, don’t worry; we only need the gist of it. A client was able to agree on a secret key with a server that has a public certificate. This secret key was securely generated so that a third party monitoring the channel wouldn’t be able to discover it. Further communication between the client and the server will be encrypted using the generated key.
Consequently, once an SSL/TLS handshake has been established, HTTP requests and exchanged data won’t be accessible to anyone watching the communication channel.
As a final note, for SSL/TLS to be effective, especially when browsing the web over HTTPS, we rely on public certificates signed by certificate authorities trusted by our systems. In other words, when we browse to TryHackMe over HTTPS, our browser expects the TryHackMe web server to provide a signed certificate from a trusted certificate authority, as per the example below. This way, our browser ensures that it is communicating with the correct server, and a MITM attack cannot occur.
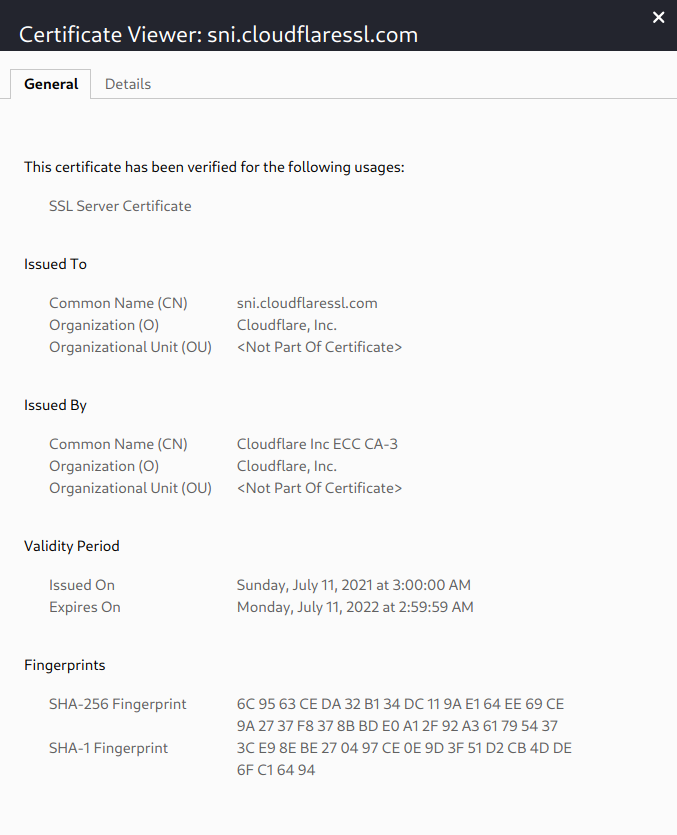
In the figure above, we can see the following information:
To whom is the certificate issued? That is the name of the company that will use this certificate. Who issued the certificate? This is the certificate authority that issued this certificate. Validity period. You don’t want to use a certificate that has expired, for instance. Luckily, we don’t have to check the certificate manually for every site we visit; our web browser will do it for us. Our web browser will ensure that we are talking with the correct server and ensure that our communication is secure, thanks to the server’s certificate.
DNS can also be secured using TLS. What is the three-letter acronym of the DNS protocol that uses TLS?
1
2
DoT
DNS over TLS (DoT)
Task 5 Secure Shell (SSH) —
Secure Shell (SSH) was created to provide a secure way for remote system administration. In other words, it lets you securely connect to another system over the network and execute commands on the remote system. Put simply, the “S” in SSH stands for secure, which can be summarized simply as:
- You can confirm the identity of the remote server
- Exchanged messages are encrypted and can only be decrypted by the intended recipient
- Both sides can detect any modification in the messages
The above three points are ensured by cryptography. In more technical terms, they are part of confidentiality and integrity, made possible through the proper use of different encryption algorithms.
To use SSH, you need an SSH server and an SSH client. The SSH server listens on port 22 by default. The SSH client can authenticate using:
- A username and a password
- A private and public key (after the SSH server is configured to recognize the corresponding public key)
On Linux, macOS, and MS Windows builds after 2018, you can connect to an SSH server using the following command
1
ssh username@MACHINE_IP
This command will try to connect to the server of IP address MACHINE_IP with the login name username. If an SSH server is listening on the default port, it will ask you to provide the password for username. Once authenticated, the user will have access to the target server’s terminal. The terminal output below is an example of using SSH to access a Debian Linux server.
Terminal
1
2
ssh mark@MACHINE_IP
mark@MACHINE_IP's password: XBtc49AB
1
2
3
4
5
6
7
8
The programs included with the Debian GNU/Linux system are free software;
the exact distribution terms for each program are described in the
individual files in /usr/share/doc/*/copyright.

Debian GNU/Linux comes with ABSOLUTELY NO WARRANTY, to the extent
permitted by applicable law.
Last login: Mon Sep 20 13:53:17 2021
mark@debian8:~$
In the example above, we issued the command ssh mark@MACHINE_IP. Then, once we entered the correct password, we got access to the remote system’s terminal. SSH is very reliable for remote administration because our username and password were sent encrypted; moreover, all commands we execute on the remote system will be sent over an encrypted channel.
Note that if this is the first time we connect to this system, we will need to confirm the fingerprint of the SSH server’s public key to avoid man-in-the-middle (MITM) attacks. As explained earlier, MITM takes place when a malicious party, E, situates itself between A and B, and communicates with A, pretending to be B, and communicates with B pretending to be A, while A and B think that they are communicating directly with each other. In the case of SSH, we don’t usually have a third party to check if the public key is valid, so we need to do this manually. This attack is shown in the image below.
We can use SSH to transfer files using SCP (Secure Copy Protocol) based on the SSH protocol. An example of the syntax is as follows:
1
scp mark@MACHINE_IP:/home/mark/archive.tar.gz ~.
This command will copy a file named archive.tar.gz from the remote system located in the /home/mark directory to ~, i.e., the root of the home directory of the currently logged-in user.
Another example syntax is
1
scp backup.tar.bz2 mark@MACHINE_IP:/home/mark/
This command will copy the file backup.tar.bz2 from the local system to the directory /home/mark/ on the remote system.
Terminal
1
2
scp document.txt mark@MACHINE_IP:/home/mark
mark@MACHINE_IP's password:
1
document.txt                                        100% 1997KB  70.4MB/s   00:00
As a closing note, FTP could be secured using SSL/TLS by using the FTPS protocol which uses port 990. It is worth mentioning that FTP can also be secured using the SSH protocol which is the SFTP protocol. By default this service listens on port 22, just like SSH.
Use SSH to connect to MACHINE_IP as mark with the password XBtc49AB. Using uname -r, find the Kernel release? 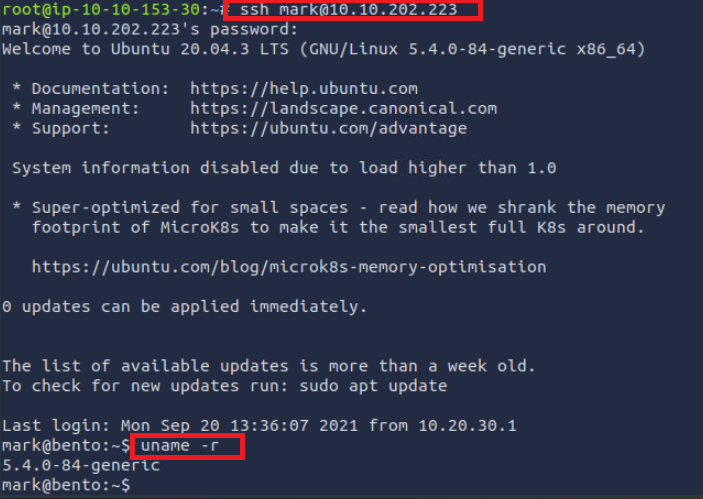
1
Answer : 5.4.0-84-generic
Use SSH to download the file book.txt from the remote system. How many KBs did scp display as download size? 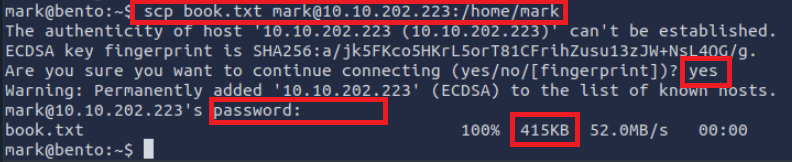
1
Answer : 415
Task 6 Password Attack —
We discussed network packet captures and MITM attacks as well as how these attacks can be mitigated using TLS and SSH. The third type of attack that we will cover in this room is a password attack.
Many protocols require you to authenticate. Authentication is proving who you claim to be. When we are using protocols such as POP3, we should not be given access to the mailbox before verifying our identity. The POP3 example from the Protocols and Servers room is repeated below for your convenience. In this example, we are identified as the user frank, and the server authenticated us because we provided the correct password. In other words, the password is one way to authentication.
Pentester Terminal
1
telnet 10.10.202.223 110
Trying 10.10.202.223… Connected to MACHINE_IP. Escape character is ‘^]’. +OK MACHINE_IP Mail Server POP3 Wed, 15 Sep 2021 11:05:34 +0300
1
USER frank
1
+OK frank
1
PASS D2xc9CgD
1
2
3
+OK 1 messages (179) octets
STAT
+OK 1 179
1
LIST
1
2
3
4
5
+OK 1 messages (179) octets
1 179
.
RETR 1
+OK
1
2
3
4
5
6
7
8
9
From: Mail Server
To: Frank
subject: Sending email with Telnet
Hello Frank,
I am just writing to say hi!
.
QUIT
+OK MACHINE_IP closing connection
Connection closed by foreign host.
Authentication, or proving your identity, can be achieved through one of the following, or a combination of two:
- Something you know, such as password and PIN code.
- Something you have, such as a SIM card, RFID card, and USB dongle.
- Something you are, such as fingerprint and iris.
This task will focus on attacks against passwords, i.e. something the target knows. If you revisit the communication with several previous servers using protocols such as Telnet, SSH, POP3, and IMAP, we always need a password to gain access. Based on the 150 million usernames and passwords leaked from the Adobe breach in 2013, the top ten passwords are:
1
2
3
4
5
6
7
8
9
10
123456
123456789
password
adobe123
12345678
qwerty
1234567
111111
photoshop
123123
Only two passwords are related to Adobe and its products, but the rest are generic. You might think that this has changed over the past decade; however, 123456, 1234567, 12345678, and 123456789 are still common choices for many users. Others haven’t realized yet that qwerty is not secret, and it is used by many as their password.
Attacks against passwords are usually carried out by:
- Password Guessing: Guessing a password requires some knowledge of the target, such as their pet’s name and birth year.
- Dictionary Attack: This approach expands on password guessing and attempts to include all valid words in a dictionary or a wordlist.
- Brute Force Attack: This attack is the most exhaustive and time-consuming where an attacker can go as far as trying all possible character combinations, which grows fast (exponential growth with the number of characters).
Let’s focus on dictionary attacks. Over time, hackers have compiled list after list containing leaked passwords from data breaches. One example is RockYou’s list of breached passwords, which you can find on the AttackBox at
1
/usr/share/wordlists/rockyou.txt
The choice of the word list should depend on your knowledge of the target. For instance, a French user might use a French word instead of an English one. Consequently, a French word list might be more promising.
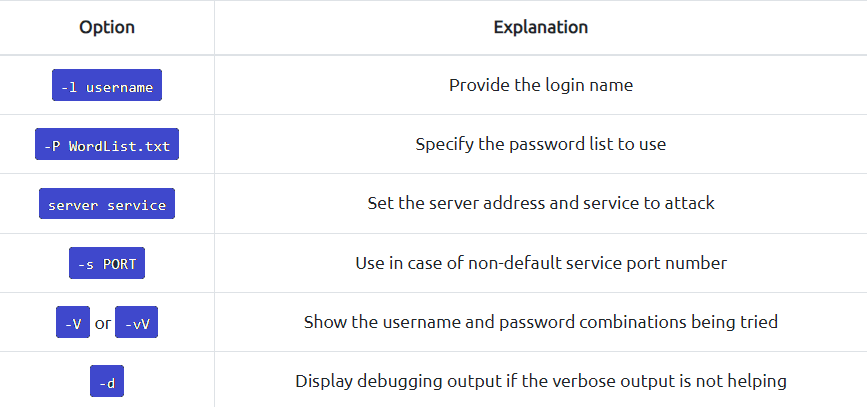
We want an automated way to try the common passwords or the entries from a word list; here comes THC Hydra. Hydra supports many protocols, including FTP, POP3, IMAP, SMTP, SSH, and all methods related to HTTP. The general command-line syntax is:
1
hydra -l username -P wordlist.txt server service
where we specify the following options:
-l username:-lshould precede the username, i.e. the login name of the target.-P wordlist.txt:-Pprecedes the wordlist.txt file, which is a text file containing the list of passwords you want to try with the provided username.serveris the hostname or IP address of the target server.serviceindicates the service which you are trying to launch the dictionary attack.
Consider the following concrete examples:
1
hydra -l mark -P /usr/share/wordlists/rockyou.txt 10.10.202.223 ftp
will use mark as the username as it iterates over the provided passwords against the FTP server.
1
hydra -l mark -P /usr/share/wordlists/rockyou.txt ftp://10.10.202.223
is identical to the previous example. 10.10.202.223 ftp is the same as ftp://10.10.202.223.
1
hydra -l frank -P /usr/share/wordlists/rockyou.txt 10.10.202.223 ssh
will use frank as the user name as it tries to login via SSH using the different passwords.
There are some extra optional arguments that you can add:
-s PORTto specify a non-default port for the service in question.-Vor-vV, for verbose, makes Hydra show the username and password combinations that are being tried. This verbosity is very convenient to see the progress, especially if you are still not confident of your command-line syntax.-tn where n is the number of parallel connections to the target. -t 16 will create 16 threads used to connect to the target.-d, for debugging, to get more detailed information about what’s going on. The debugging output can save you much frustration; for instance, if Hydra tries to connect to a closed port and timing out, -d will reveal this right away.
Once the password is found, you can issue CTRL-C to end the process. In TryHackMe tasks, we expect any attack to finish within less than five minutes; however, the attack would usually take longer in real-life scenarios. Options for verbosity or debugging can be pretty helpful if you want Hydra to update you about its progress.
In summary, attacks against login systems can be carried out efficiently using a tool, such as THC Hydra combined with a suitable word list. Mitigation against such attacks can be sophisticated and depends on the target system. A few of the approaches include:
Password Policy: Enforces minimum complexity constraints on the passwords set by the user.Account Lockout: Locks the account after a certain number of failed attempts.Throttling Authentication Attempts: Delays the response to a login attempt. A couple of seconds of delay is tolerable for someone who knows the password, but they can severely hinder automated tools.Using CAPTCHA: Requires solving a question difficult for machines. It works well if the login page is via a graphical user interface (GUI). (Note that CAPTCHA stands for Completely Automated Public Turing test to tell Computers and Humans Apart.)Requiring the use of a public certificatefor authentication. This approach works well with SSH, for instance.Two-Factor Authentication: Ask the user to provide a code available via other means, such as email, smartphone app or SMS.There are many other approaches that are more sophisticated or might require some established knowledge about the user, such as IP-based geolocation.
Using a combination of the above approaches is an excellent approach to protect against password attacks.
We learned that one of the email accounts is lazie. What is the password used to access the IMAP service on 10.10.202.223? 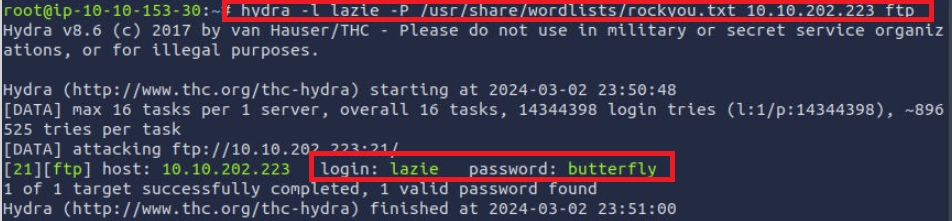
1
Answer: butterfly
Task 7 Summary — This room covered various protocols, their usage, and how they work under the hood. Three common attacks are:
- Sniffing Attack
- MITM Attack
- Password Attack
For each of the above, we focused both on the attack details and the mitigation steps.
Many other attacks can be conducted against specific servers and protocols. We will provide a list of some related modules.
Vulnerability Research: This module provides more information about vulnerabilities and exploits.
Metasploit: This module trains you on how to use Metasploit to exploit target systems.
Burp Suite: This module teaches you how to use Burp Suite to intercept HTTP traffic and launch attacks related to the web.
It is good to remember the default port number for common protocols. For convenience, the services we covered are listed in the following table sorted by alphabetical order.
Hydra remains a very efficient tool that you can launch from the terminal to try the different passwords. We summarize its main options in the following table.
By now, you have completed the eighth room of the Network Security module. Please proceed to the final room of this module to test your skills.