THM: Linux Fundamentals 01
Ref:
1
2
echo "Hello Friend!"
---
1
2
whoami
---
1
2
3
ls
---
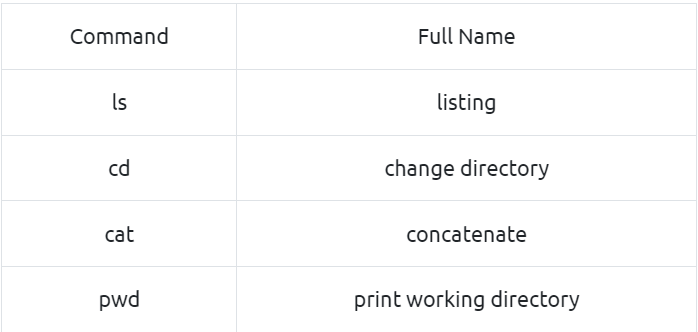
Finding out the contents of any files or folders, we need to know what exists in the first place. This can be done using the "ls" command (short for listing)
1
2
3
cd
---
"cd" command (short for change directory) to change to that directory.
1
2
3
4
5
6
7
8
9
10
11
12
13
cat
---
Outputting the Contents of a File (cat)
"Cat" is short for concatenating & is a fantastic way for us to output the contents of files (not just text files!).

I.e.
cat todo.txt
Here's something important for me to do later!

You can use cat to output the contents of a file within directories without having to navigate to it by using cat and the name of the directory.
I.e.
cat /home/ubuntu/Documents/todo.txt
1
2
3
4
5
6
7
8
9
10
pwd
---
Finding out the full Path to our Current Working Directory (pwd)
(print working directory) command

i.e.
pwd
/home/ubuntu/Documents
On the Linux machine that you deploy, how many folders are there?
1
4
Which directory contains a file?
1
folder4
What is the contents of this file?
1
2
3
cd folder4
cat mote.txt
=> Hello World!
Use the cd command to navigate to this file and find out the new current working directory. What is the path?
1
2
pwd
/home/tryhackme/folder4
Search for Files
Using Find
A list of directories available
1
2
ls
Desktop Documents Pictures folder1
If we remember the filename, we can simply use find -name passwords.txt where the command will look through every folder in our current directory for that specific file like so:
1
2
find -name passwords.txt
./folder1/passwords.txt
wildcard (*) to search for anything that has .txt at the end
1
2
3
find -name *.txt
./folder1/passwords.txt
./Documents/todo.txt
Using Grep
The grep command allows us to search the contents of files for specific values that we are looking for. Take for example, the access log of a web server. In this case, the access.log of a web server has 244 entries.The grep command allows us to search the contents of files for specific values that we are looking for.
Take for example, the access log of a web server. In this case, the access.log of a web server has 244 entries.
Using a command like cat isn’t going to cut it too well here. Let’s say for example if we wanted to search this log file to see the things that a certain user/IP address visited? Looking through 244 entries isn’t all that efficient considering we want to find a specific value.
Use grep to search the entire contents of this file for any entries of the value that we are searching for.
1
2
3
wc -l access.log

244 access.log
1
2
grep "81.143.211.90" access.log
81.143.211.90 - - [25/Mar/2021:11:17 + 0000] "GET / HTTP/1.1" 200 417 "-" "Mozilla/5.0 (Linux; Android 7.0; Moto G(4))"
Use grep on “access.log” to find the flag that has a prefix of “THM”. What is the flag?
1
2
3
4
5
6
7
8
9
=>THM{ACCESS}

grep "THM" access.log

13.127.130.212 - - [04/May/2021:08:35:26 +0000] "GET THM{ACC
ESS} lang=en HTTP/1.1" 404 360 "-" "Mozilla/5.0 (Windows NT
10.0; Win64; x64) AppleWebKit/537.36 (KHTML, like Gecko) Chr
ome/77.0.3865.120 Safari/537.36"
Linux operators
Operator “&”
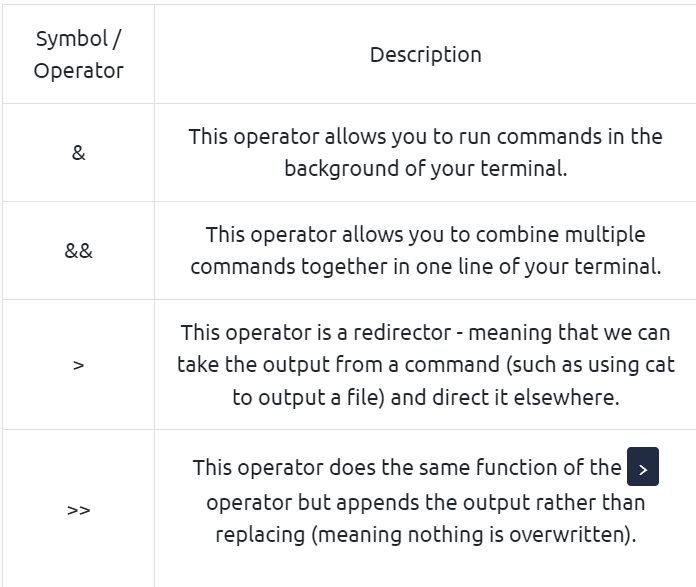
This operator allows us to execute commands in the background. For example, let’s say we want to copy a large file. This will obviously take quite a long time and will leave us unable to do anything else until the file successfully copies.
The “&” shell operator allows us to execute a command and have it run in the background (such as this file copy) allowing us to do other things!
Operator “&&”
This shell operator is a bit misleading in the sense of how familiar is to its partner “&”. Unlike the “&” operator, we can use “&&” to make a list of commands to run for example command1 && command2. However, it’s worth noting that command2 will only run if command1 was successful.
Operator “>”
This operator is what’s known as an output redirector. What this essentially means is that we take the output from a command we run and send that output to somewhere else.
A great example of this is redirecting the output of the echo command that we learned in Task 4. Of course, running something such as echo howdy will return “howdy” back to our terminal — that isn’t super useful. What we can do instead, is redirect "howdy" to something such as a new file!
Let’s say we wanted to create a file named “welcome” with the message “hey”. We can run echo hey > welcome where we want the file created with the contents “hey” like so:
1
2
3
4
5
echo hey > welcome

cat welcome
=> hey
Note: If the file i.e. “welcome” already exists, the contents will be overwritten!
Operator “»”
This operator is also an output redirector like in the previous operator (>) we discussed. However, what makes this operator different is that rather than overwriting any contents within a file, for example, it instead just puts the output at the end.
Following on with our previous example where we have the file “welcome” that has the contents of “hey”. If were to use echo to add “hello” to the file using the > operator, the file will now only have “hello” and not “hey”.
The >> operator allows to append the output to the bottom of the file— rather than replacing the contents like so:
1
2
3
4
5
6
echo hello >> welcome

cat welcome

=>hey
=>hello
If we wanted to run a command in the background, what operator would we want to use?
1
&
If I wanted to replace the contents of a file named “passwords” with the word “password123”, what would my command be?
1
echo password123 > passwords
Now if I wanted to add “tryhackme” to this file named “passwords” but also keep “passwords123”, what would my command be
1
echo tryhackme >> passwords123
Summary
To quickly recap, we’ve covered the following:
Understanding why Linux is so commonplace today Interacting with your first-ever Linux machine! Ran some of the most fundamental commands Had an introduction to navigating around the filesystem & how we can use commands like find and grep to make finding data even more efficient! Power up your commands by learning about some of the important shell operators. Take some time to have a play around in this room. When you feel a little bit more comfortable, progress onto Linux Fundamentals Part 2


