THM: Burp Sutie-Intruder

Ref:
Task 1 Introduction
Welcome to the Burp Suite Intruder room! In this room, we will explore Burp Suite’s Intruder module, which offers automated request manipulation and enables tasks such as fuzzing and brute-forcing. If you are not familiar with Burp Suite’s Proxy and Repeater functionality, it is recommended to complete at least the Burp Basics room before proceeding.
Burp Suite’s Intruder module is a powerful tool that allows for automated and customisable attacks. It provides the ability to modify specific parts of a request and perform repetitive tests with variations of input data. Intruder is particularly useful for tasks like fuzzing and brute-forcing, where different values need to be tested against a target.
Deploy the target VM attached to this task by pressing the green Start Machine button. Also, start the AttackBox by pressing the blue Start AttackBox button at the top of this room if you are not using your own machine. Then start Burp and follow along with the next tasks.
Task 2 What is Intruder —
Intruder is Burp Suite’s built-in fuzzing tool that allows for automated request modification and repetitive testing with variations in input values. By using a captured request (often from the Proxy module), Intruder can send multiple requests with slightly altered values based on user-defined configurations. It serves various purposes, such as brute-forcing login forms by substituting username and password fields with values from a wordlist or performing fuzzing attacks using wordlists to test subdirectories, endpoints, or virtual hosts. Intruder's functionality is comparable to command-line tools like Wfuzz or ffuf.
However, it’s important to note that while Intruder can be used with Burp Community Edition, it is rate-limited, significantly reducing its speed compared to Burp Professional. This limitation often leads security practitioners to rely on other tools for fuzzing and brute-forcing. Nonetheless, Intruder remains a valuable tool and is worth learning how to use it effectively.
Let’s explore the Intruder interface:
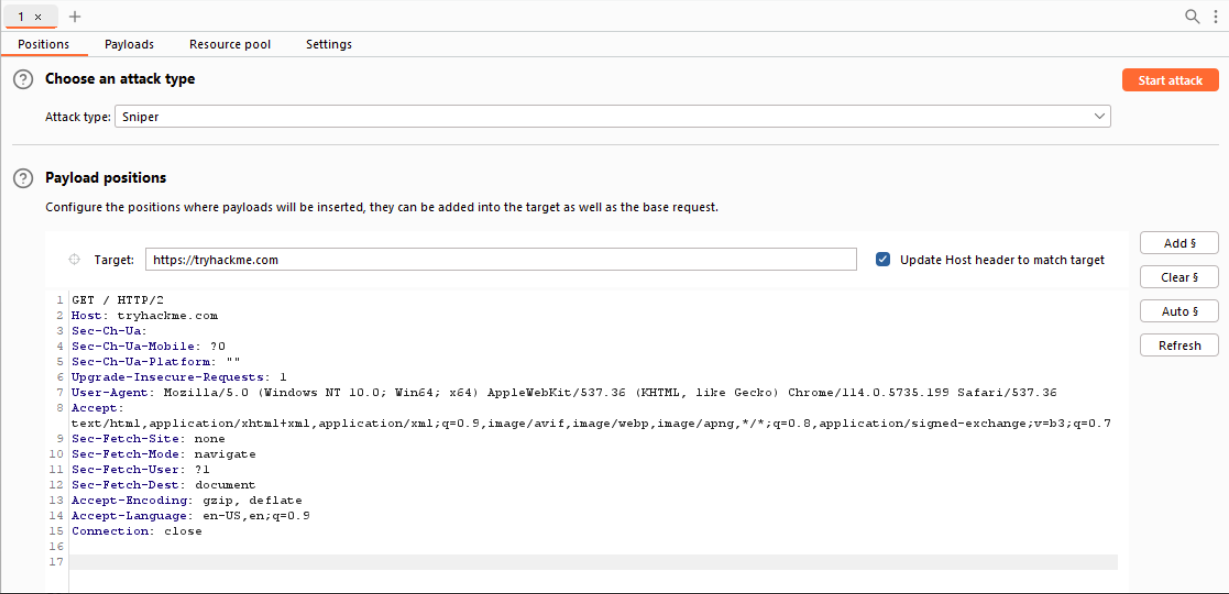
The initial view of Intruder presents a simple interface where we can select our target. This field will already be populated if a request has been sent from the Proxy (using Ctrl + I or right-clicking and selecting “Send to Intruder”).
There are four sub-tabs within Intruder:
Positions: This tab allows us to select an attack type (which we will cover in a future task) and configure where we want to insert our payloads in the request template.Payloads: Here we can select values to insert into the positions defined in the Positions tab. We have various payload options, such as loading items from a wordlist. The way these payloads are inserted into the template depends on the attack type chosen in the Positions tab. The Payloads tab also enables us to modify Intruder’s behavior regarding payloads, such as defining pre-processing rules for each payload (e.g., adding a prefix or suffix, performing match and replace, or skipping payloads based on a defined regex).Resource Pool: This tab is not particularly useful in the Burp Community Edition. It allows for resource allocation among various automated tasks in Burp Professional. Without access to these automated tasks, this tab is of limited importance.Settings: This tab allows us to configure attack behavior. It primarily deals with how Burp handles results and the attack itself. For instance, we can flag requests containing specific text or define Burp’s response to redirect (3xx) responses.
Note:
The term "fuzzing" refers to the process of testing functionality or existence by applying a set of data to a parameter.
For example:
Fuzzing for endpoints in a web application involves taking each word in a wordlist and appending it to a request URL (e.g., http://MACHINE_IP/WORD_GOES_HERE) to observe the server’s response.
1
2
3
4

In which Intruder tab can we define the "Attack type" for our planned attack?

Answer : Positions
Task 3 Positions
When using Burp Suite Intruder to perform an attack, the first step is to examine the positions within the request where we want to insert our payloads. These positions inform Intruder about the locations where our payloads will be introduced (as we will explore in upcoming tasks).
Let’s navigate to the Positions tab: 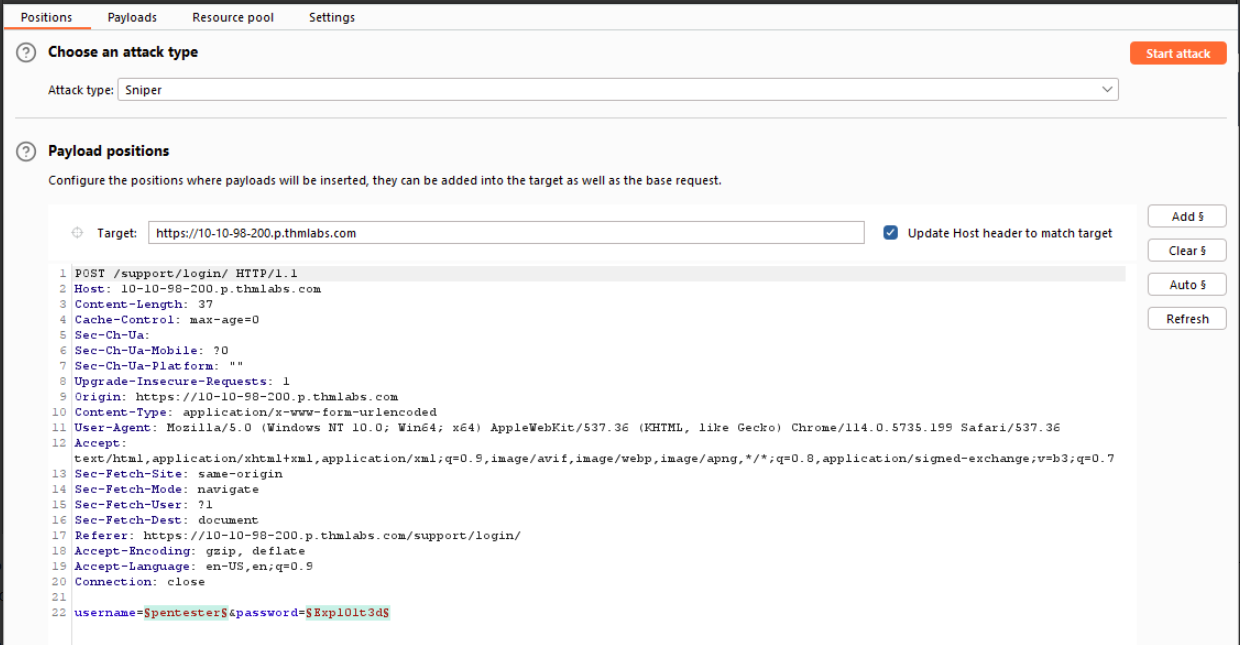
Notice that Burp Suite automatically attempts to identify the most probable positions where payloads can be inserted. These positions are highlighted in green and enclosed by section marks (§).
On the right-hand side of the interface, we find the following buttons: Add §, Clear §, and Auto §:
The
Add §button allows us to define new positions manually by highlighting them within the request editor and then clicking the button.The
Clear §button removes all defined positions, providing a blank canvas where we can define our own positions.The
Auto §button automatically attempts to identify the most likely positions based on the request. This feature is helpful if we previously cleared the default positions and want them back.
The following GIF demonstrates the process of adding, clearing, and automatically reselecting positions:
What symbol defines the start and the end of a payload position?
1
§
Task 4 Payloads
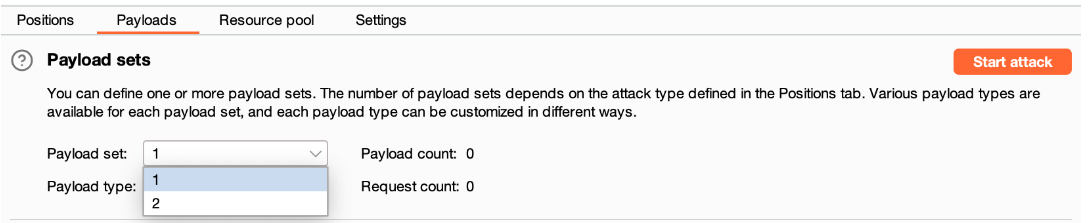
In the Payloads tab of Burp Suite Intruder, we can create, assign, and configure payloads for our attack. This sub-tab is divided into four sections:
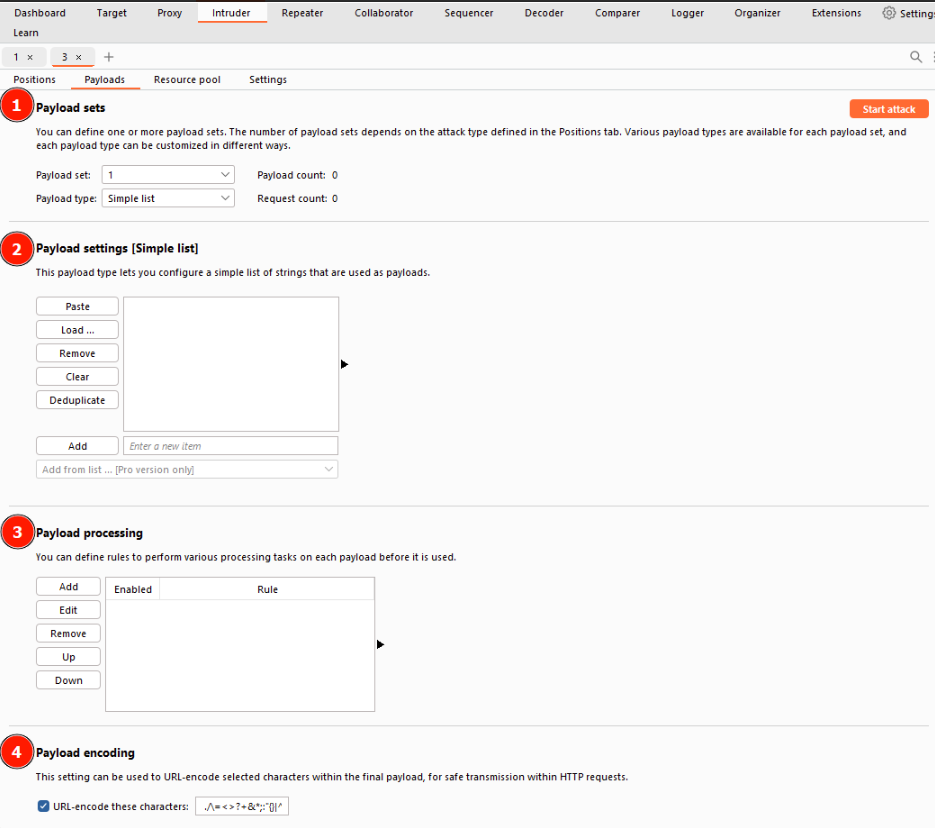
Payload Sets:This section allows us to choose the position for which we want to configure a payload set and select the type of payload we want to use.
When using attack types that allow only a single payload set (Sniper or Battering Ram), the “Payload Set” dropdown will have only one option, regardless of the number of defined positions.
If we use attack types that require multiple payload sets (Pitchfork or Cluster Bomb), there will be one item in the dropdown for each position.
Note: When assigning numbers in the “Payload Set” dropdown for multiple positions, follow a top-to-bottom, left-to-right order. For example, with two positions (
username=§pentester§&password=§Expl01ted§), the first item in the payload set dropdown would refer to the username field, and the second item would refer to the password field.
Payload settings:This section provides options specific to the selected payload type for the current payload set.
For example, when using the “Simple list” payload type, we can manually add or remove payloads to/from the set using the Add text box, Paste lines, or Load payloads from a file. The Remove button removes the currently selected line, and the Clear button clears the entire list. Be cautious with loading huge lists, as it may cause Burp to crash.
Each payload type will have its own set of options and functionality. Explore the options available to understand the range of possibilities.
- Payload Processing:
In this section, we can define rules to be applied to each payload in the set before it is sent to the target.
For example, we can capitalize every word, skip payloads that match a regex pattern, or apply other transformations or filtering.
While you may not use this section frequently, it can be highly valuable when specific payload processing is required for your attack.
- Payload Encoding:
The section allows us to customize the encoding options for our payloads.
By default, Burp Suite applies URL encoding to ensure the safe transmission of payloads. However, there may be cases where we want to adjust the encoding behavior.
We can override the default URL encoding options by modifying the list of characters to be encoded or unchecking the “URL-encode these characters” checkbox.
By leveraging these sections, we can create and customise payload sets to suit the specific requirements of our attacks. This level of control allows us to finely tune our payloads for effective testing and exploitation.
Which Payload processing rule could we use to add characters at the end of each payload in the set?
Answer : Add Suffix
Task 5 Sniper
The Sniper attack type is the default and most commonly used attack type in Burp Suite Intruder. It is particularly effective for single-position attacks, such as password brute-force or fuzzing for API endpoints. In a Sniper attack, we provide a set of payloads, which can be a wordlist or a range of numbers, and Intruder inserts each payload into each defined position in the request.
Let’s refer to our example template from before:
Example Positions
1
2
3
4
5
6
7
8
9
10
11
12
13
14
15
POST /support/login/ HTTP/1.1
Host: MACHINE_IP
User-Agent: Mozilla/5.0 (X11; Ubuntu; Linux x86_64; rv:80.0) Gecko/20100101 Firefox/80.0
Accept: text/html,application/xhtml+xml,application/xml;q=0.9,image/webp,*/*;q=0.8
Accept-Language: en-US,en;q=0.5
Accept-Encoding: gzip, deflate
Content-Type: application/x-www-form-urlencoded
Content-Length: 37
Origin: http://MACHINE_IP
Connection: close
Referer: http://MACHINE_IP/support/login/
Upgrade-Insecure-Requests: 1


username=§pentester§&password=§Expl01ted§
In this example, we have two positions defined for the username and password body parameters. In a Sniper attack, Intruder takes each payload from the payload set and substitutes it into each defined position in turn.
Assuming we have a wordlist with three words: burp, suite, and intruder, Intruder would generate six requests:
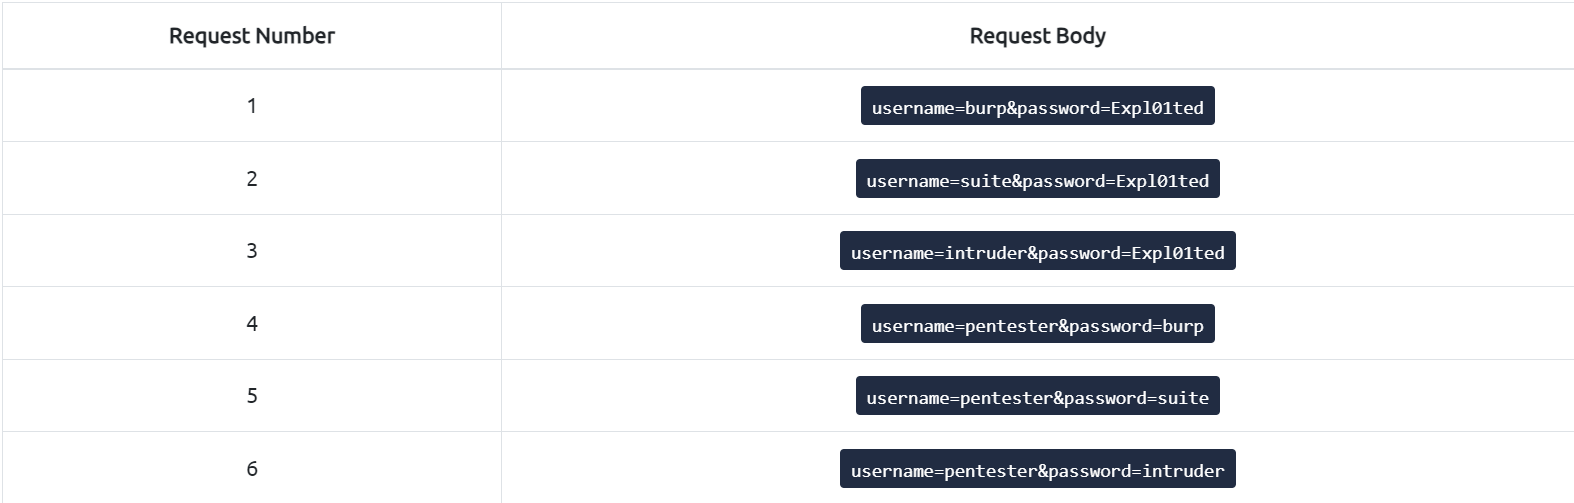
Observe how Intruder starts with the first position (username) and substitutes each payload into it, then moves to the second position (password) and performs the same substitution with the payloads. The total number of requests made by Intruder Sniper can be calculated as
requests = numberOfWords * numberOfPositions.
The Sniper attack type is beneficial when we want to perform tests with single-position attacks, utilizing different payloads for each position. It allows for precise testing and analysis of different payload variations.
If you were using Sniper to fuzz three parameters in a request with a wordlist containing 100 words, how many requests would Burp Suite need to send to complete the attack?
Answer : 300
How many sets of payloads will Sniper accept for conducting an attack?
Answer : 1
Task 6 Battering Ram
The Battering ram attack type in Burp Suite Intruder differs from Sniper in that it places the same payload in every position simultaneously, rather than substituting each payload into each position in turn.
Let’s refer back to our previous example template:
Example Positions
1
2
3
4
5
6
7
8
9
10
11
12
13
14
15
POST /support/login/ HTTP/1.1
    Host: MACHINE_IP
    User-Agent: Mozilla/5.0 (X11; Ubuntu; Linux x86_64; rv:80.0) Gecko/20100101 Firefox/80.0
    Accept: text/html,application/xhtml+xml,application/xml;q=0.9,image/webp,*/*;q=0.8
    Accept-Language: en-US,en;q=0.5
    Accept-Encoding: gzip, deflate
    Content-Type: application/x-www-form-urlencoded
    Content-Length: 37
    Origin: http://MACHINE_IP
    Connection: close
    Referer: http://MACHINE_IP/support/login/
    Upgrade-Insecure-Requests: 1

    username=§pentester§&password=§Expl01ted§
Using the Battering Ram attack type with the same wordlist from before (burp, suite, and intruder), Intruder would generate three requests:
As shown in the table, each payload from the wordlist is inserted into every position for each request made. In a Battering Ram attack, the same payload is thrown at every defined position simultaneously, providing a brute-force-like approach to testing.
The Battering Ram attack type is useful when we want to test the same payload against multiple positions at once without the need for sequential substitution.
In the upcoming tasks, we will explore further configurations and settings related to Intruder’s Battering Ram attack type and examine its applications in different scenarios.
As a hypothetical question: You need to perform a Battering ram Intruder attack on the example request above.
If you have a wordlist with two words in it (admin and Guest) and the positions in the request template look like this:
1
username=§pentester§&password=§Expl01ted§
What would the body parameters of the first request that Burp Suite sends be?
Answer : username=admin&password=admin
Task 7 Pitchfork
The Pitchfork attack type in Burp Suite Intruder is similar to having multiple Sniper attacks running simultaneously. While Sniper uses one payload set to test all positions simultaneously, Pitchfork utilises one payload set per position (up to a maximum of 20) and iterates through them all simultaneously.
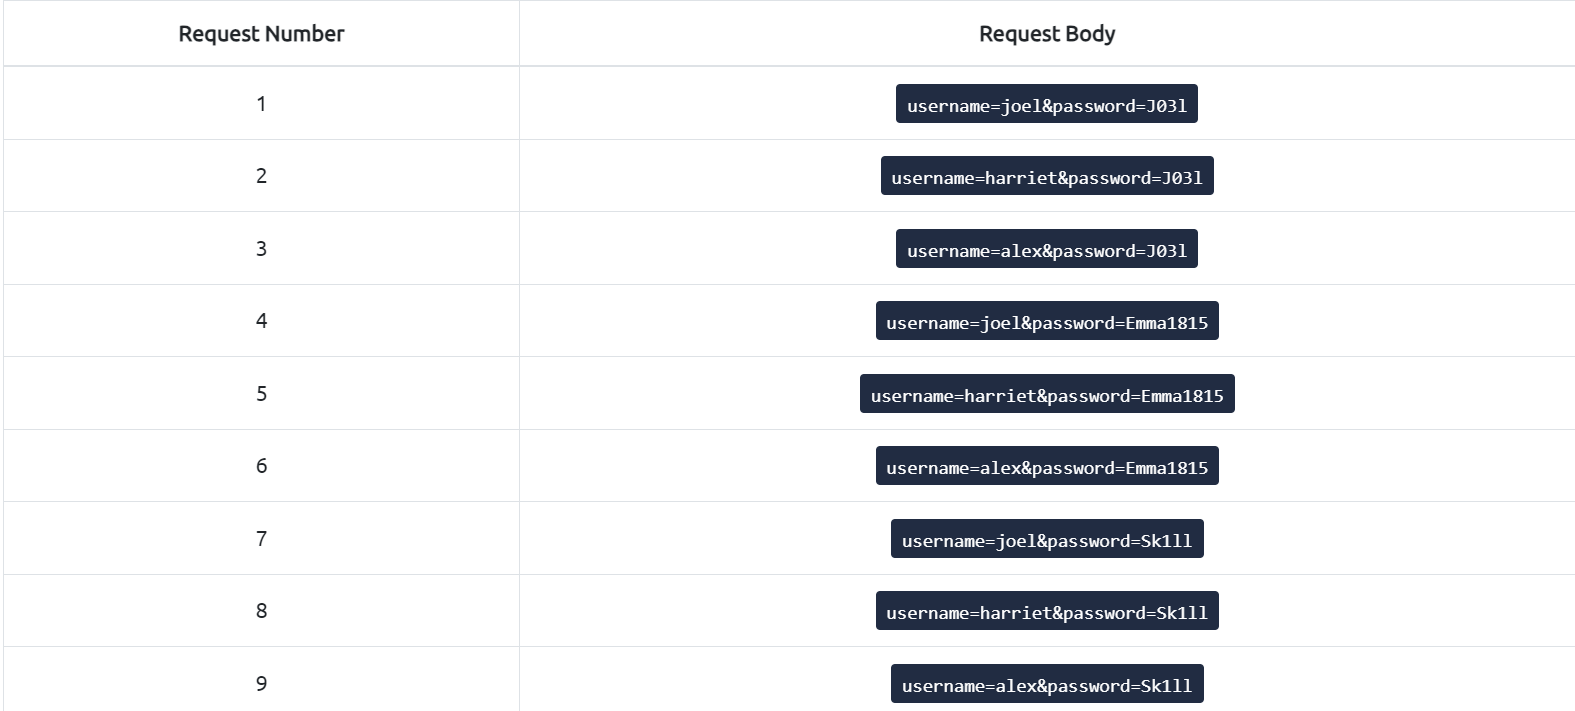
To better understand Pitchfork, let us revisit our brute-force example, but this time with two wordlists:
- The first wordlist contains usernames:
joel, harriet, and alex. - The second wordlist contains passwords:
J03l, Emma1815, and Sk1ll.
We can use these two lists to perform a Pitchfork attack on the login form. Each request made during the attack would look like this:

As shown in the table, Pitchfork takes the first item from each list and substitutes them into the request, one per position. It then repeats this process for the next request by taking the second item from each list and substituting it into the template. Intruder continues this iteration until one or all of the lists run out of items. It’s important to note that Intruder stops testing as soon as one of the lists is complete. Therefore, in Pitchfork attacks, it is ideal for the payload sets to have the same length. If the lengths of the payload sets differ, Intruder will only make requests until the shorter list is exhausted, and the remaining items in the longer list will not be tested.
The Pitchfork attack type is especially useful when conducting credential-stuffing attacks or when multiple positions require separate payload sets. It allows for simultaneous testing of multiple positions with different payloads.
In the upcoming tasks, we will explore further configurations and settings related to Intruder’s Pitchfork attack type and explore its applications in different scenarios, including credential-stuffing attacks.
What is the maximum number of payload sets we can load into Intruder in Pitchfork mode?
Answer : 20
Task 8 Cluster Bomb
The Cluster bomb attack type in Burp Suite Intruder allows us to choose multiple payload sets, one per position (up to a maximum of 20). Unlike Pitchfork, where all payload sets are tested simultaneously, Cluster bomb iterates through each payload set individually, ensuring that every possible combination of payloads is tested.
To illustrate the Cluster bomb attack type, let’s use the same wordlists as before:
- Usernames:
joel, harriet, and alex. - Passwords:
J03l, Emma1815, and Sk1ll.
In this example, let’s assume that we don’t know which password belongs to which user. We have three users and three passwords, but the mappings are unknown. In this case, we can use a Cluster bomb attack to try every combination of values. The request table for our username and password positions would look like this:
As shown in the table, the Cluster bomb attack type iterates through every combination of the provided payload sets. It tests every possibility by substituting each value from each payload set into the corresponding position in the request.
Cluster bomb attacks can generate a significant amount of traffic as it tests every combination. The number of requests made by a Cluster bomb attack can be calculated by multiplying the number of lines in each payload set together. It’s important to be cautious when using this attack type, especially when dealing with large payload sets. Additionally, when using Burp Community and its Intruder rate-limiting, the execution of a Cluster bomb attack with a moderately sized payload set can take a significantly longer time.
The Cluster bomb attack type is particularly useful for credential brute-forcing scenarios where the mapping between usernames and passwords is unknown.
In the upcoming tasks, we will explore further configurations and settings related to Intruder’s Cluster bomb attack type and examine its applications in different scenarios.
We have three payload sets. The first set contains 100 lines, the second contains 2 lines, and the third contains 30 lines.
How many requests will Intruder make using these payload sets in a Cluster bomb attack?
Answer : 6000
Task 9 Introduction to Attack Types
The Positions tab of Burp Suite Intruder has a dropdown menu for selecting the attack type. Intruder offers four attack types, each serving a specific purpose. Let’s explore each of them:
Sniper: The Sniper attack type is the default and most commonly used option. It cycles through the payloads, inserting one payload at a time into each position defined in the request. Sniper attacks iterate through all the payloads in a linear fashion, allowing for precise and focused testing.Battering ram: The Battering ram attack type differs from Sniper in that it sends all payloads simultaneously, each payload inserted into its respective position. This attack type is useful when testing for race conditions or when payloads need to be sent concurrently.Pitchfork: The Pitchfork attack type enables the simultaneous testing of multiple positions with different payloads. It allows the tester to define multiple payload sets, each associated with a specific position in the request. Pitchfork attacks are effective when there are distinct parameters that need separate testing.Cluster bomb: The Cluster bomb attack type combines the Sniper and Pitchfork approaches. It performs a Sniper-like attack on each position but simultaneously tests all payloads from each set. This attack type is useful when multiple positions have different payloads, and we want to test them all together.
Each attack type has its advantages and is suitable for different testing scenarios. Understanding their differences helps us select the appropriate attack type based on the testing objectives.
What attack type cycles through the payloads inserting one payload at a time into each position defined in the request?
Answer : Sniper
Task 10 Practical Example
To put our theoretical knowledge into practice, we will attempt to gain access to the support portal located at http://MACHINE_IP/support/login. This portal follows a typical login structure, and upon inspecting its source code, we find that no protective measures have been implemented:
Support Login Form Source Code
1
2
3
4
5
6
7
8
9
10
11
12
13
---
<form method="POST">
    <div class="form-floating mb-3">
        <input class="form-control" type="text" name=username  placeholder="Username" required>
        <label for="username">Username</label>
    </div>
    <div class="form-floating mb-3">
        <input class="form-control" type="password" name=password  placeholder="Password" required>
        <label for="password">Password</label>
    </div>
    <div class="d-grid"><button class="btn btn-primary btn-lg" type="submit">Login!</button></div>
</form>
---
Given the absence of protective measures, we have multiple options to exploit this form, including a cluster bomb attack for brute-forcing the credentials. However, we have an easier approach at our disposal. Attached to this task is a compressed file called BastionHostingCreds.zip, which contains a collection of leaked credentials belonging to Bastion Hosting employees.
Approximately three months ago, Bastion Hosting fell victim to a cyber attack, compromising employee usernames, email addresses, and plaintext passwords. While the affected employees were instructed to change their passwords promptly, there is a possibility that some disregarded this advice.
As we possess a list of known usernames, each accompanied by a corresponding password, we can leverage a credential-stuffing attack instead of a straightforward brute-force. This method proves advantageous and significantly quicker, especially when utilising the rate-limited version of Intruder. To access the leaked credentials, download the file from the target machine using the following command in the AttackBox:
1
wget http://MACHINE_IP:9999/Credentials/BastionHostingCreds.zip
Tutorial
To solve this example, follow these steps to conduct a credential-stuffing attack with Burp Macros:
Download and Prepare Wordlists:
- Download and extract the BastionHostingCreds.zip file.
- Within the extracted folder, find the following wordlists:
- emails.txt
- usernames.txt
- passwords.txt
- combined.txt
1
2
3
4
5
6
7
8
9
10
11
12
13
14
15
16
17
18
19
20
21
22
root@ip-10-10-38-111:~# cd ..
root@ip-10-10-38-111:/# ls
bin   home            lib32       mnt   run       sys  vmlinuz
boot  initrd.img      lib64       opt   sbin      tmp  vmlinuz.old
dev   initrd.img.old  lost+found  proc  srv       usr
etc   lib             media       root  swapfile  var
root@ip-10-10-38-111:/# cd root
root@ip-10-10-38-111:~# ls
BastionHostingCreds.zip  Downloads     Postman  thinclient_drives
CTFBuilder               Instructions  Rooms    Tools
Desktop                  Pictures      Scripts
root@ip-10-10-38-111:~# ls
BastionHostingCreds.zip  Downloads     Postman  thinclient_drives
CTFBuilder               Instructions  Rooms    Tools
Desktop                  Pictures      Scripts
root@ip-10-10-38-111:~# unzip BastionHostingCreds.zip
Archive:  BastionHostingCreds.zip
  inflating: combined.txt
  inflating: emails.txt
  inflating: passwords.txt
  inflating: usernames.txt
These contain lists of leaked emails, usernames, and passwords, respectively. The last list contains the combined email and password lists. We will be using the usernames.txt and passwords.txt lists.
Navigate to
http://MACHINE_IP/support/loginin your browser. Activate the Burp Proxy and attempt to log in, capturing the request in your proxy. Note that any credentials will suffice for this step.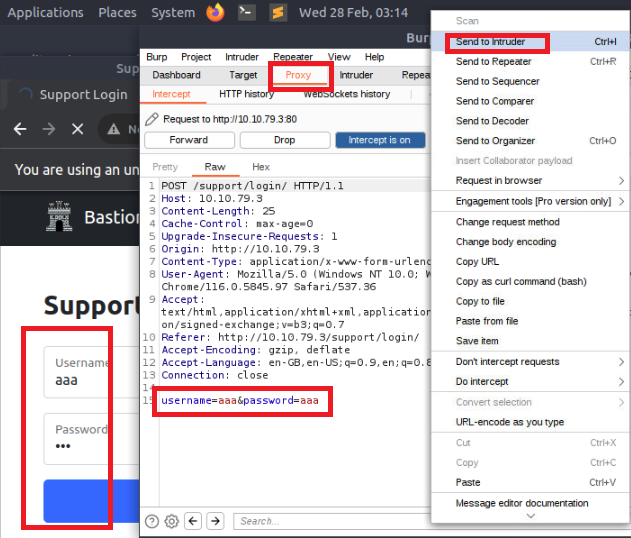
Send the captured request from the Proxy to Intruder by right-clicking and selecting “Send to Intruder” or using
Ctrl + I.In the
"Positions"sub-tab, ensure that only the username and password parameters are selected. Clear any additional selections, such as session cookies.Set the Attack type to
"Pitchfork."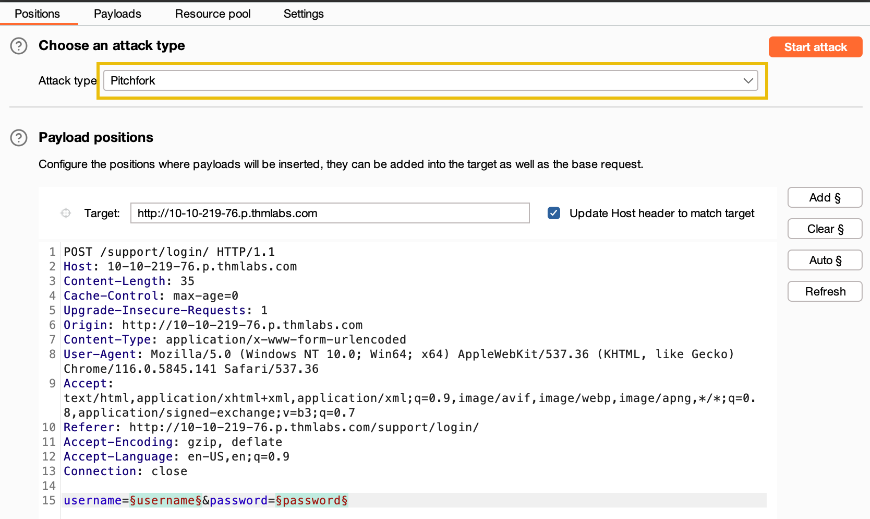
Move to the “Payloads” sub-tab. You will find two payload sets available for the username and password fields.
In the first payload set (for usernames), go to “Payload Options,” choose “Load,” and select the
usernames.txtlist. Repeat the same process for the second payload set (for passwords) using thepasswords.txtlist.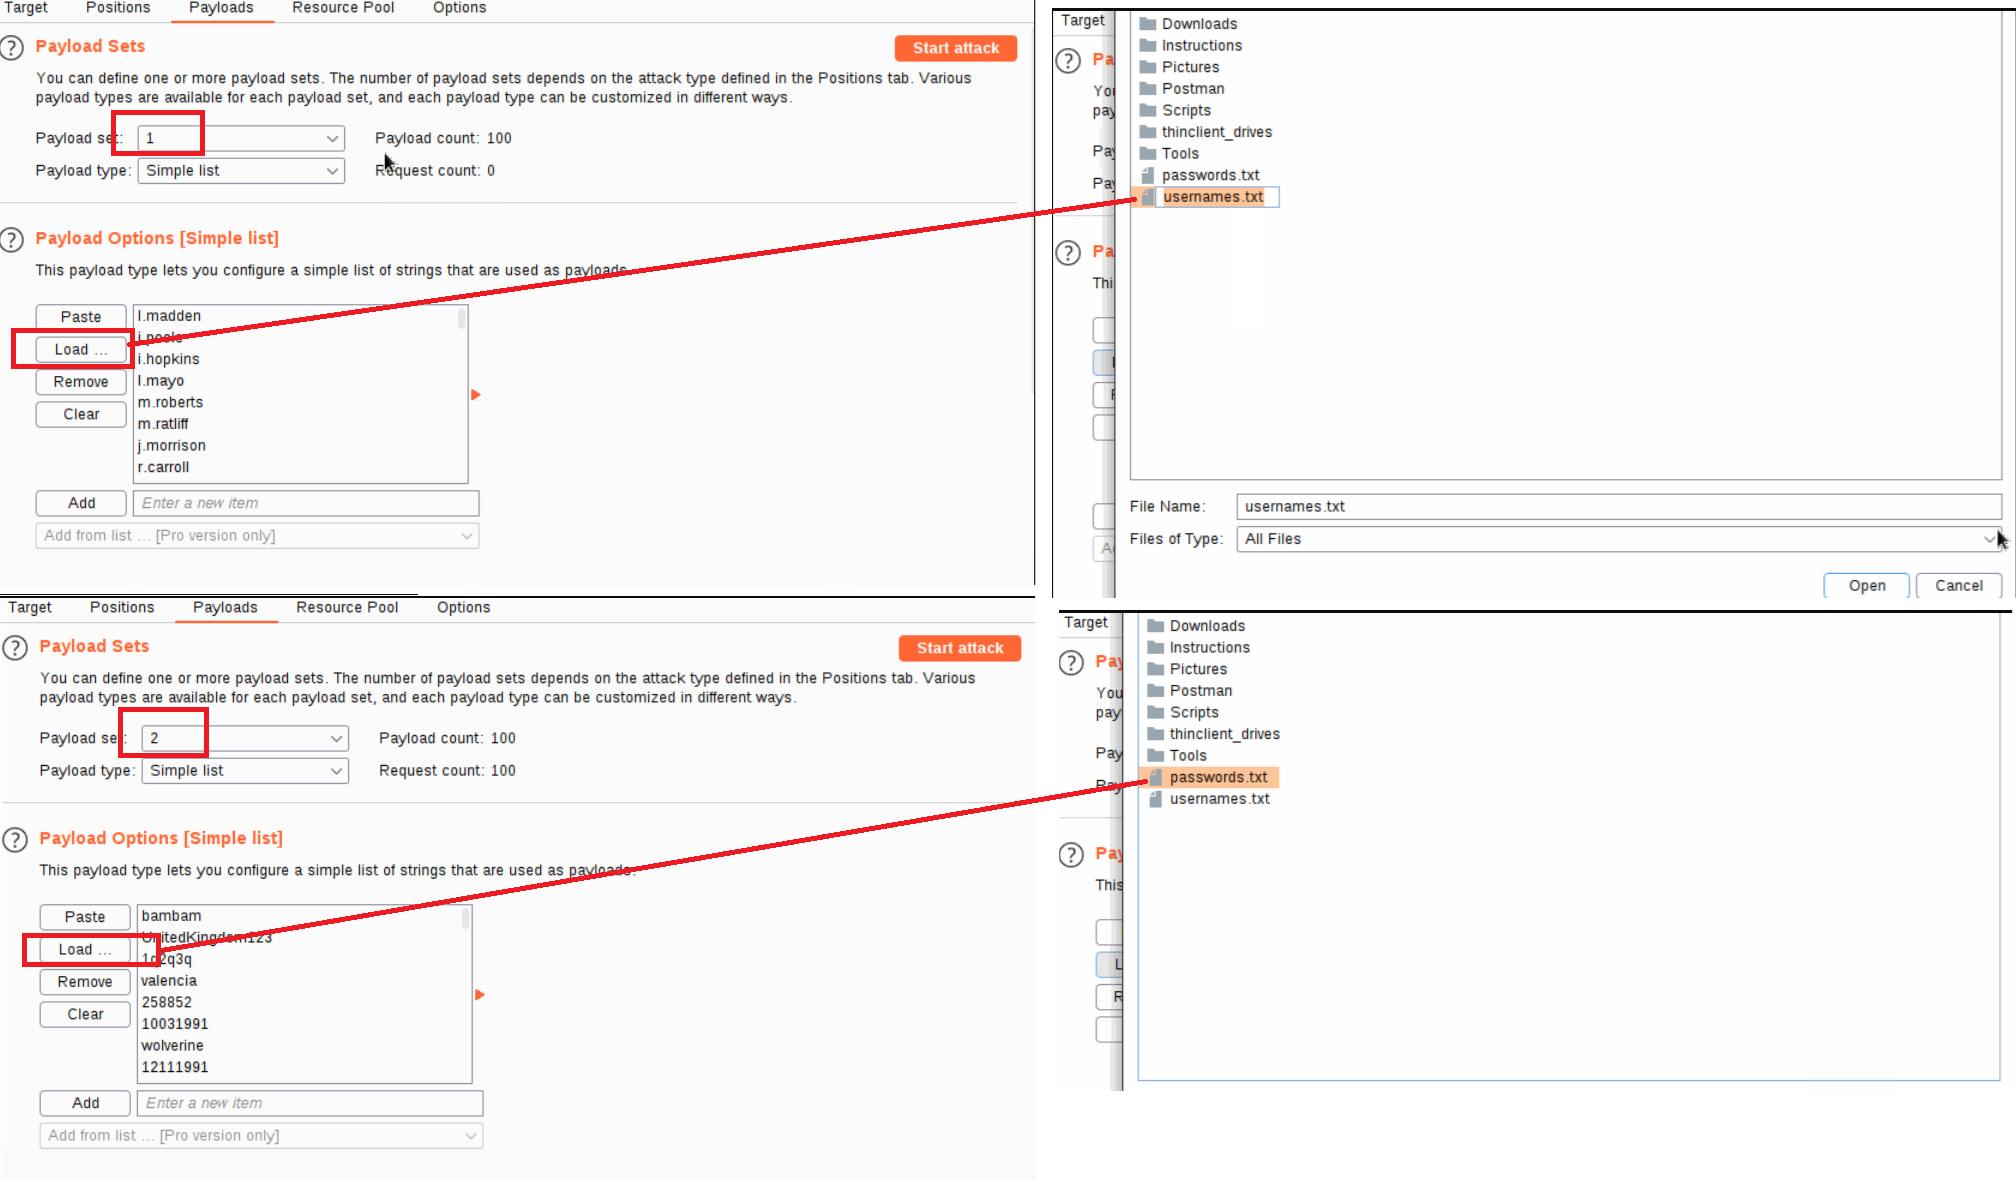
Click the Start Attack button to begin the credential-stuffing attack. A warning about rate-limiting may appear; click OK to proceed. The attack will take a few minutes to complete in Burp Community.
Once the attack starts, a new window will display the results of the requests. However, as Burp sent 100 requests, we need to identify which one(s) were successful.
Since the response status codes are not differentiating successful and unsuccessful attempts (all are 302 redirects), we need to use the response length to distinguish them.

Click on the header for the “Length” column to sort the results by byte length. Look for the request with a shorter response length, indicating a successful login attempt.
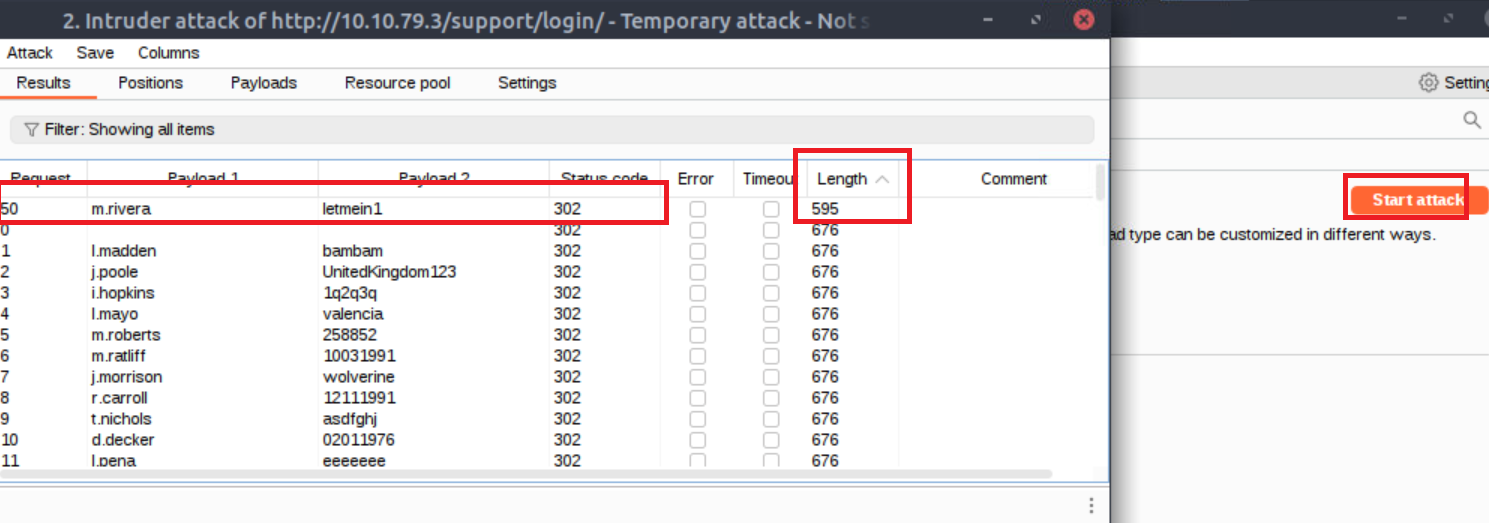
To confirm the successful login attempt, use the credentials from the request with the shorter response length to log in.
What username and password combination indicates a successful login attempt? The answer format is “username:password”.
Answer : m.rivera:letmein1
Task 11 Practical Challenge
Having gained access to the support system, we now have the opportunity to explore its functionalities and see what actions we can perform.
Upon accessing the home interface, we are presented with a table displaying various tickets. Clicking on any row redirects us to a page where we can view the complete ticket. By examining the URL structure, we observe that these pages are numbered in the following format:
http://10.10.79.3/support/ticket/NUMBER
The numbering system indicates that the tickets are assigned integer identifiers rather than complex and hard-to-guess IDs. This information is significant because it suggests two possible scenarios:
Access Control: The endpoint may be properly configured to restrict access only to tickets assigned to our current user. In this case, we can only view tickets associated with our account.IDOR Vulnerability: Alternatively, the endpoint may lack appropriate access controls, leading to a vulnerability known asInsecure Direct Object References (IDOR). If this is the case, we could potentially exploit the system and read all existing tickets, regardless of the assigned user.
To investigate further, we will utilize the Intruder tool to fuzz the /support/ticket/NUMBER endpoint. This approach will help us determine whether the endpoint has been correctly configured or if an IDOR vulnerability is present. Let’s proceed with the fuzzing process!
Note: You have to capture a request while being logged in.
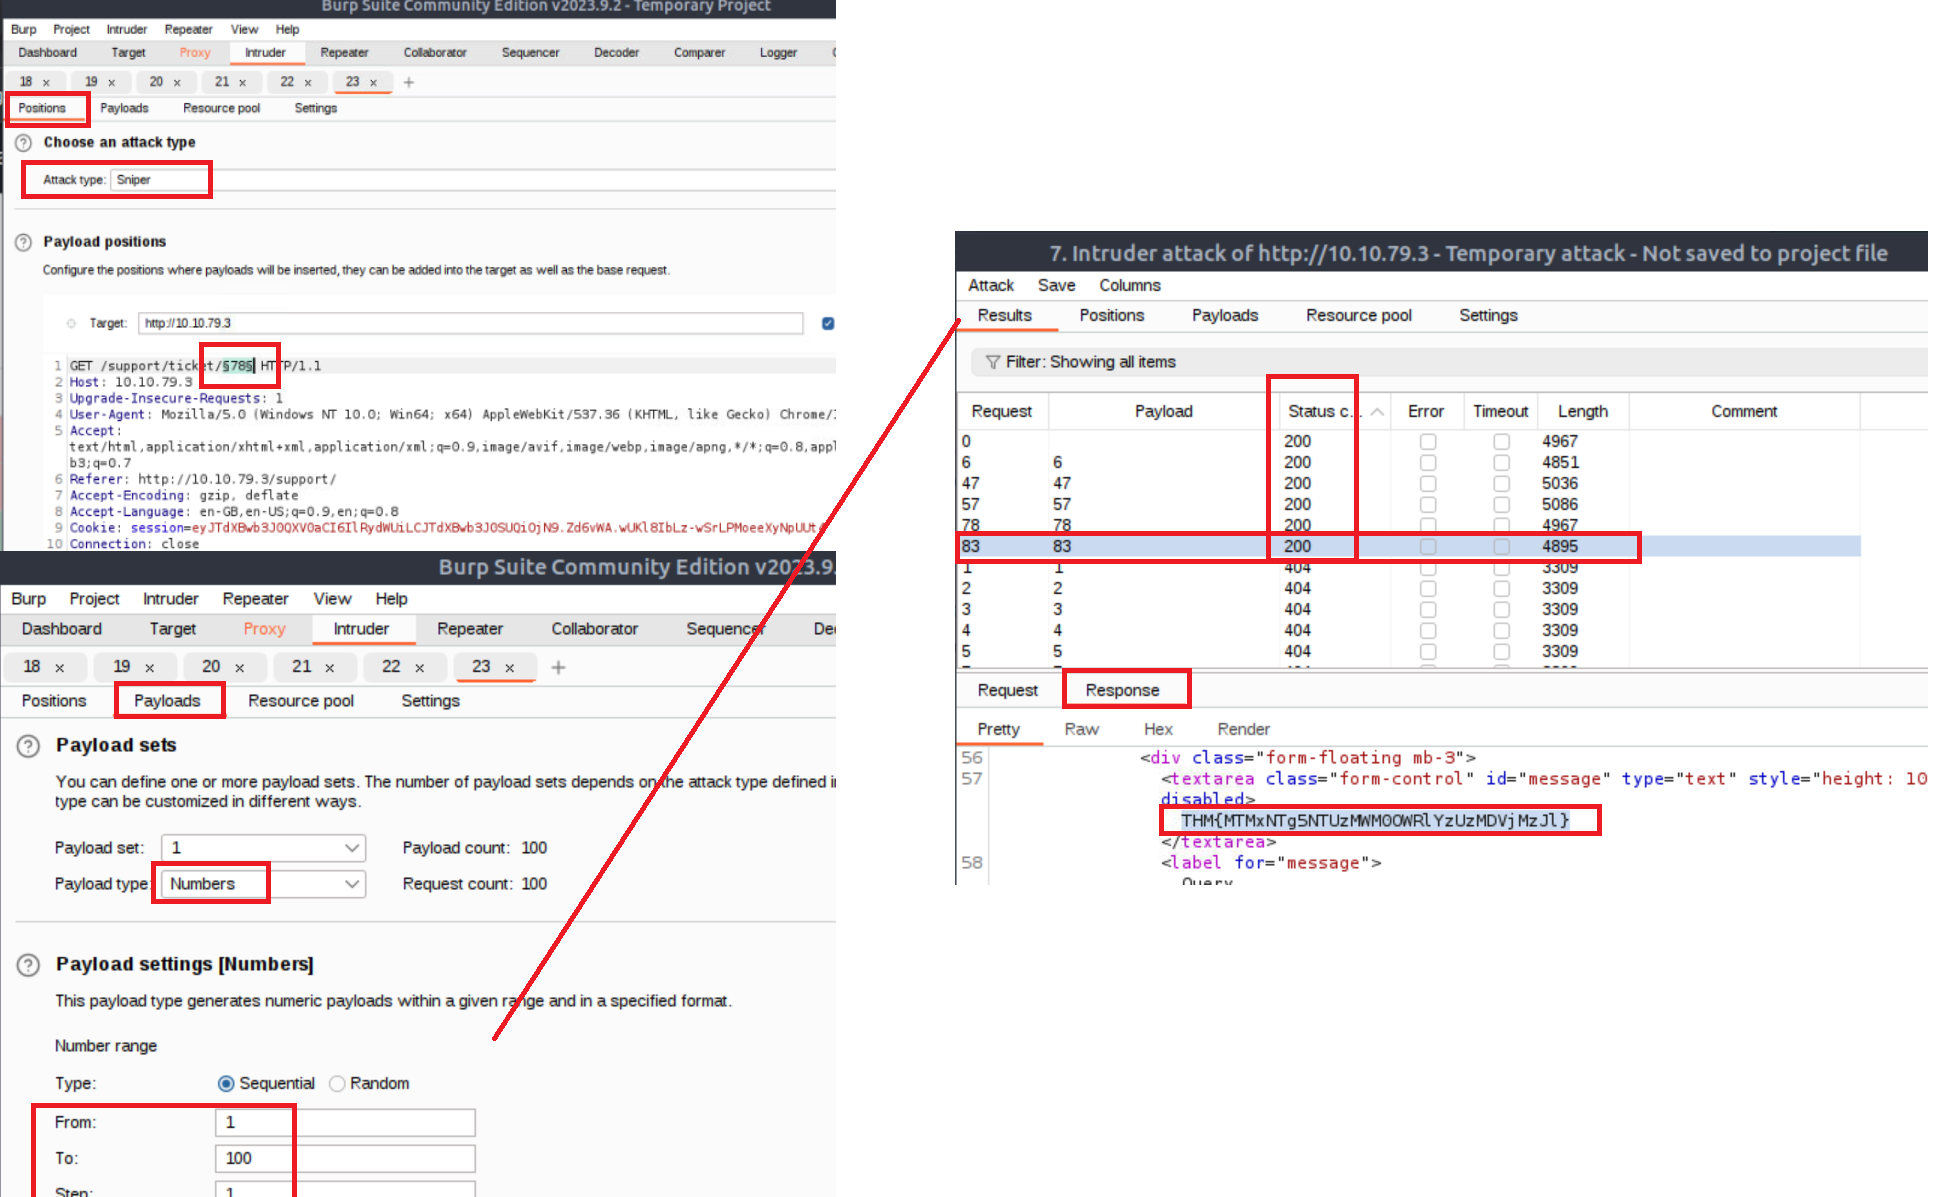
Which attack type is best suited for this task? Answer : Sniper
Configure an appropriate position and payload (the tickets are stored at values between 1 and 100), then start the attack.
You should find that at least five tickets will be returned with a status code 200, indicating that they exist.
No answer needed Either using the Response tab in the Attack Results window or by looking at each successful (i.e. 200 code) request manually in your browser, find the ticket that contains the flag.
What is the flag?
Answer : THM{MTMxNTg5NTUzMWM0OWRlYzUzMDVjMzJl}
Step 1: login to http://10.10.79.3/support/login using previous Task
Step 2: click on one of the ticket and use proxy to capture and use Intruder(Sniper) to attack
Task 12 Extra Mile Challenge
In this extra-mile exercise, we will tackle a more challenging variant of the credential-stuffing attack we previously performed. However, this time, additional measures have been implemented to make brute-forcing more difficult. If you are comfortable using Burp Macros, you can attempt this challenge without the instructions below. Otherwise, let’s proceed with the step-by-step approach.
Catching the Request
Begin by capturing a request to http://10.10.79.3/admin/login/ and reviewing the response. Here is an example of the response:
Example Response
1
2
3
4
5
6
7
8
9
10
11
12
13
14
15
16
17
18
19
20
21
22
HTTP/1.1 200 OK
Server: nginx/1.18.0 (Ubuntu)
Date: Fri, 20 Aug 2021 22:31:16 GMT
Content-Type: text/html; charset=utf-8
Connection: close
Set-Cookie: session=eyJ0b2tlbklEIjoiMzUyNTQ5ZjgxZDRhOTM5YjVlMTNlMjIzNmI0ZDlkOGEifQ.YSA-mQ.ZaKKsUnNsIb47sjlyux_LN8Qst0; HttpOnly; Path=/
Vary: Cookie
Front-End-Https: on
Content-Length: 3922
---
<form method="POST">
    <div class="form-floating mb-3">
        <input class="form-control" type="text" name=username  placeholder="Username" required>
        <label for="username">Username</label>
    </div>
    <div class="form-floating mb-3">
        <input class="form-control" type="password" name=password  placeholder="Password" required>
        <label for="password">Password</label>
    </div>
    <input type="hidden" name="loginToken" value="84c6358bbf1bd8000b6b63ab1bd77c5e">
    <div class="d-grid"><button class="btn btn-warning btn-lg" type="submit">Login!</button></div>
</form>
In this response, we notice that alongside the username and password fields, there is now a session cookie set, as well as a CSRF (Cross-Site Request Forgery) token in the form as a hidden field. Refreshing the page reveals that both the session cookie and the loginToken change with each request. This means that for every login attempt, we need to extract valid values for both the session cookie and the loginToken.
To accomplish this, we will use Burp Macros to define a repeated set of actions (macro) to be executed before each request. This macro will extract unique values for the session cookie and loginToken, replacing them in every subsequent request of our attack.
Tutorial
Navigate to http://10.10.79.3/admin/login/. Activate Intercept in the Proxy module and attempt to log in. Capture the request and send it to Intruder.
Configure the positions the same way as we did for brute-forcing the support login:
- Set the attack type to
"Pitchfork". - Clear all predefined positions and select only the username and password form fields. Our macro will handle the other two positions.
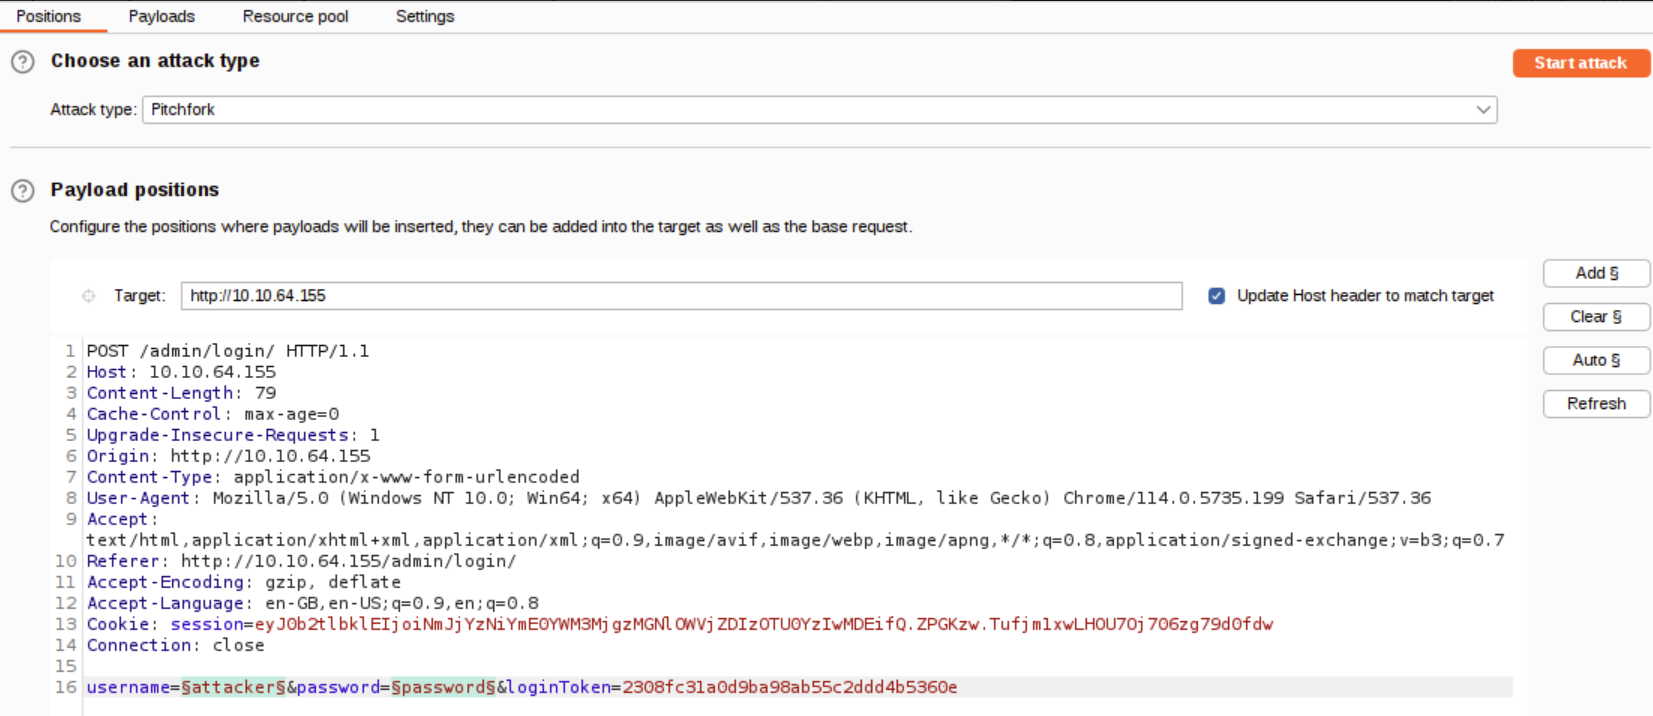
- Set the attack type to
Now switch over to the Payloads tab and load in the same username and password wordlists we used for the support login attack.
Up until this point, we have configured Intruder in almost the same way as our previous credential stuffing attack; this is where things start to get more complicated.
With the username and password parameters handled, we now need to find a way to grab the ever-changing loginToken and session cookie. Unfortunately, “recursive grep” won’t work here due to the redirect response, so we can’t do this entirely within Intruder – we will need to build a macro.
Macrosallow us to perform the same set of actions repeatedly. In this case, we simply want to send a GET request to /admin/login/.Fortunately, setting this up is a straightforward process.
- Switch over to the main “Settings” tab at the top-right of Burp.
- Click on the “Sessions” category.
- Scroll down to the bottom of the category to the “Macros” section and click the Add button.
- The menu that appears will show us our request history. If there isn’t a GET request to http://10.10.79.3/admin/login/ in the list already, navigate to this location in your browser, and you should see a suitable request appear in the list.
- With the request selected, click OK.
- Finally, give the macro a suitable name, then click OK again to finish the process.
There are a lot of steps here, comparatively speaking, so the following GIF shows the entire process: 
Now that we have a macro defined, we need to set Session Handling rules that define how the macro should be used.
- Still in the “Sessions” category of the main settings, scroll up to the “Session Handling Rules” section and choose to Add a new rule.
A new window will pop up with two tabs in it: “Details” and “Scope”. We are in the Details tab by default.
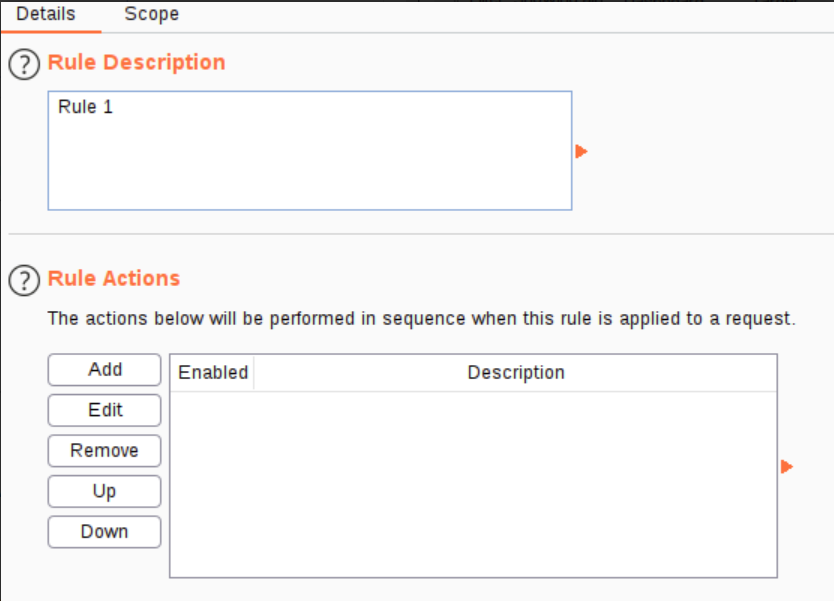
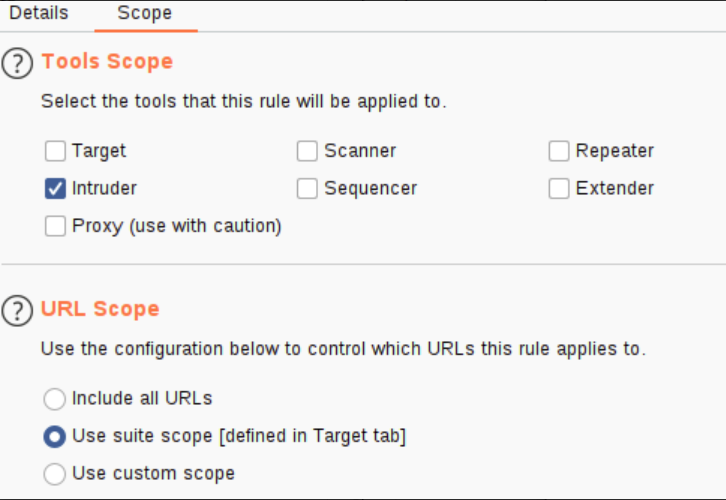
Fill in an appropriate description, then switch to the Scope tab.
In the “Tools Scope” section, deselect every checkbox other than Intruder – we do not need this rule to apply anywhere else.
- In the “URL Scope” section, choose “Use suite scope”; this will set the macro to only operate on sites that have been added to the global scope (as was discussed in Burp Basics). If you have not set a global scope, keep the “Use custom scope” option as default and add http://10.10.79.3/ to the scope in this section.
Now we need to switch back over to the Details tab and look at the “Rule Actions” section.
- Click the Add button – this will cause a dropdown menu to appear with a list of actions we can add.
- Select “Run a Macro” from this list.
- In the new window that appears, select the macro we created earlier.
As it stands, this macro will now overwrite all of the parameters in our Intruder requests before we send them; this is great, as it means that we will get the loginTokens and session cookies added straight into our requests. That said, we should restrict which parameters and cookies are being updated before we start our attack:
- Select “Update only the following parameters and headers”, then click the Edit button next to the input box below the radio button.
- In the “Enter a new item” text field, type “loginToken”. Press Add, then Close.
- Select “Update only the following cookies”, then click the relevant Edit button.
- Enter “session” in the “Enter a new item” text field. Press Add, then Close.
- Finally, press OK to confirm our action.
The following GIF demonstrates this final stage of the process: 
Click OK, and we’re done!
You should now have a macro defined that will substitute in the CSRF token and session cookie. All that’s left to do is switch back to Intruder and start the attack!
Note: You should be getting 302 status code responses for every request in this attack. If you see 403 errors, then your macro is not working properly.
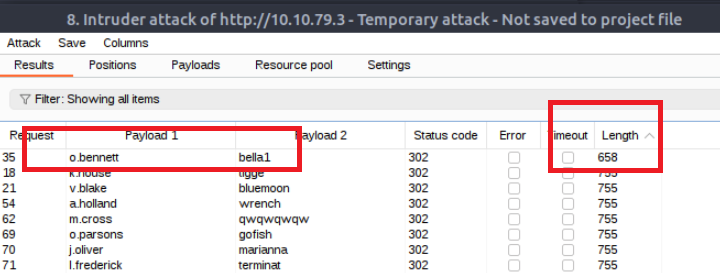
As with the support login credential stuffing attack we carried out, the response codes here are all the same (302 Redirects). Once again, order your responses by length to find the valid credentials. Your results won’t be quite as clear-cut as last time – you will see quite a few different response lengths: however, the response that indicates a successful login should still stand out as being significantly shorter.
Use the credentials you just found to log in (you may need to refresh the login page before entering the credentials).
What username and password combination indicates a successful login attempt? The answer format is “username:password”.
Answer : o.bennett:bella1
Step 1. Turn off “Proxy” and navigate to http://10.10.79.3/admin/login/ to load the page
- Step 2. Enter whatever the login
- Step 3. Turn On “Proxy”
- Step 4. Enter whatever the login again to capture Username, Password and LoginToken
- Step 5. Send the result to Intruder
- Step 6. Set “Positions” to Pitchfork
- Step 7. Only set username and password as variables
- Step 8. On Payloads tab, set payload 1 to load username.txt list; set payload 2 to password.txt list
- Step 9. Project Options tab or Project>Sessions>Marcos>Add
Then look for status code with 200, method with GET, URL with “/admin/login” and Length with “4378” 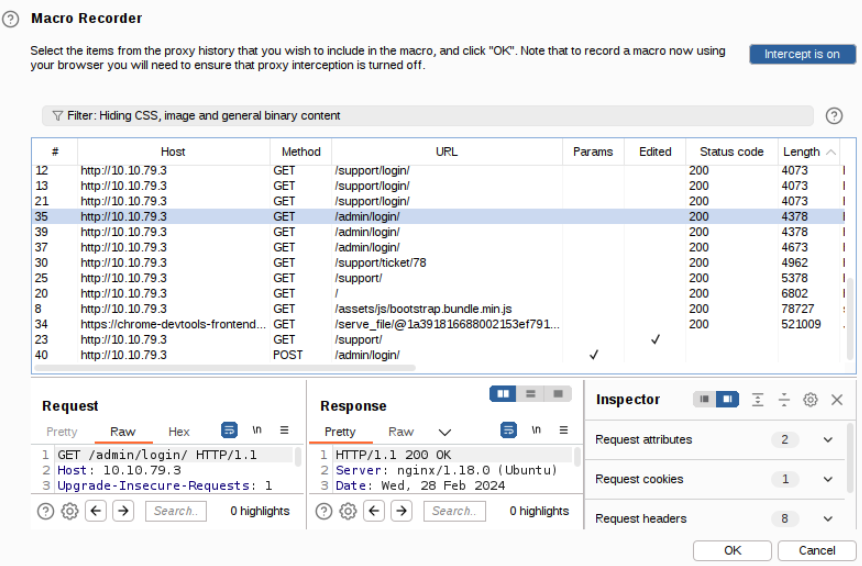
Click ok and give a name CSFR
- Step 10. Add Session Handling Rules Details tab: Use Suite Scope
Scope tab:
- Tools scope: Only select “Intruder”
URL Scope: “Use suite scope” or Use Custom Scope > Include in scope > Add > Prefix: > http://MAchine_IP/
Step 11. Add Rule actions > Run a Marco > Select the Macro created earlier
Step 12. Select the “Update only the following parameters and headers:” option and click “Edit” Enter “loginToken”
- Step 13. Select “Update only the following cookies” option and enter “session” > OK > Attack
- Step 14. Login to the machine /admin/login page
Task 13 Conclusion
Congratulations on completing the Burp Suite Intruder room!
By now, you should have a solid understanding of how to effectively utilize Intruder to automate requests and perform various types of attacks.
In the next room of the module, we will be looking at some of Burp Suite’s other modules!