THM: Active Directory Basics
Ref:
Task 1 - Introduction
Microsoft’s Active Directory is the backbone of the corporate world. It simplifies the management of devices and users within a corporate environment. In this room, we’ll take a deep dive into the essential components of Active Directory.
Room Objectives
In this room, we will learn about Active Directory and will become familiar with the following topics
- What Active Directory is
- What an Active Directory Domain is
- What components go into an Active Directory - Domain
- Forests and Domain Trust
- And much more!
Prerequisites
General familiarity with Windows. Check the Windows Fundamentals module for more information on this.
Task 2 - Windows Domains
Picture yourself administering a small business network with only five computers and five employees. In such a tiny network, you will probably be able to configure each computer separately without a problem. You will manually log into each computer, create users for whoever will use them, and make specific configurations for each employee’s accounts. If a user’s computer stops working, you will probably go to their place and fix the computer on-site.
While this sounds like a very relaxed lifestyle, let’s suppose your business suddenly grows and now has 157 computers and 320 different users located across four different offices. Would you still be able to manage each computer as a separate entity, manually configure policies for each of the users across the network and provide on-site support for everyone? The answer is most likely no.
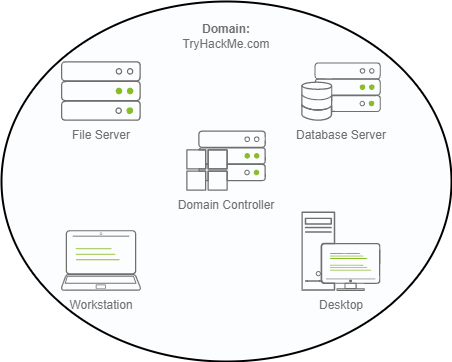
To overcome these limitations, we can use a Windows domain. Simply put, a Windows domain is a group of users and computers under the administration of a given business. The main idea behind a domain is to centralise the administration of common components of a Windows computer network in a single repository called Active Directory (AD). The server that runs the Active Directory services is known as a Domain Controller (DC).
The main advantages of having a configured Windows domain are:
Centralised identity management: All users across the network can be configured from Active Directory with minimum effort. Managing security policies: You can configure security policies directly from Active Directory and apply them to users and computers across the network as needed.
A Real-World Example
If this sounds a bit confusing, chances are that you have already interacted with a Windows domain at some point in your school, university or work.
In school/university networks, you will often be provided with a username and password that you can use on any of the computers available on campus. Your credentials are valid for all machines because whenever you input them on a machine, it will forward the authentication process back to the Active Directory, where your credentials will be checked. Thanks to Active Directory, your credentials don’t need to exist in each machine and are available throughout the network.
Active Directory is also the component that allows your school/university to restrict you from accessing the control panel on your school/university machines. Policies will usually be deployed throughout the network so that you don’t have administrative privileges over those computers.
Welcome to THM Inc.
During this task, we’ll assume the role of the new IT admin at THM Inc. As our first task, we have been asked to review the current domain “THM.local” and do some additional configurations. You will have administrative credentials over a pre-configured Domain Controller (DC) to do the tasks.
Be sure to click the Start Machine button now, as you’ll use the same machine for all tasks. This should open a machine in your browser. Should you prefer to connect to it via RDP, you can use the following credentials:
- Username: Administrator
- Password: Password321
Note: When connecting via RDP, use THM\Administrator as the username to specify you want to log in using the user Administrator on the THM domain.
Since we will be connecting to the target machine via RDP, this is also a good time to start the AttackBox (unless you are using your own machine).
In a Windows domain, credentials are stored in a centralised repository called…
Answer format: Active Directory
The server in charge of running the Active Directory services is called…
Answer : Domain Controller
Task 3 - Active Directory
The core of any Windows Domain is the Active Directory Domain Service (AD DS). This service acts as a catalogue that holds the information of all of the “objects” that exist on your network. Amongst the many objects supported by AD, we have users, groups, machines, printers, shares and many others. Let’s look at some of them:
Users
Users are one of the most common object types in Active Directory. Users are one of the objects known as security principals, meaning that they can be authenticated by the domain and can be assigned privileges over resources like files or printers. You could say that a security principal is an object that can act upon resources in the network.
Users can be used to represent two types of entities:
People: users will generally represent persons in your organisation that need to access the network, like employees.
Services: you can also define users to be used by services like IIS or MSSQL. Every single service requires a user to run, but service users are different from regular users as they will only have the privileges needed to run their specific service.
Machines
Machines are another type of object within Active Directory; for every computer that joins the Active Directory domain, a machine object will be created. Machines are also considered “security principals” and are assigned an account just as any regular user. This account has somewhat limited rights within the domain itself.
The machine accounts themselves are local administrators on the assigned computer, they are generally not supposed to be accessed by anyone except the computer itself, but as with any other account, if you have the password, you can use it to log in.
Note: Machine Account passwords are automatically rotated out and are generally comprised of 120 random characters.
Identifying machine accounts is relatively easy. They follow a specific naming scheme. The machine account name is the computer’s name followed by a dollar sign. For example, a machine named DC01 will have a machine account called DC01$.
Security Groups
If you are familiar with Windows, you probably know that you can define user groups to assign access rights to files or other resources to entire groups instead of single users. This allows for better manageability as you can add users to an existing group, and they will automatically inherit all of the group’s privileges. Security groups are also considered security principals and, therefore, can have privileges over resources on the network.
Groups can have both users and machines as members. If needed, groups can include other groups as well.
Several groups are created by default in a domain that can be used to grant specific privileges to users. As an example, here are some of the most important groups in a domain:
Security Group
Domain Admins - Users of this group have administrative privileges over the entire domain. By default, they can administer any computer on the domain, including the DCs.
Server Operators - Users in this group can administer Domain Controllers. They cannot change any administrative group memberships.
Backup Operators - Users in this group are allowed to access any file, ignoring their permissions. They are used to perform backups of data on computers.
Account Operators - Users in this group can create or modify other accounts in the domain.
Domain Users - Includes all existing user accounts in the domain.
Domain Computers - Includes all existing computers in the domain.
Domain Controllers - Includes all existing DCs on the domain.
You can obtain the complete list of default security groups from the Microsoft documentation.
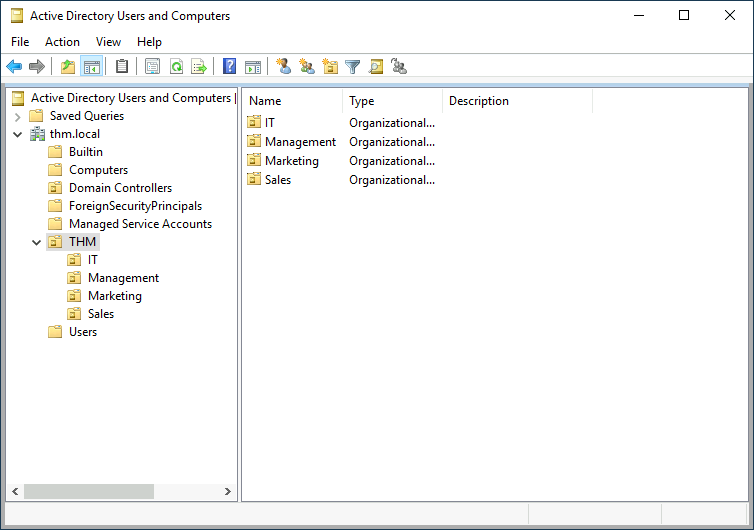
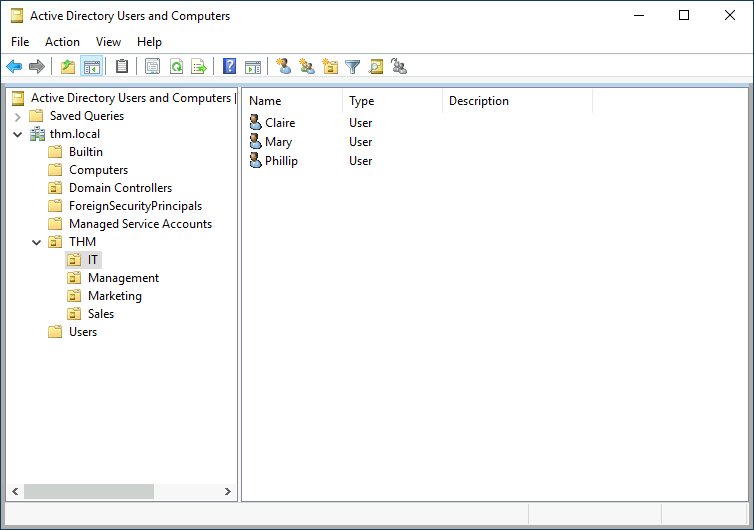
This will open up a window where you can see the hierarchy of users, computers and groups that exist in the domain. These objects are organised in Organizational Units (OUs) which are container objects that allow you to classify users and machines. OUs are mainly used to define sets of users with similar policing requirements. The people in the Sales department of your organisation are likely to have a different set of policies applied than the people in IT, for example. Keep in mind that a user can only be a part of a single OU at a time.
Checking our machine, we can see that there is already an OU called THM with four child OUs for the IT, Management, Marketing and Sales departments. It is very typical to see the OUs mimic the business’ structure, as it allows for efficiently deploying baseline policies that apply to entire departments. Remember that while this would be the expected model most of the time, you can define OUs arbitrarily. Feel free to right-click the THM OU and create a new OU under it called Students just for the fun of it.
If you open any OUs, you can see the users they contain and perform simple tasks like creating, deleting or modifying them as needed. You can also reset passwords if needed (pretty useful for the helpdesk):
You probably noticed already that there are other default containers apart from the THM OU. These containers are created by Windows automatically and contain the following:
Builtin: Contains default groups available to any Windows host.
Computers: Any machine joining the network will be put here by default. You can move them if needed.
Domain Controllers: Default OU that contains the DCs in your network.
Users: Default users and groups that apply to a domain-wide context.
Managed Service Accounts: Holds accounts used by services in your Windows domain.
Security Groups vs OUs
You are probably wondering why we have both groups and OUs. While both are used to classify users and computers, their purposes are entirely different:
OUs are handy for
applying policiesto users and computers, which include specific configurations that pertain to sets of users depending on their particular role in the enterprise. Remember, a user can only be a member of a single OU at a time, as it wouldn’t make sense to try to apply two different sets of policies to a single user.Security Groups, on the other hand, are used to
grant permissions over resources. For example, you will use groups if you want to allow some users to access a shared folder or network printer. A user can be a part of many groups, which is needed to grant access to multiple resources.
Which group normally administrates all computers and resources in a domain?
Domain Admin
What would be the name of the machine account associated with a machine named TOM-PC?
TOM-PC$
Suppose our company creates a new department for Quality Assurance. What type of containers should we use to group all Quality Assurance users so that policies can be applied consistently to them?
Organization units
Task 4 - Managing Users in AD
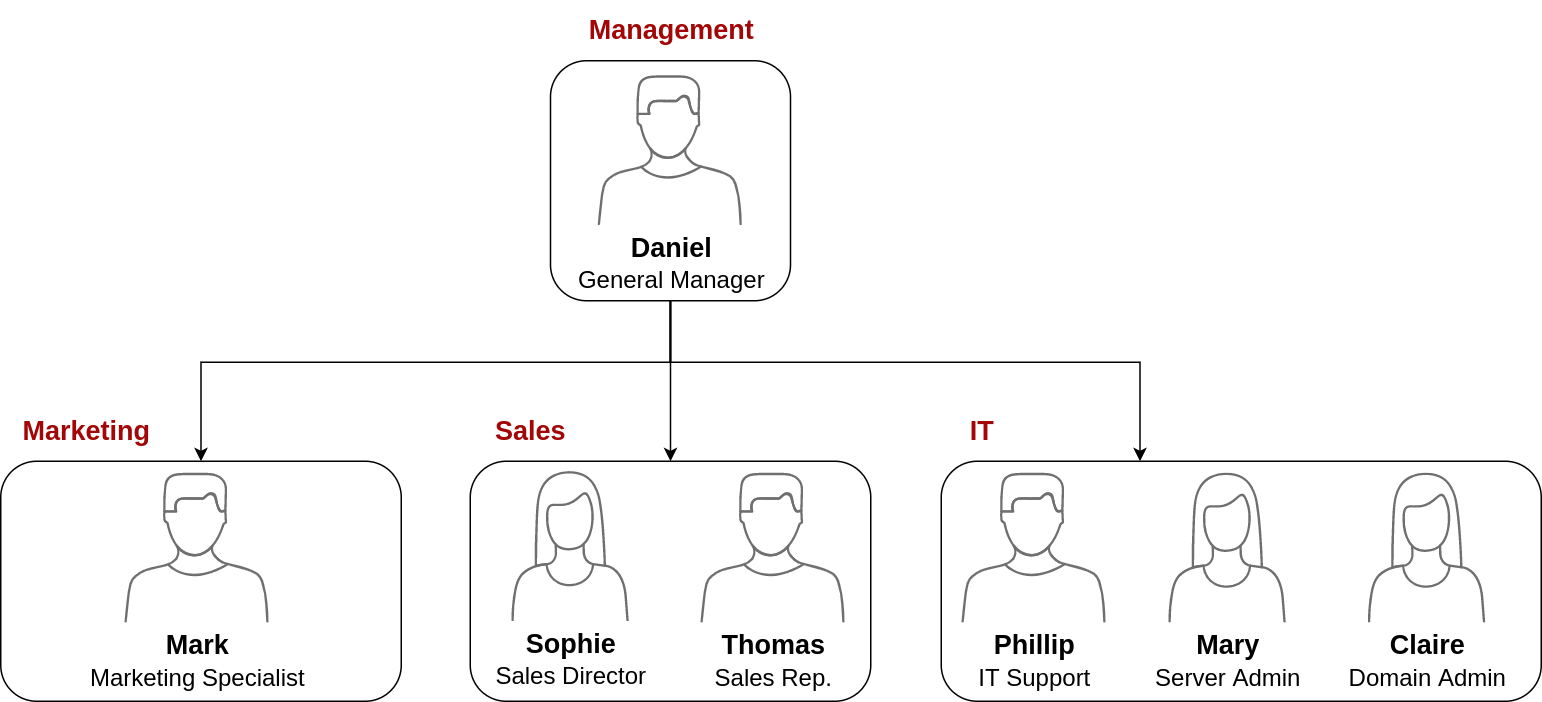
Your first task as the new domain administrator is to check the existing AD OUs and users, as some recent changes have happened to the business. You have been given the following organisational chart and are expected to make changes to the AD to match it:
Deleting extra OUs and users
The first thing you should notice is that there is an additional department OU in your current AD configuration that doesn’t appear in the chart. We’ve been told it was closed due to budget cuts and should be removed from the domain. If you try to right-click and delete the OU, you will get the following error:
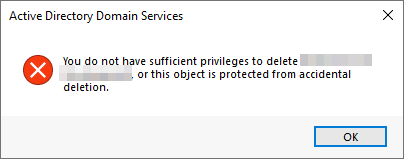
By default, OUs are protected against accidental deletion. To delete the OU, we need to enable the Advanced Features in the View menu:
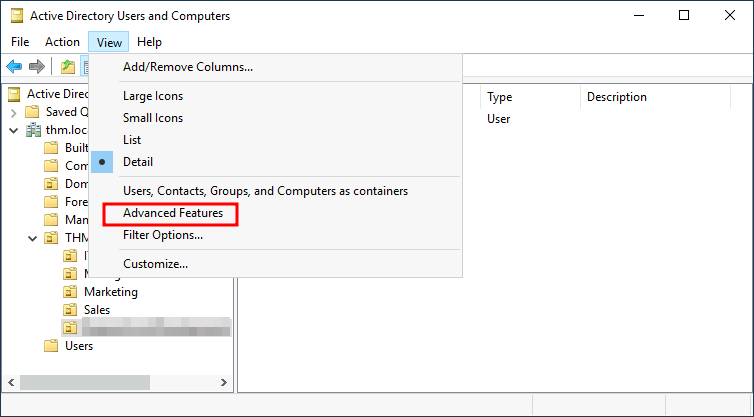
This will show you some additional containers and enable you to disable the accidental deletion protection. To do so, right-click the OU and go to Properties. You will find a checkbox in the Object tab to disable the protection:
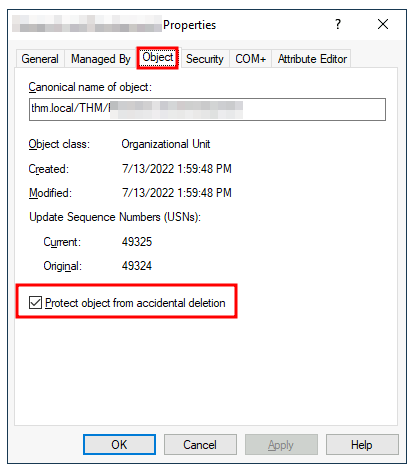
Be sure to uncheck the box and try deleting the OU again. You will be prompted to confirm that you want to delete the OU, and as a result, any users, groups or OUs under it will also be deleted.
After deleting the extra OU, you should notice that for some of the departments, the users in the AD don’t match the ones in our organisational chart. Create and delete users as needed to match them.
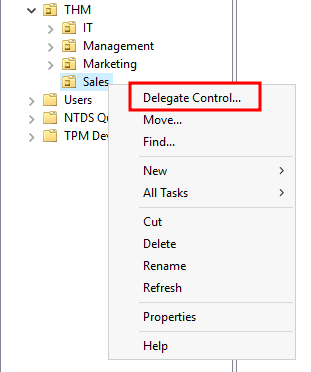
Delegation
One of the nice things you can do in AD is to give specific users some control over some OUs. This process is known as delegation and allows you to grant users specific privileges to perform advanced tasks on OUs without needing a Domain Administrator to step in.
One of the most common use cases for this is granting IT support the privileges to reset other low-privilege users’ passwords. According to our organisational chart, Phillip is in charge of IT support, so we’d probably want to delegate the control of resetting passwords over the Sales, Marketing and Management OUs to him.
For this example, we will delegate control over the Sales OU to Phillip. To delegate control over an OU, you can right-click it and select Delegate Control:
This should open a new window where you will first be asked for the users to whom you want to delegate control:
Note: To avoid mistyping the user’s name, write “phillip” and click the Check Names button. Windows will autocomplete the user for you.
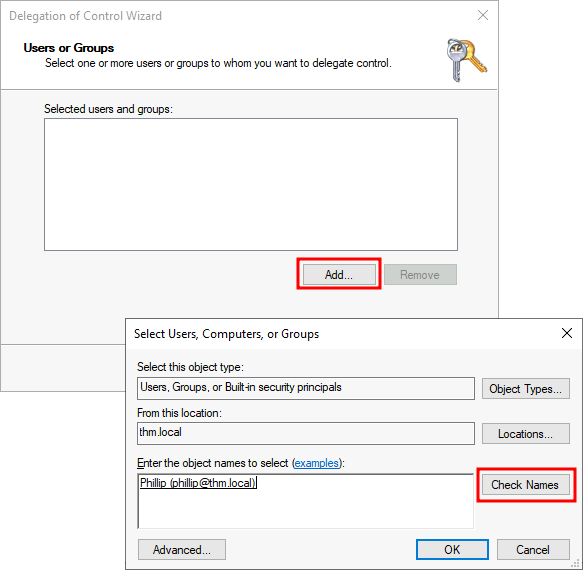
Click OK, and on the next step, select the following option:
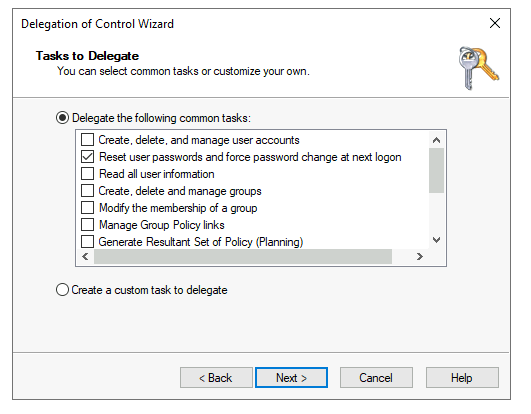
Click next a couple of times, and now Phillip should be able to reset passwords for any user in the sales department. While you’d probably want to repeat these steps to delegate the password resets of the Marketing and Management departments, we’ll leave it here for this task. You are free to continue to configure the rest of the OUs if you so desire.
Now let’s use Phillip’s account to try and reset Sophie’s password. Here are Phillip’s credentials for you to log in via RDP:
Username phillip Password Claire2008
Note: When connecting via RDP, use THM\phillip as the username to specify you want to log in using the user phillip on the THM domain.
While you may be tempted to go to Active Directory Users and Computers to try and test Phillip’s new powers, he doesn’t really have the privileges to open it, so you’ll have to use other methods to do password resets. In this case, we will be using Powershell to do so:
Windows PowerShell (As Phillip)
1
2
3
4
5
PS C:\Users\phillip> Set-ADAccountPassword sophie -Reset -NewPassword (Read-Host -AsSecureString -Prompt 'New Password') -Verbose

New Password: *********

VERBOSE: Performing the operation "Set-ADAccountPassword" on target "CN=Sophie,OU=Sales,OU=THM,DC=thm,DC=local".
Since we wouldn’t want Sophie to keep on using a password we know, we can also force a password reset at the next logon with the following command:
Windows PowerShell (as Phillip)
1
2
3
PS C:\Users\phillip> Set-ADUser -ChangePasswordAtLogon $true -Identity sophie -Verbose

VERBOSE: Performing the operation "Set" on target "CN=Sophie,OU=Sales,OU=THM,DC=thm,DC=local".
Log into Sophie’s account with your new password and retrieve a flag from Sophie’s desktop.
Note: When connecting via RDP, use THM\sophie as the username to specify you want to log in using the user sophie on the THM domain.
What was the flag found on Sophie’s desktop?
1
2
 Set-ADAccountPassword sophie -Reset -NewPassword (Read-Host -AsSecureString -Prompt 'New Password') -Verbose
RDP to Sophie’s computer => THM.local\LPT-SOPHIE with the new password
Answer : THM{thanks_for_contacting_support}
The process of granting privileges to a user over some OU or other AD Object is called…
Answer : Delegation
Task 5 - Managing Computers in AD
By default, all the machines that join a domain (except for the DCs) will be put in the container called “Computers”. If we check our DC, we will see that some devices are already there:
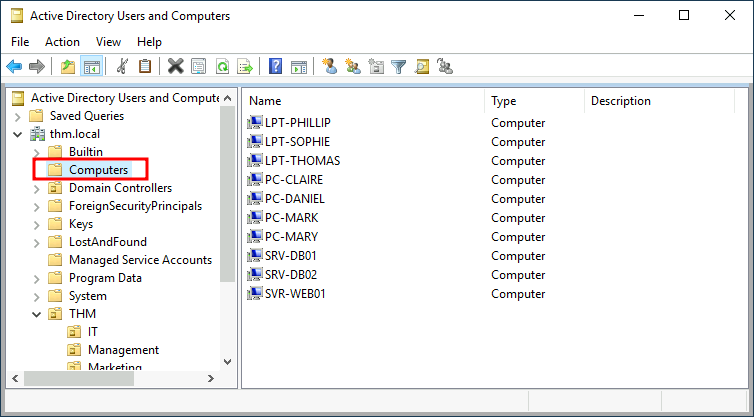
We can see some servers, some laptops and some PCs corresponding to the users in our network. Having all of our devices there is not the best idea since it’s very likely that you want different policies for your servers and the machines that regular users use on a daily basis.
While there is no golden rule on how to organise your machines, an excellent starting point is segregating devices according to their use. In general, you’d expect to see devices divided into at least the three following categories:
Workstations
Workstations are one of the most common devices within an Active Directory domain. Each user in the domain will likely be logging into a workstation. This is the device they will use to do their work or normal browsing activities. These devices should never have a privileged user signed into them.
Servers
Servers are the second most common device within an Active Directory domain. Servers are generally used to provide services to users or other servers.
Domain Controllers
Domain Controllers are the third most common device within an Active Directory domain. Domain Controllers allow you to manage the Active Directory Domain. These devices are often deemed the most sensitive devices within the network as they contain hashed passwords for all user accounts within the environment.
Since we are tidying up our AD, let’s create two separate OUs for Workstations and Servers (Domain Controllers are already in an OU created by Windows). We will be creating them directly under the thm.local domain container. In the end, you should have the following OU structure:
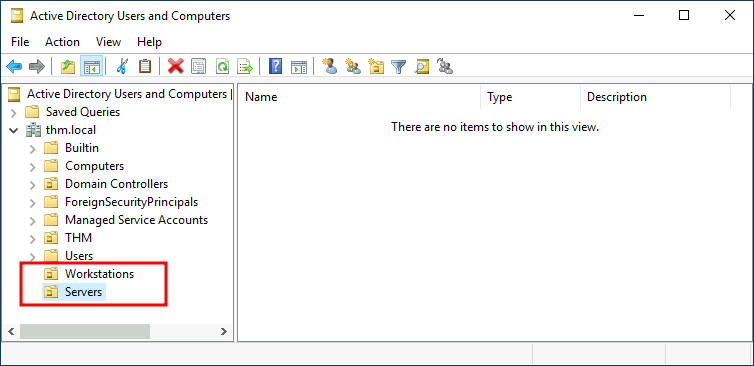
Now, move the personal computers and laptops to the Workstations OU and the servers to the Servers OU from the Computers container. Doing so will allow us to configure policies for each OU later.
After organising the available computers, how many ended up in the Workstations OU?
Answer : 7
Is it recommendable to create separate OUs for Servers and Workstations? (yay/nay)
Answer : yay
Task 6 - Group Policies
So far, we have organised users and computers in OUs just for the sake of it, but the main idea behind this is to be able to deploy different policies for each OU individually. That way, we can push different configurations and security baselines to users depending on their department.
Windows manages such policies through Group Policy Objects (GPO). GPOs are simply a collection of settings that can be applied to OUs. GPOs can contain policies aimed at either users or computers, allowing you to set a baseline on specific machines and identities.
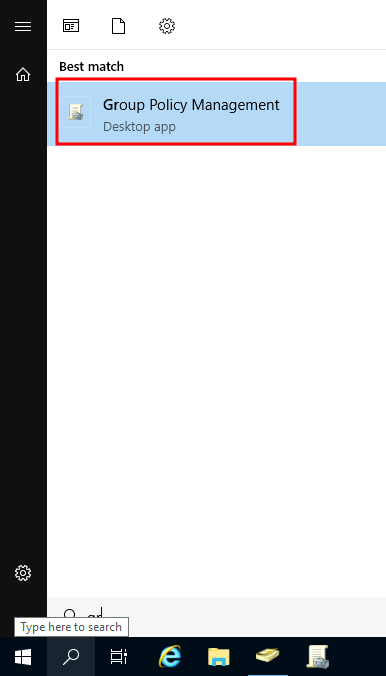
To configure GPOs, you can use the Group Policy Management tool, available from the start menu:
The first thing you will see when opening it is your complete OU hierarchy, as defined before. To configure Group Policies, you first create a GPO under Group Policy Objects and then link it to the OU where you want the policies to apply. As an example, you can see there are some already existing GPOs in your machine:
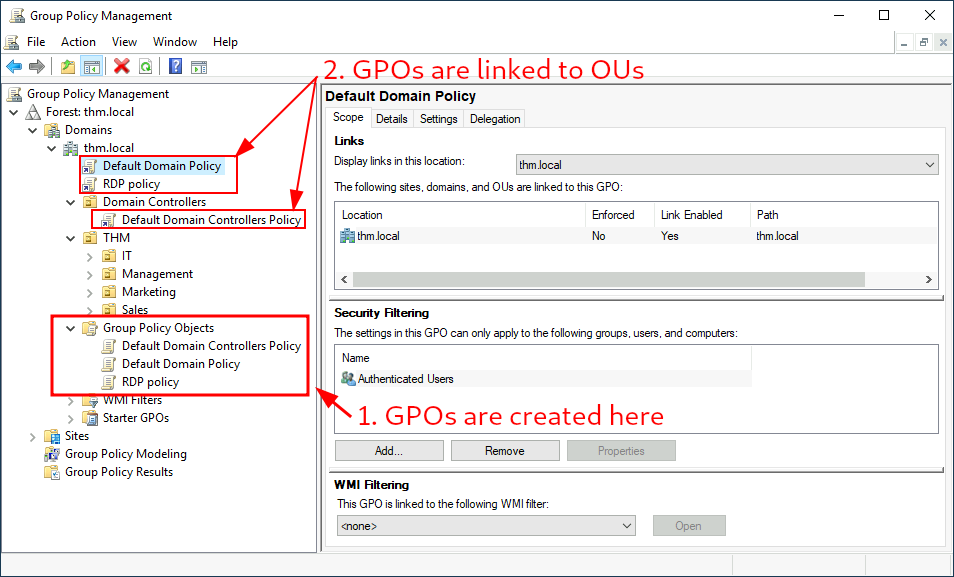
We can see in the image above that 3 GPOs have been created. From those, the Default Domain Policy and RDP Policy are linked to the thm.local domain as a whole, and the Default Domain Controllers Policy is linked to the Domain Controllers OU only. Something important to have in mind is that any GPO will apply to the linked OU and any sub-OUs under it. For example, the Sales OU will still be affected by the Default Domain Policy.
Let’s examine the Default Domain Policy to see what’s inside a GPO. The first tab you’ll see when selecting a GPO shows its scope, which is where the GPO is linked in the AD. For the current policy, we can see that it has only been linked to the thm.local domain:
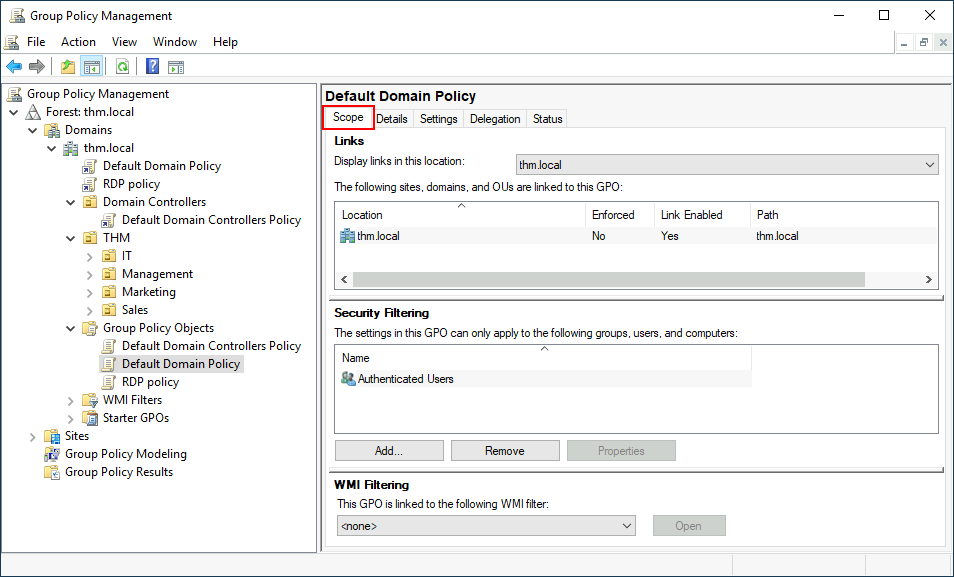
As you can see, you can also apply Security Filtering to GPOs so that they are only applied to specific users/computers under an OU. By default, they will apply to the Authenticated Users group, which includes all users/PCs.
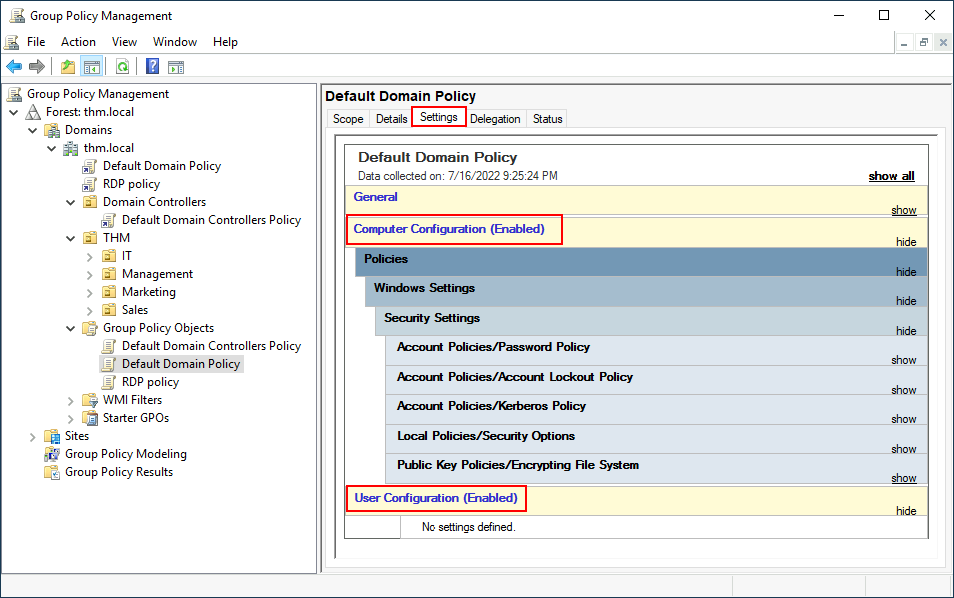
The Settings tab includes the actual contents of the GPO and lets us know what specific configurations it applies. As stated before, each GPO has configurations that apply to computers only and configurations that apply to users only. In this case, the Default Domain Policy only contains Computer Configurations:
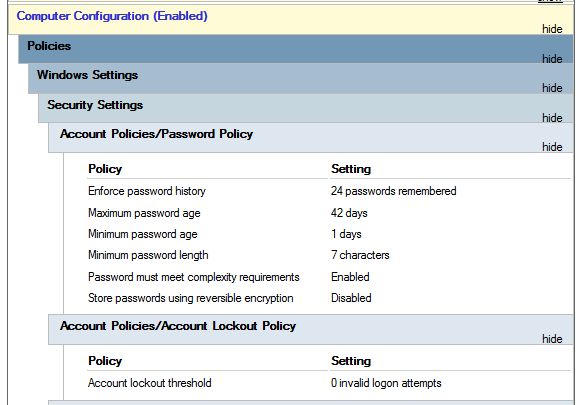
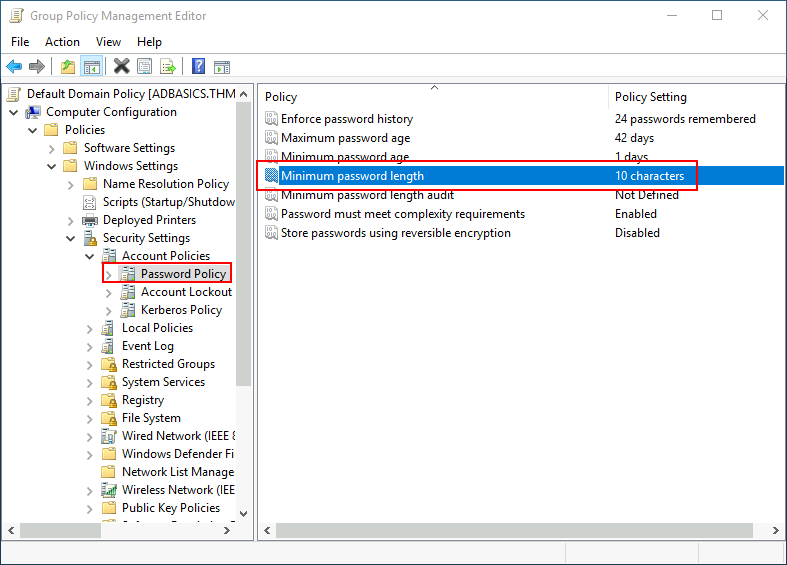
Feel free to explore the GPO and expand on the available items using the “show” links on the right side of each configuration. In this case, the Default Domain Policy indicates really basic configurations that should apply to most domains, including password and account lockout policies:
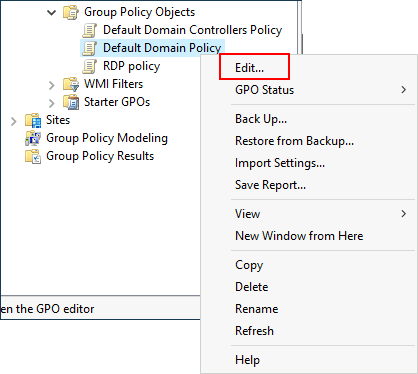
Since this GPO applies to the whole domain, any change to it would affect all computers. Let’s change the minimum password length policy to require users to have at least 10 characters in their passwords. To do this, right-click the GPO and select Edit:
This will open a new window where we can navigate and edit all the available configurations. To change the minimum password length, go to Computer Configurations -> Policies -> Windows Setting -> Security Settings -> Account Policies -> Password Policy and change the required policy value:
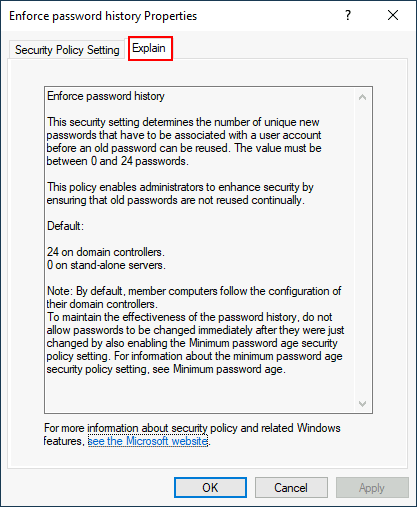
As you can see, plenty of policies can be established in a GPO. While explaining every single of them would be impossible in a single room, do feel free to explore a bit, as some of the policies are straightforward. If more information on any of the policies is needed, you can double-click them and read the Explain tab on each of them:
GPO distribution
GPOs are distributed to the network via a network share called SYSVOL, which is stored in the DC. All users in a domain should typically have access to this share over the network to sync their GPOs periodically. The SYSVOL share points by default to the C:\Windows\SYSVOL\sysvol\ directory on each of the DCs in our network.
Once a change has been made to any GPOs, it might take up to 2 hours for computers to catch up. If you want to force any particular computer to sync its GPOs immediately, you can always run the following command on the desired computer:
Windows PowerShell PS C:> gpupdate /force Creating some GPOs for THM Inc.
As part of our new job, we have been tasked with implementing some GPOs to allow us to:
Block non-IT users from accessing the Control Panel. Make workstations and servers lock their screen automatically after 5 minutes of user inactivity to avoid people leaving their sessions exposed. Let’s focus on each of those and define what policies we should enable in each GPO and where they should be linked.
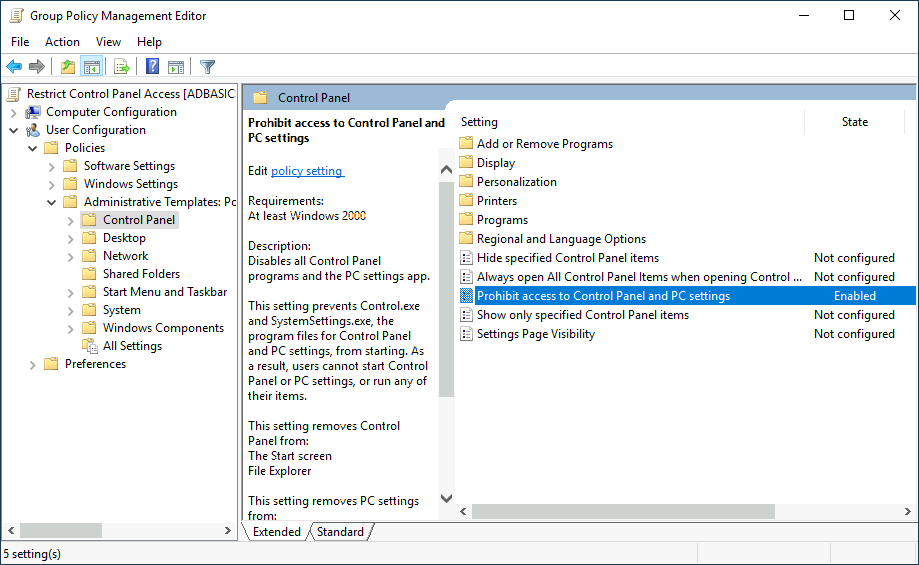
Restrict Access to Control Panel
We want to restrict access to the Control Panel across all machines to only the users that are part of the IT department. Users of other departments shouldn’t be able to change the system’s preferences.
Let’s create a new GPO called Restrict Control Panel Access and open it for editing. Since we want this GPO to apply to specific users, we will look under User Configuration for the following policy:
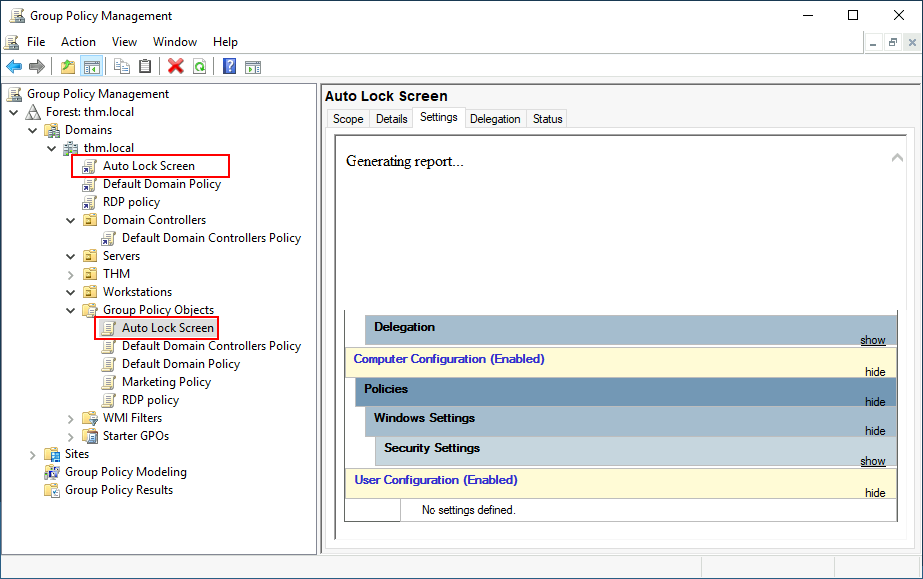
Auto Lock Screen GPO
For the first GPO, regarding screen locking for workstations and servers, we could directly apply it over the Workstations, Servers and Domain Controllers OUs we created previously.
While this solution should work, an alternative consists of simply applying the GPO to the root domain, as we want the GPO to affect all of our computers. Since the Workstations, Servers and Domain Controllers OUs are all child OUs of the root domain, they will inherit its policies.
Note: You might notice that if our GPO is applied to the root domain, it will also be inherited by other OUs like Sales or Marketing. Since these OUs contain users only, any Computer Configuration in our GPO will be ignored by them.
Let’s create a new GPO, call it Auto Lock Screen, and edit it. The policy to achieve what we want is located in the following route:
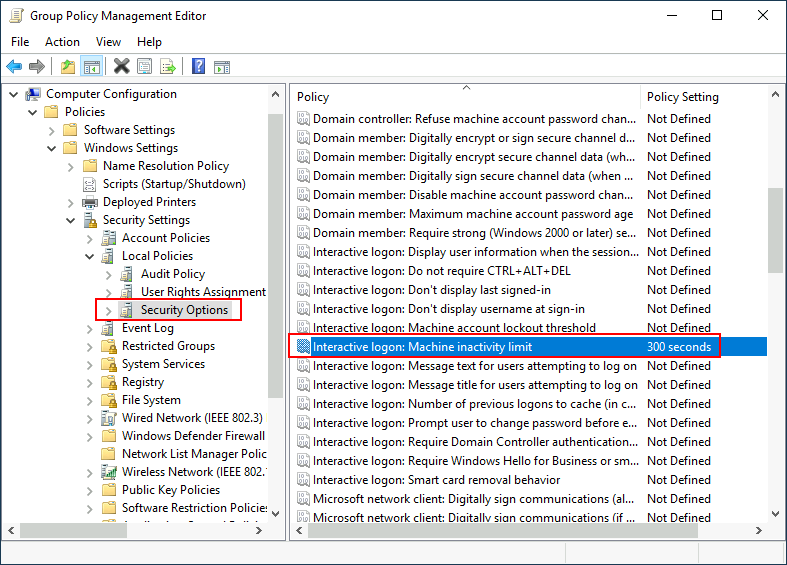
We will set the inactivity limit to 5 minutes so that computers get locked automatically if any user leaves their session open. After closing the GPO editor, we will link the GPO to the root domain by dragging the GPO to it:
Once the GPOs have been applied to the correct OUs, we can log in as any users in either Marketing, Sales or Management for verification. For this task, let’s connect via RDP using Mark’s credentials:
Username Mark Password M4rk3t1ng.21
Note: When connecting via RDP, use THM\Mark as the username to specify you want to log in using the user Mark on the THM domain.
If we try opening the Control Panel, we should get a message indicating this operation is denied by the administrator. You can also wait 5 minutes to check if the screen is automatically locked if you want.
Since we didn’t apply the control panel GPO on IT, you should still be able to log into the machine as any of those users and access the control panel.
Note: If you created and linked the GPOs, but for some reason, they still don’t work, remember you can run gpupdate /force to force GPOs to be updated.
What is the name of the network share used to distribute GPOs to domain machines?
Answer : SYSVOL
Can a GPO be used to apply settings to users and computers? (yay/nay)
Answer : yay
Task 7 - Authentication Methods
When using Windows domains, all credentials are stored in the Domain Controllers. Whenever a user tries to authenticate to a service using domain credentials, the service will need to ask the Domain Controller to verify if they are correct. Two protocols can be used for network authentication in windows domains:
Kerberos: Used by any recent version of Windows. This is the default protocol in any recent domain. NetNTLM: Legacy authentication protocol kept for compatibility purposes. While NetNTLM should be considered obsolete, most networks will have both protocols enabled. Let’s take a deeper look at how each of these protocols works.
Kerberos Authentication
Kerberos authentication is the default authentication protocol for any recent version of Windows. Users who log into a service using Kerberos will be assigned tickets. Think of tickets as proof of a previous authentication. Users with tickets can present them to a service to demonstrate they have already authenticated into the network before and are therefore enabled to use it.
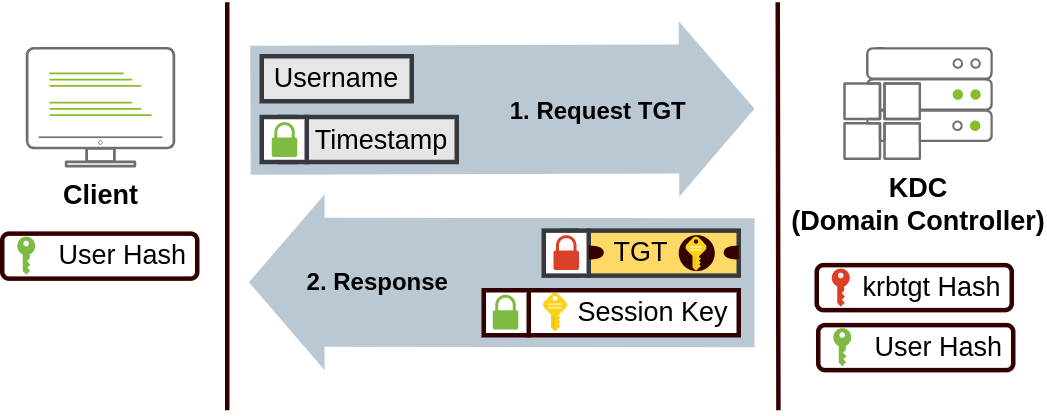
When Kerberos is used for authentication, the following process happens:
The user sends their username and a timestamp encrypted using a key derived from their password to the Key Distribution Center (KDC), a service usually installed on the Domain Controller in charge of creating Kerberos tickets on the network.
The KDC will create and send back a
Ticket Granting Ticket (TGT), which will allow the user to request additional tickets to access specific services. The need for a ticket to get more tickets may sound a bit weird, but it allows users to request service tickets without passing their credentials every time they want to connect to a service. Along with the TGT, aSession Keyis given to the user, which they will need to generate the following requests.Notice the TGT is encrypted using the
krbtgtaccount’s password hash, and therefore the user can’t access its contents. It is essential to know that the encrypted TGT includes a copy of the Session Key as part of its contents, and the KDC has no need to store the Session Key as it can recover a copy by decrypting the TGT if needed.
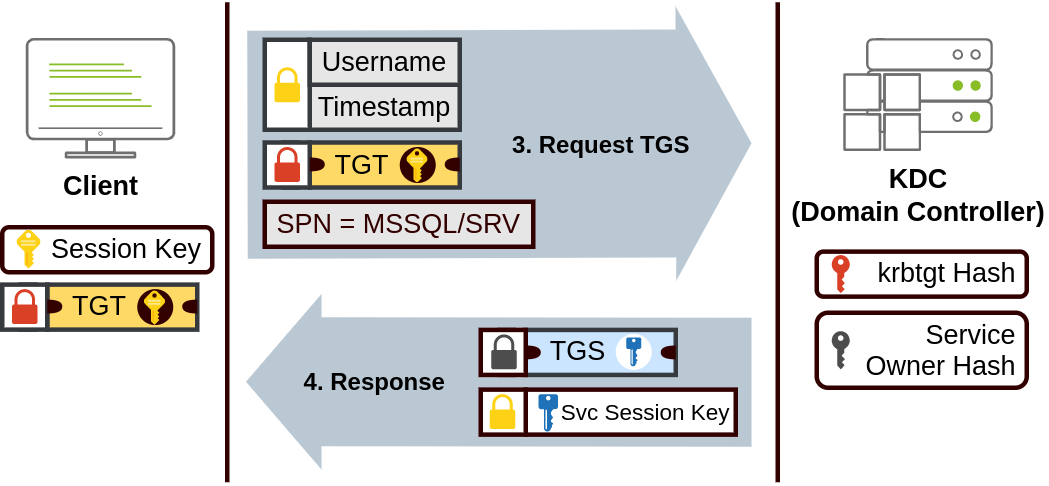
When a user wants to connect to a service on the network like a share, website or database, they will use their TGT to ask the KDC for a
Ticket Granting Service (TGS). TGS are tickets that allow connection only to the specific service they were created for. To request a TGS, the user will send their username and a timestamp encrypted using the Session Key, along with the TGT and aService Principal Name (SPN), which indicates the service and server name we intend to access.As a result, the KDC will send us a TGS along with a
Service Session Key, which we will need to authenticate to the service we want to access. The TGS is encrypted using a key derived from the Service Owner Hash. The Service Owner is the user or machine account that the service runs under. The TGS contains a copy of the Service Session Key on its encrypted contents so that the Service Owner can access it by decrypting the TGS.
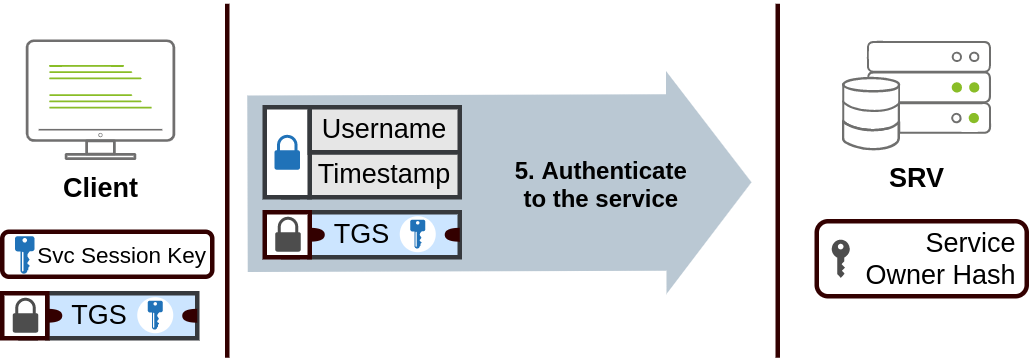
- The TGS can then be sent to the desired service to authenticate and establish a connection. The service will use its configured account’s password hash to decrypt the TGS and validate the Service Session Key.
NetNTLM Authentication
NetNTLM works using a challenge-response mechanism. The entire process is as follows:
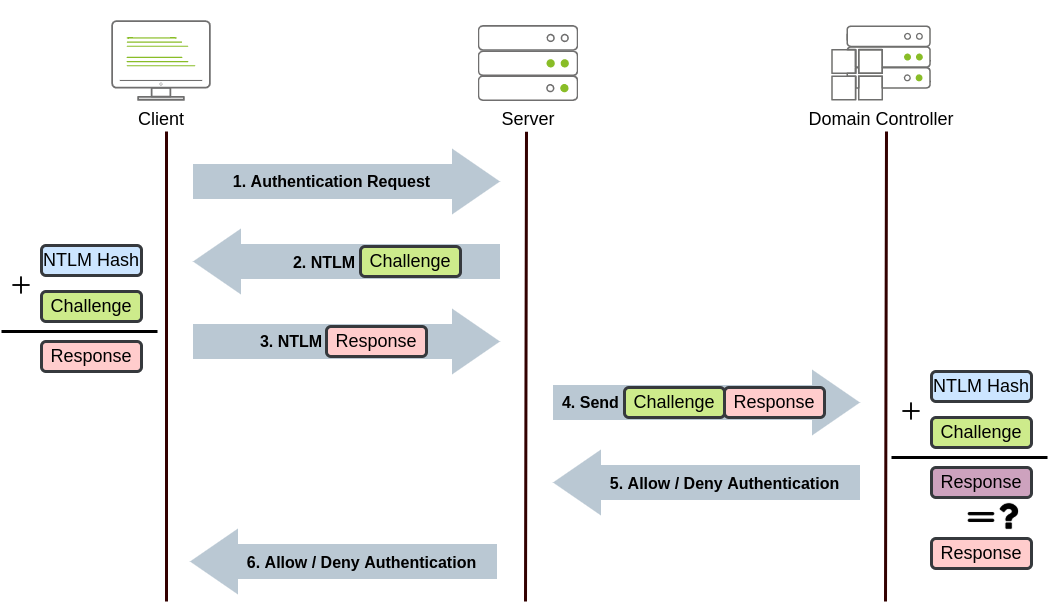
The client sends an authentication request to the server they want to access.
The server generates a random number and sends it as a challenge to the client.
The client combines their NTLM password hash with the challenge (and other known data) to generate a response to the challenge and sends it back to the server for verification.
The server forwards the challenge and the response to the Domain Controller for verification.
The domain controller uses the challenge to recalculate the response and compares it to the original response sent by the client. If they both match, the client is authenticated; otherwise, access is denied. The authentication result is sent back to the server.
The server forwards the authentication result to the client.
Note that the user’s password (or hash) is never transmitted through the network for security.
Note: The described process applies when using a domain account. If a local account is used, the server can verify the response to the challenge itself without requiring interaction with the domain controller since it has the password hash stored locally on its SAM.
Will a current version of Windows use NetNTLM as the preferred authentication protocol by default? (yay/nay)
Answer : nay
When referring to Kerberos, what type of ticket allows us to request further tickets known as TGS?
Answer : Ticket Granting Ticket
When using NetNTLM, is a user’s password transmitted over the network at any point? (yay/nay)
Answer:
Task 8 - Trees, Forests and Trusts
So far, we have discussed how to manage a single domain, the role of a Domain Controller and how it joins computers, servers and users.
As companies grow, so do their networks. Having a single domain for a company is good enough to start, but in time some additional needs might push you into having more than one.
Trees
Imagine, for example, that suddenly your company expands to a new country. The new country has different laws and regulations that require you to update your GPOs to comply. In addition, you now have IT people in both countries, and each IT team needs to manage the resources that correspond to each country without interfering with the other team. While you could create a complex OU structure and use delegations to achieve this, having a huge AD structure might be hard to manage and prone to human errors.
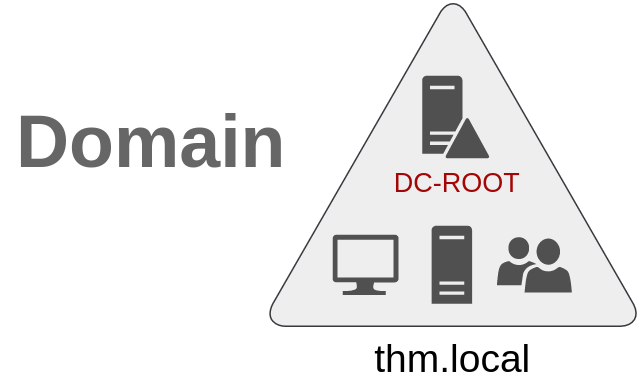
Luckily for us, Active Directory supports integrating multiple domains so that you can partition your network into units that can be managed independently. If you have two domains that share the same namespace (thm.local in our example), those domains can be joined into a Tree.
If our thm.local domain was split into two subdomains for UK and US branches, you could build a tree with a root domain of thm.local and two subdomains called uk.thm.local and us.thm.local, each with its AD, computers and users:
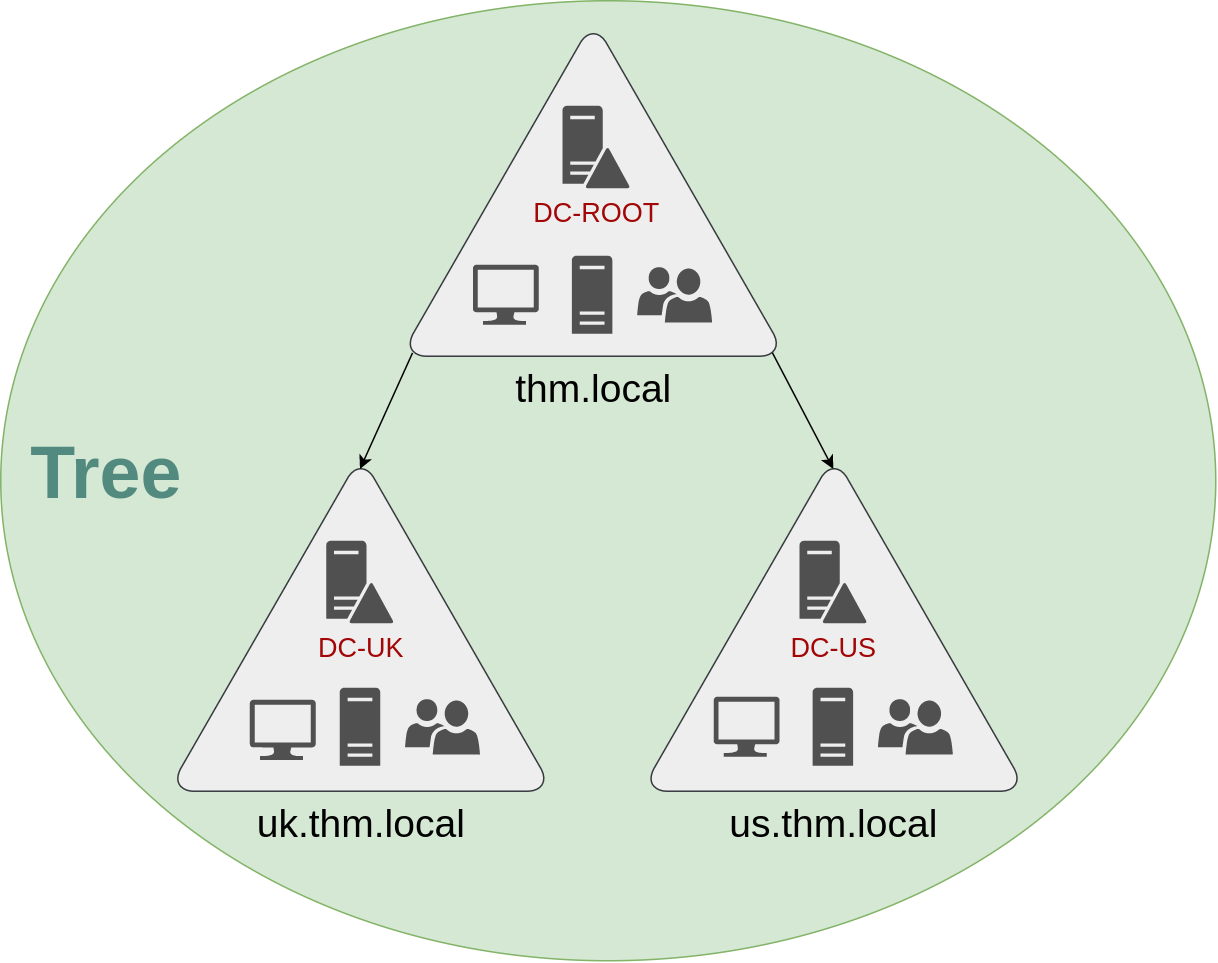
This partitioned structure gives us better control over who can access what in the domain. The IT people from the UK will have their own DC that manages the UK resources only. For example, a UK user would not be able to manage US users. In that way, the Domain Administrators of each branch will have complete control over their respective DCs, but not other branches’ DCs. Policies can also be configured independently for each domain in the tree.
A new security group needs to be introduced when talking about trees and forests. The Enterprise Admins group will grant a user administrative privileges over all of an enterprise’s domains. Each domain would still have its Domain Admins with administrator privileges over their single domains and the Enterprise Admins who can control everything in the enterprise.
Forests
The domains you manage can also be configured in different namespaces. Suppose your company continues growing and eventually acquires another company called MHT Inc. When both companies merge, you will probably have different domain trees for each company, each managed by its own IT department. The union of several trees with different namespaces into the same network is known as a forest.
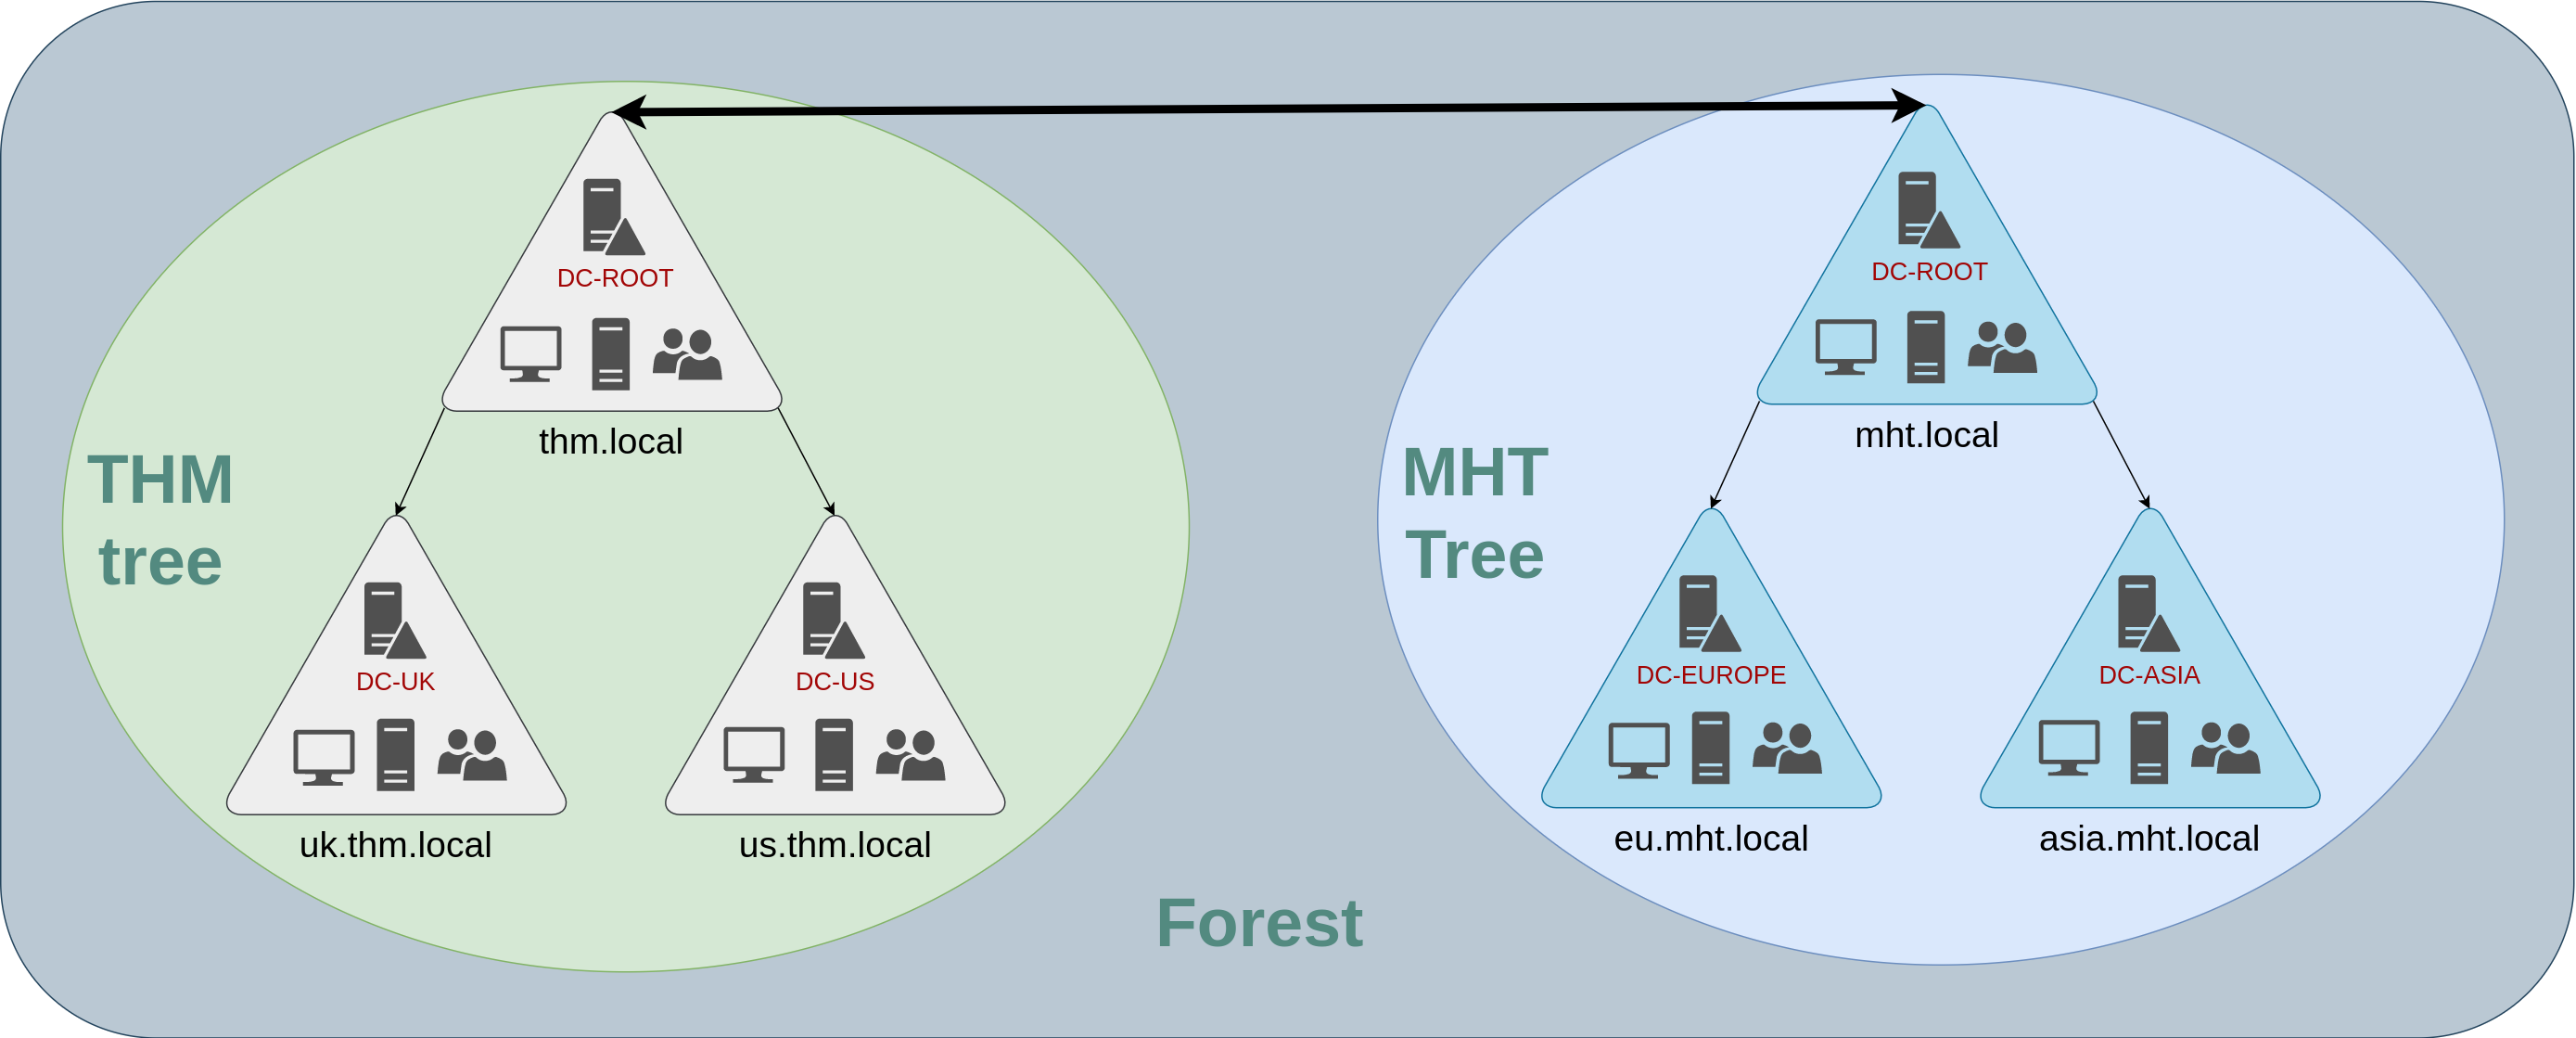
Trust Relationships
Having multiple domains organised in trees and forest allows you to have a nice compartmentalised network in terms of management and resources. But at a certain point, a user at THM UK might need to access a shared file in one of MHT ASIA servers. For this to happen, domains arranged in trees and forests are joined together by trust relationships.
In simple terms, having a trust relationship between domains allows you to authorise a user from domain THM UK to access resources from domain MHT EU.
The simplest trust relationship that can be established is a one-way trust relationship. In a one-way trust, if Domain AAA trusts Domain BBB, this means that a user on BBB can be authorised to access resources on AAA:
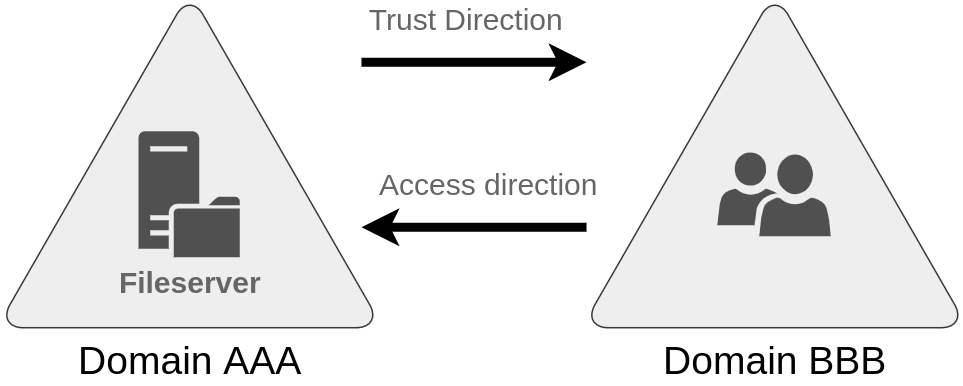
The direction of the one-way trust relationship is contrary to that of the access direction.
Two-way trust relationships can also be made to allow both domains to mutually authorise users from the other. By default, joining several domains under a tree or a forest will form a two-way trust relationship.
It is important to note that having a trust relationship between domains doesn’t automatically grant access to all resources on other domains. Once a trust relationship is established, you have the chance to authorise users across different domains, but it’s up to you what is actually authorised or not.
What is a group of Windows domains that share the same namespace called?
Answer : tree
What should be configured between two domains for a user in Domain A to access a resource in Domain B?
Answer : a trust relationship
Task 9 - Conclusion
In this room, we have shown the basic components and concepts related to Active Directories and Windows Domains. Keep in mind that this room should only serve as an introduction to the basic concepts, as there’s quite a bit more to explore to implement a production-ready Active Directory environment.
If you are interested in learning how to secure an Active Directory installation, be sure to check out the Active Directory Hardening Room (To be released soon). If, on the other hand, you’d like to know how attackers can take advantage of common AD misconfigurations and other AD hacking techniques, the Compromising Active Directory module is the way to go.